Establishing a Three-dimensional Co-culture Model of Murine Dorsal Root Ganglia and Cancer Cells: An In Vitro Model to Study Perineural Cancer Cell Invasion
Abstract
Source: Huyett, P. et al. A Model for Perineural Invasion in Head and Neck Squamous Cell Carcinoma. J. Vis. Exp. (2017)
In this video, we demonstrate the procedure for developing an in vitro perineural cancer cell invasion model by co-culturing mouse dorsal root ganglion and neurotropic cancer cells. The model can be utilized to conduct cancer assays, producing rapid and reproducible results.
Protocol
All procedures involving animal models have been reviewed by the local institutional animal care committee and the JoVE veterinary review board.
1. Preparation of Semi-solid Matrix Droplets (< 1 min per plate)
- Place a pre-chilled glass well-bottom plate on an ice block underneath the operating microscope. Make sure the aliquot of matrix remains on the ice at all times.
- Place a 1.5 µL droplet of matrix in each of the four corners of the glass-bottom plate with a 2 µL or 10 µL micropipetter, leaving a distance at least as great as the droplet itself from the edge of the glass well.
- Place the tip of the pipette directly onto the glass at a 45-degree angle. Slowly pipette the matrix. Slowly move away from the glass bottom after the matrix is engaged on the plate.
NOTE: The surface tension between the matrix and glass should create a perfect hemisphere each time. - Stop pipetting just before the tip is empty because inadvertent injection of air into the matrix droplet makes the diameter of the matrix droplet far greater and is difficult to remove.
NOTE: Using a second hand to stabilize the pipetting hand facilitates more accurate placement.
- Place the tip of the pipette directly onto the glass at a 45-degree angle. Slowly pipette the matrix. Slowly move away from the glass bottom after the matrix is engaged on the plate.
2. Insertion of DRG into Semi-solid Matrix Droplets (< 2 min per plate)
- Leave the plate with the matrix droplets briefly at room temperature (~1 min). This slightly stiffens the matrix, making it easier for the precise placement of the DRG.
- Scoop (do not grasp) the DRG gently with closed microscopic forceps in the left hand. Again, a dark background against the small, white DRG facilitates visualization. Transfer the DRG to the tip of a 21G needle in the right hand. This transfer will leave residual media on the forceps.
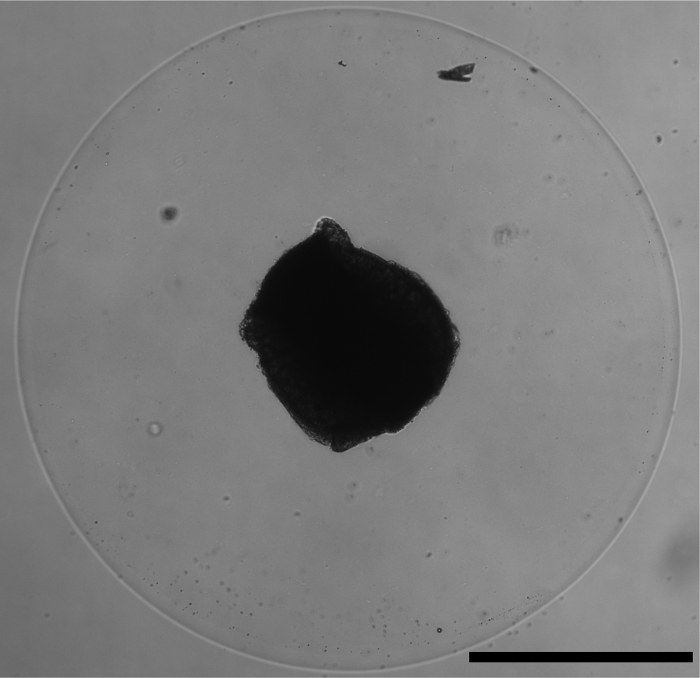
- Gently insert the DRG into the middle of the matrix droplet using the 21G needle (Figure 1). Most of the time, the DRG will easily release into the matrix and then can be positioned centrally with the needle.
- If the DRG sticks to the needle, use the microscopic forceps to push the DRG off of the needle and into the matrix droplet. Wick away excess media from the microscopic forceps with a lab wipe.
NOTE: Introducing media to the matrix will alter the diameter, volume, and consistency of the assay. An ice block with color or colored writing provides background contrast, which eases visualization of this delicate process.
- If the DRG sticks to the needle, use the microscopic forceps to push the DRG off of the needle and into the matrix droplet. Wick away excess media from the microscopic forceps with a lab wipe.
- After the plate has all four DRGs, perform a final inspection to ensure that the DRG is in the center of the matrix droplet. Make adjustments as needed with the 21G needle.
- Transfer the completed plate to a 37 °C incubator. This will solidify the semi-solid matrix and fix the DRG in position.
- Repeat this process for all of the DRGs. Place blank matrix droplets without a DRG as the negative control.
- Add 4 mL of DMEM with 10% FBS media to each glass-bottom plate after completing all plates and exposing them to the 37 °C incubator for at least 3 min. Place the plate at a slight angle and slowly add the medium, such that it gradually comes into contact with the matrix-DRG units.
NOTE: If the medium is added too quickly or vigorously, the matrix and/or DRG can become dislodged. - Store the assays in the 37 °C incubator for the next 48–72 h.
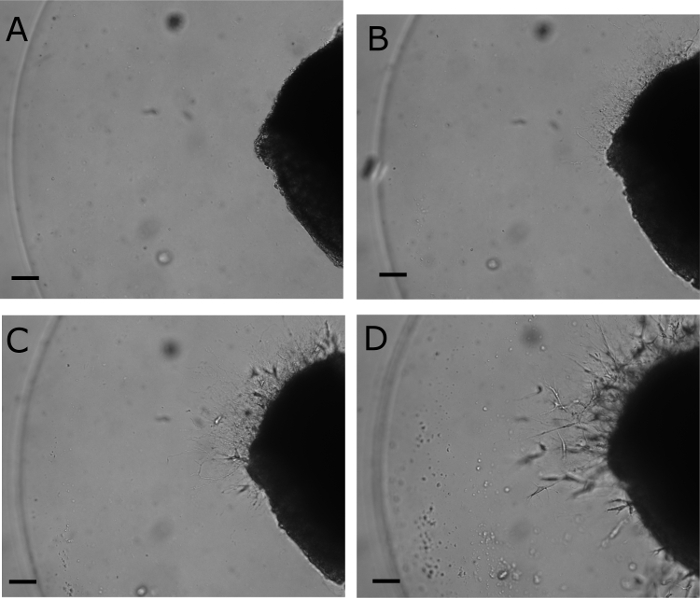
NOTE: Periodic examination of the assays will show circumferential outgrowth of neurites towards the matrix edge (Figure 2). When the neurites are greater than three-fourths of the way to the matrix, it is appropriate to plate the cells.
3. Preparation of the Head and Neck Cancer Cells
NOTE: Cell lines other than head and neck squamous cell carcinoma cells can be used in this experimental design.
- Maintain squamous cell carcinoma cell lines in DMEM with 10% FBS in preferred flasks or culture dishes in a 37 °C incubator. To prepare cells for experimentation, suction all the medium from the culture flask or dish and wash it twice with PBS. Suspend the cells by adding an appropriate amount of 0.025% trypsin for 5 min, followed by DMEM with 10% FBS. Pipette 4 mL of the cell and media mixture into 6 mL culture dishes.
NOTE: A 6 mL culture plate provides more than enough cells, even when less than 50% confluent. - Expose the HNSCC cell lines to different conditions 24 h prior to staining and plating on the DRG assay. Re-dose the condition once the cells are plated to maintain a consistent environment.
NOTE: Add antibodies, growth factors, cytokines, or other molecules to the cell culture dishes 1–2 days following mouse dissection and implantation of the DRG into the matrix. - Add fluorescent cell stains 1 h before plating the cells (2–3 days after the DRG harvest and implantation into the matrix).
NOTE: The particular stains used here pass freely through the cell membrane; however, after reacting with intracellular thiol groups, the stain remains within the cell and is passed on to daughter cells. The staining greatly facilitates visualization within the assays. These temporary stains are ideal for these assays because the fluorescence is present for 2–3 days, which is the timeframe of these experiments. It also allows for the use of many different colors and obviates the need for creating fluorescent protein-transfected cell lines.- Prepare 10 µM of dye solution by mixing 2 µL of 10 mM stock cell stains in 2 mL of serum-free DMEM for every cell condition. Warm this to 37 °C before adding it to cells.
- Remove the culture medium within the 6 mL plate, leaving the adherent HNSCC cells on the plate. Add 2 mL of phosphate-buffered saline (PBS) and remove 2 mL of the 10 µM cell stain/serum-free DMEM added to each plate.
- Return the 6 mL culture plate with the cell stain to the 37 °C incubator for 40 min.
- After 40 min, aspirate the medium. Add 2 mL of PBS and then aspirate it. Add 1 mL of 0.025% trypsin to each plate and replace them in the 37 °C incubator.
- Add 2 mL of DMEM with 10% FBS after 3–5 min and transfer the suspended cells to a 15 mL conical tube. Spin the cells and resuspend them in 1 mL of DMEM with 10% FBS.
- Count the cells with a hemocytometer or automated cell counter and then add DMEM with 10% FBS to create a final cell concentration of 300,000 cells per mL.
4. Plating Head and Neck Cancer Cells
- Remove the glass-bottom plates with the matrix-DRG assays from the incubator.
NOTE: Again, they are appropriate when neurites are at least 75% of the way to the edge of the matrix, which generally occurs after 2–3 days. This is best seen using at least a 10X objective. - Aspirate the medium within the glass-bottom plate. Completely aspirate the medium within the glass well without removing the matrix-DRG units.
- Draw up 200 µL of the 300,000 cells/mL medium using a 200 µL pipette. Place two drops of the cells over each matrix-DRG assay. Perform this step for each matrix droplet, creating four repeats of each cell condition on one plate.
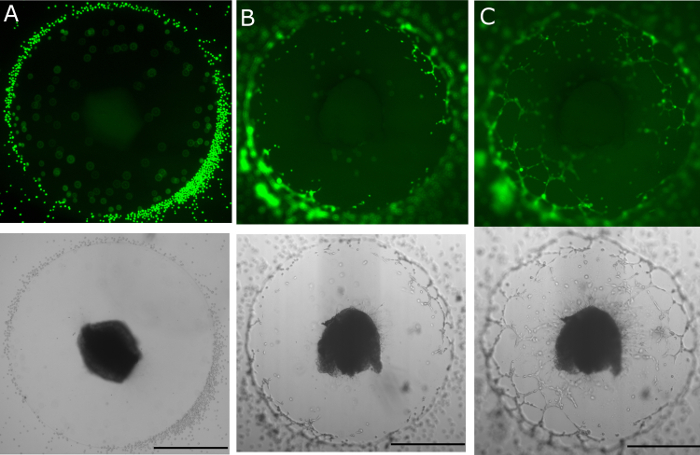
NOTE: The hemispherical shape of the matrix allows the cells to settle in a ring along the periphery of the assay (Figure 3a, Figure 3b). Finding a pipette with a smooth trigger makes the placement of uniform drops far easier. - Confirm similar cell numbers and distribution of the various cell conditions under 4X microscopy.
- Place the glass-bottom plates into the 37 °C incubator for approximately 60 min.
NOTE: Although there is only a small volume of cells and media (~150 µL), the assays do not dry out until several hours of incubator time have elapsed. - After 60 min, gently add 4 mL of DMEM with 10% FBS along the sidewall of the glass-bottom plate.
NOTE: Over a period of time, the cells partially adhere to the plate bottom, and the method of adding the medium does not disturb the cells. Different cell types may take more or less time to begin to adhere to the glass-bottom plate. - Replace any exogenous drugs or growth factors at this time to maintain the previous concentration levels.
- Return the assays to the 37 °C incubator, except when they are examined microscopically. Quantify the results of this assay by microscopic imaging. Briefly, count the strands of perineural invasion within four quadrants using a 4X microscopic image.
NOTE: A microscope with a 4X objective and fluorescence capabilities is adequate for photo-documenting the assays. The size of the assays fits nicely within the field of a 4X objective, which is detailed enough to capture the individual areas of perineural invasion. Perineural invasion becomes apparent within 24 h, but beyond 48 h, the integrity of the assays begins to weaken, as the tumor cells divide along the periphery of the matrix and invade. Beyond 48 h, there is also a substantial efflux of fibroblasts from the DRG, which obscures visualization using brightfield microscopy. Therefore, it is advisable to photo-document the results with 4X microscopy at least twice during this window (e.g., at 24 and 48 h after plating the tumor cells). Be mindful that these are 3-dimensional assays, and it is difficult to completely image the entire assay. Most perineural invasion occurs in a plane from the bottom of the plate, where the cells are embedded in the matrix slightly above the bottom of the plate. Because this plane is close to horizontal, the vast majority of neurites with tumor cells are captured in a single-level image at 4X.
Representative Results

Figure 1. DRG-matrix assay. Correct placement of the dorsal root ganglion within the matrix droplet, shown with brightfield microscopy at 4X. Scale bar represents 1 mm.

Figure 2. Outgrowth of neurites. Neurites are absent on day 0 immediately after placing the DRG in the matrix droplet (A). By day 1 (B), neurite outgrowth is apparent at 10X on brightfield microscopy. Neurite growth continues on day 2 (C) and day 3 (D); however, note the efflux of the fibroblasts. Scale bar represents 0.1 mm.

Figure 3. DRG-matrix assay with FaDu. Head and neck squamous cell carcinoma line FaDu added peripherally around an assay on day 3 (A), shown in green fluorescent, and brightfield microscopy at 4X Progressive neural invasion is seen on day 4 (B) and day 5 (C). Scale bar represents 1 mm.
Divulgazioni
The authors have nothing to disclose.
Materials
| DMEM/F-12 50/50 Mix with L-glutamine & 15 mM HEPES | Corning Cellgro | 10-090-CV | Manassas, VA |
| Fetal bovine serum | Atlanta biologicals | S11150 | Flowery Branch, GA |
| 0.25% Trypsin-EDTA (1x) | Life Technologies Corporation | 25200056 | Grand Island, NY |
| Phosphate buffered Saline 1x | Corning | 21-040-CM | Manassas, VA |
| Matrigel hESC-Qualif Mouse | Corning Incorporated | 354277 | Bedford, MA |
| Gamma Irradiated 35 mm glass bottom culture dishes | MatTek Corporation | P35G-1.5-14-C | Ashland, MA |
| SteREO Discovery.V8 Operating Microscope | Carl Zeiss Microimaging | 495015-0021-000 | Thornwood, NY |
| Schott ACE I light source | Schott | A20500 | Germany |
| CellTracker | Life Technologies Corporation | C2925 | Carlsbad, CA |
| BD PrecisionGlide Needle 21 G | BD | 305195 | Franklin Lakes, NJ |

