A Technique to Optimize Cerebral Organoid Culture Using Lateral Soft Light Illumination
Abstract
Source: Chen, B. et al., Facilitating Cerebral Organoid Culture via Lateral Soft Light Illumination. J. Vis. Exp. (2022).
This video showcases the utilization of a lateral soft light illumination technique to improve the naked-eye visualization of embryoid bodies, thereby facilitating their manipulation and transfer during cerebral organoid culture. It elucidates the setup of soft light illumination, methods for media changes and embryoid body transfer, as well as the procedure for inducing neural differentiation in embryoid bodies for cerebral organoid development.
Protocol
All procedures involving sample collection have been performed in accordance with the institute's IRB guidelines.
1. Preparation of the soft light lamp (day 1)
- Use a transparent acrylic board with a thickness of 0.3-0.5 cm in the size of A5 paper. Paste white pads on the front and back of the acrylic plate.
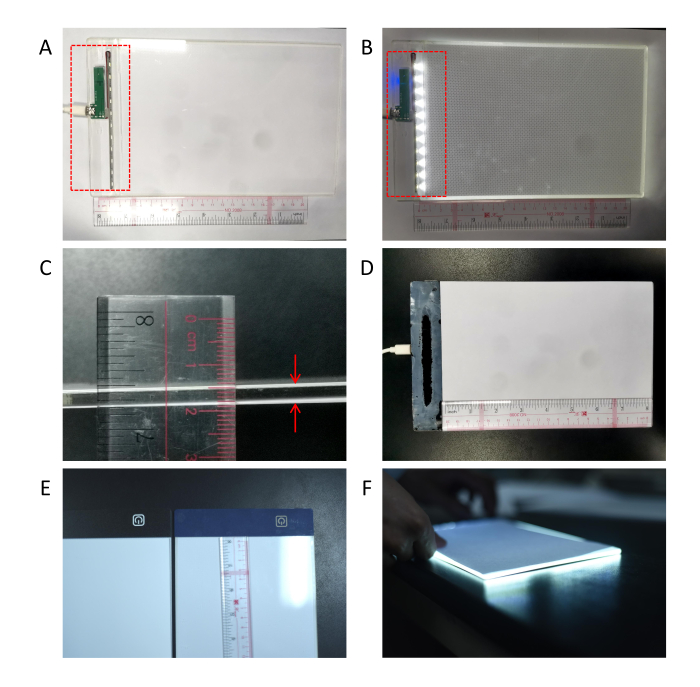
- Install a row of LED white lights on the edge of the plate so that the lights can enter from the side of the acrylic plate and then shoot out in parallel (Figure 1A-F, Figure 2B).
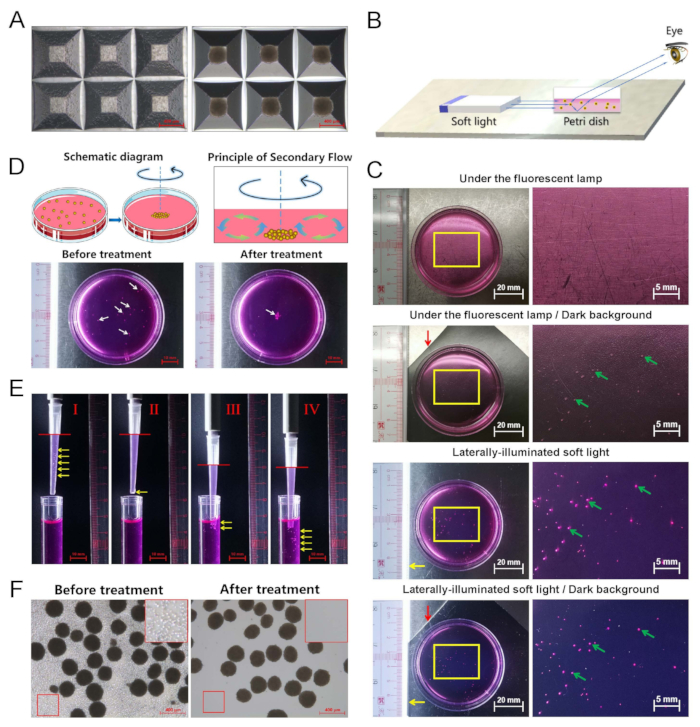
NOTE: As the diameters of EBs in the early stage are approximately 200 µm to 300 µm, it is difficult to observe them clearly with the naked eye under the fluorescent lamp of clean benches. In contrast, due to the enhancement of diffuse reflection, we can detect the EBs clearly by using laterally illuminated soft light (Figure 2B, C). A 6-well plate is recommended for EB cultures in subsequent experiments. However, to better show the visual effect of soft light, dishes are sometimes used to take pictures and videos in this study instead of plates, so please do not misunderstand. The laterally illuminated soft light lamp can also be used for the 6-well plate.
2. EB transfer and medium replacement (days 2-5)
- Prepare a new 6-well low adhesion plate and add 2 mL of embryoid body (EB)-formation medium to each well.
- Remove the EBs together with the medium with a 1000 µL wide-bore pipette tip (see Table of Materials) and transfer them to the 6-well low adhesion plate (~100 EBs/well).
NOTE: The operation process adopts a soft light lamp (mentioned in step 1) to make the EBs easier to observe. Turn off other indoor light sources to improve the visual effect of the soft light. - Replace with the same volume of fresh EB-formation medium every day. Use the secondary flow to gather the EBs to the center and change the medium.
- Aspirate the old medium by pipetting to the edge of the well slowly. Do not suck too hard; otherwise, the EBs will be removed together. Then, add fresh medium to resuspend the EBs.
NOTE: The principle secondary flow (Figure 2D). Induce a swirl flow by rotating the dish along a circular orbit. Due to the swirl flow, a secondary flow is induced and directed toward the center. The EBs or organoids converge to the center of the well due to the secondary flow generated through rotation, after which medium change or embryoid transfer can be executed readily.
- Aspirate the old medium by pipetting to the edge of the well slowly. Do not suck too hard; otherwise, the EBs will be removed together. Then, add fresh medium to resuspend the EBs.
3. Neural induction (days 5-7)
- Prepare a new 6-well plate with low adhesion and add 3 mL of Neural induction medium (Table 1) to each well.
- Turn on the lateral soft light (mentioned in step 1) and turn off other indoor light sources.
- Transfer the EBs to the 6-well plate with added Neural induction medium (~100 EBs/well). Add as little as possible of the original medium to the new well.
NOTE: Introduce simple skills of organoid transfer. Naturally, under gravity and with a relatively higher density than the medium, the resuspended EBs will gradually sink by applying the operation shown in Figure 2E. Hence, the EBs can be conveniently transferred. Since, compared to EBs, free cells and dead cell fragments sink more slowly, most of the free cells and dead cell fragments can thus be removed through this sedimentation method (Figure 2F). - Incubate the samples at 37 °C and 5% CO2 for 24 h.
NOTE: Under the microscope, the diameter of the EBs was approximately 500 µm, and the edge was translucent, indicating that a neuroepithelial layer formed.
Table 1. Composition of the Neural induction medium
| Components | Volume |
| DMEM-F12 | 97 mL |
| N2 supplement | 1 mL |
| Glutamax supplement | 1 mL |
| MEM-NEAA | 1 mL |
| Heparin | Final concentration 1 μg/mL |
Representative Results

Figure 1: Preparation of the soft light lamp. (A) The power supply and the LED lights were installed on one side of the acrylic board (as shown in the red dotted box). The LED soft light lamp's scattering wavelength is 450-470 nm, luminous flux is 1300-1800 lm, and color rendering index is 75-85 Ra. (B) It was checked whether the LED bulbs could light normally (as shown in the red dotted box). (C) A white pad was pasted on the front and back of the acrylic plate (as indicated by the red arrows). (D) The overall appearance of the soft light lamp. (E) The soft light lamp can also be replaced by a commercial LED painting light pad without a frame, which is usually used for tracking when copying sketches. A layer of white film needs to be pasted directly above the LED painting light pad. (F)The soft light lamp at work.

Figure 2: Optimized medium change and transfer operations of EBs. (A) EB preparation. The iPSCs were digested and added to the specialized 24-well plates (left). The cells formed EBs (right). The scale bar is 400 µm. (B) Schematic diagram of laterally illuminated soft light to assist in observing organoids. (C) The EBs were observed with different light sources. Yellow arrow: laterally illuminated light; red arrow: dark background; green arrows: EBs. (D) A swirl flow is induced by rotating the dish along a circular orbit. Due to the swirl flow, a secondary flow directed toward the center is induced. The EBs converge to the center of the dish driven by the secondary flow generated through rotation. White arrows: EBs. (E) Organoid transfer. (I) First, a wide-mouth pipette tip is used to suck up the mixture solution, including both the EBs and the culture medium. (II) Then, while keeping the pipette upright, the EBs gradually sink under the gravity effect and converge towards the mouth of the pipette tip. (III) As the mouth of the pipette tip touches the liquid (usually the fresh medium) surface again, and due to liquid surface tension, (IV) the EBs quickly sink into the medium (no need for additional blowing out by pipetting manually). Red line: the liquid level; yellow arrows: EBs. (F) Since free cells and dead cell fragments sink more slowly than EBs, most of the free cells and dead cell fragments can thus be removed through the above sedimentation method to facilitate the embryoid transfer. The red box in the upper right corner is an enlarged image. The scale bar is 400 µm.
Divulgaciones
The authors have nothing to disclose.
Materials
| 0.2 μm Filter | NEST Biotechnology, China | 331001 | |
| 1000 μL wide-bore pipette tip | Thermo Fisher Scientific, USA | 9405163 | |
| 6-well low adhesion plate | NEST Biotechnology, China | 703011 | It is used for EBs suspension cultures |
| Centrifuge | Eppendorf, Germany | 5810 R | It can be used for centrifugation of various types of centrifuge tubes, reagent bottles and working plates. |
| DMEM-F12 | Thermo Fisher Scientific, USA | 11330032 | |
| Heparin | Merck, Germany | H3149 | |
| Glutamax supplement | Thermo Fisher Scientific, USA | 35050061 | |
| Glutamax supplement | Thermo Fisher Scientific, USA | 17504044 | |
| MEM-NEAA | Thermo Fisher Scientific, USA | 11140050 | |
| N2 supplement | Thermo Fisher Scientific, USA | 17502048 | |
| Soft light lamp | NUT | NUT | A simple self made device, refer to supplementary figure 2 for preparation. |

