Functional MRI in Conjunction with a Novel MRI-compatible Hand-induced Robotic Device to Evaluate Rehabilitation of Individuals Recovering from Hand Grip Deficits
Summary
We performed functional MRI using a novel MRI-compatible hand-induced robotic device to evaluate its utility for monitoring hand motor function in individuals recovering from neurological deficits.
Abstract
Functional magnetic resonance imaging (fMRI) is a non-invasive magnetic resonance imaging technique that images brain activation in vivo, using endogenous deoxyhemoglobin as an endogenous contrast agent to detect changes in blood-level-dependent oxygenation (BOLD effect). We combined fMRI with a novel robotic device (MR-compatible hand-induced robotic device [MR_CHIROD]) so that a person in the scanner can execute a controlled motor task, hand-squeezing, which is a very important hand movement to study in neurological motor disease. We employed parallel imaging (generalized auto-calibrating partially parallel acquisitions [GRAPPA]), which allowed higher spatial resolution resulting in increased sensitivity to BOLD. The combination of fMRI with the hand-induced robotic device allowed precise control and monitoring of the task that was executed while a participant was in the scanner; this may prove to be of utility in rehabilitation of hand motor function in patients recovering from neurological deficits (e.g., stroke). Here we outline the protocol for using the current prototype of the MR_CHIROD during an fMRI scan.
Introduction
Appropriate imaging metrics may monitor and predict the likelihood of therapy success in individuals better than clinical assessments and provide information to improve and individualize therapy planning. We have developed experience with patients recovering from chronic stroke1,2,3,4,5,6,7,8. Developing optimal individualized strategies that focus on how motor training can influence incremental improvement either in reorganization of neural activity and/or motor function is still challenging. Insights into the underlying structural remodeling and re-organization processes for functional recovery in the brain after neurological disease can allow us to evaluate the relationship between distributed topographic patterns of neural activity and functional recovery via functional neuroimaging methods and brain mapping. Success will facilitate developing personalized treatment strategies optimized to yield improvements in grip strength in broad population with neurological conditions based on magnetic resonance imaging (MRI) metrics9.
Here we present a protocol that employs a newly re-designed robotic hand device that provides a controllable resistance force against which a subject grips and releases a handle in synchrony with an oscillating visual stimulus. The MR_CHIROD v3 (MR-compatible Hand-Induced RObotic Device) is a system for presentation of adjustable forces against which gripping and releasing motions are performed, while measuring and recording applied force, grip displacement and timestamps for each data point (Figure 1). The device was engineered to provide reliable assessments of brain activation images during fMRI (functional Magnetic Resonance Imaging), which can be used to evaluate blood-oxygen-level dependent (BOLD) changes in brain responses of patients recovering from neurological disorders. MR-compatibility is achieved through the use of entirely non-ferrous/non-magnetic components for the structure and pneumatic actuator elements and shielded sensor/electronic components that are positioned on the scanner’s bed. Figure 2 shows the device attached to an MR scanner bed, and with a subject in the magnet bore grasping the handle of the MR_CHIROD v3 (Figure 3). Interface and control components are positioned outside the MR scanner room (Figure 4).
The device is used simultaneously with brain imaging methods to assess relevant brain activations. The primary use of the system is to provide a motor task that generates activations of the brain's motor areas, which are detected using fMRI. Brain activation while using the MR_CHIROD during imaging can assess neuroplasticity in neurological disease. By tracking changes in activations in the course of and after motor training using the MR_CHIROD, progress of motor rehabilitation following any neurological disease that leads to motor deficits (e.g., stroke) may be observed.
The MR_CHIROD v3 can also be table-mounted, for use in intra-scan training exercises, in which the subject grips and releases in response to suitable visual stimuli for periods of 45 min, three times per week during the study. Our experience with robotically delivered training, monitored with imaging, suggests that the recovery window for stroke patients for instance may never close1.
Our rationale for building and using an MR-compatible hand-grip robot is that robotic recovery has the potential to produce a great impact on impairment due to its easy deployment, applicability across various motor impairments, high measurement reliability, and capacity to deliver high intensity training protocols10. Our MR-compatible robot can: (a) be set for subject-specific ranges of motion and be programmatically adjusted to apply subject-specific force levels; (b) control, measure and record force and displacement parameters through a host computer; (c) remotely adjust control parameters without requiring interruption of scanning for access to the MR scanner room or repositioning of the subject; and (d) provide therapy via training exercises precisely and consistently for extended periods.
We are aware of no commercially available recovery robotic device that can be used with an MR scanner to measure the subject’s hand grip force and displacement while applying computer-controlled time-varying force. Tsekos et al.11 have reviewed a variety of primarily research-based, MR-compatible robotic and rehabilitation devices, including earlier iterations of the MR_CHIROD series of devices. Other devices were designed for studying wrist motion, finger motion, isometric grip strength, and multi-joint movements. For devices that actively provide resistive or other forces, a variety of MR-compatible technologies have been employed including hydraulics, pneumatics, mechanical linkages and electrorheological fluid dampers. Some devices include multiple degrees of freedom, including another extension of the earlier MR_CHIROD versions added a rotational degree of freedom and hydraulic force application, however it was not adapted for MR-compatibility12.
Our hand-grip-specific device has the advantages of portability (it is regularly transported between the MR facility and office-based training sites), and capability of producing large, computer-controlled, time-varying resistive forces. Current use of pneumatic technology in the MR_CHIROD avoids the need for high voltage sources necessary for electro-rheological fluid-based systems, the potential for leakage of hydraulic fluid, and complex cable/linkages linking the interface mechanism with external power and control components.
The MR_CHIROD was the first device that was demonstrated to function in conjunction with fMRI for brain mapping in stroke patients1. Importantly, the MR_CHIROD v3 is particularly useful for home- or office-based training, as the system and its software were designed for use without expert clinical support and with motivational elements (“gamification”). Relative to physical therapist-facilitated training in a hospital, office- or home-based training is less expensive and more convenient, making it easier for patients to adhere to daily therapy. The device, already relatively inexpensive relative to some of the other research-based devices, can be reengineered to improve the cost-to-benefit ratio. Virtual reality and gamification of training, both of which are compatible with the MR_CHIROD v3, can engage patients, increase their attention during the task, and improve motivation, thus increasing the effectiveness of recovery13.
Protocol
All experiments were approved by the Institutional Review Board at Massachusetts General Hospital and performed as approved at the Athinoula A. Martinos Center for Biomedical Imaging.
1. Subject Preparation
NOTE: Inclusion criteria are: (i) right hand dominance, (ii) ability to give written informed consent. Exclusion was implemented on the basis of screening for contra-indicators in the magnetic resonance environment such as the following: (a) Routine MRI exclusion criteria, such as the presence of a pacemaker or cerebral aneurysm clip and metal implants or metal content in body; (b) history of seizures (c) claustrophobia; (d) pregnancy.
- To obtain informed consent, read the consent form to the volunteer. Both the volunteer and investigator sign in the appropriate locations on consent form in duplicate. Leave one signed copy of consent form in an appropriate location for the investigator records. Keep the second copy of consent form for the participant’s records.
- Screen the volunteer for MRI (magnetic resonance imaging) contra-indications. Fill out the MRI contra-indications list and inquire about each item on the list, checking off boxes as appropriate.
- Do not proceed with the scan if participants have (or potentially have) any contra-indications, including surgical aneurysm clips, cardiac pacemaker, prosthetic heart valve, neurostimulator, implanted pumps, cochlear implants, metal rods, plates, screws, hearing aid or transdermal patch.
2. Setup
- Perform initial setup in the scanner room.
NOTE: All necessary training must be obtained by the investigator in advance of the procedure. Precautions relevant to the MR facility must be taken at all times.- Bring the MR_CHIROD (Magnetic Resonance-Compatible Hand Induced Robotic Device) into the MRI scanner room and place it near the penetration panel. Insert the 3/8-inch pneumatic tube into the pass-through tube in the panel into the adjacent MRI support room.
- Connect the MRI scanner room force sensing and encoder cables to the 9-pin D-shaped (DSUB) connector on the scanner room side of the panel.
- Setup the MRI support room.
- Plug the air compressor into a 110VAC wall outlet. With the compressor’s internal regulator turned to the off/minimum pressure position and the ball valve in off-position, turn on compressor and allow it to come to full internal pressure (~4 min).
- Connect the support room force sensing and encoder cables to the DSUB connector on the external side of the penetration panel.
- Connect the 3/8-inch pneumatic tube fitting, emerging from the penetration panel pass-through to the outlet of the interface/power unit pressure regulator outlet. Connect the 4 mm pneumatic tube to the outlet of the compressor and the inlet of the air filter on the interface/power/regulator unit.
- Connect the interface/power/regulator unit to the micro-USB connector of the USB cable/repeater assembly and lay the repeater cable out to the host PC/laptop in the MRI control room. Plug the interface/power/regulator unit into a 110VAC wall plug in the support room, and then turn on power switch.
- Position MR_CHIROD v3 with the patient.
- Fully extend and lower the MR scanner bed. Attach the bottom half of the head coil and guide the volunteer to lay down, making sure that the volunteer is resting comfortably and has extended their arms comfortably.
- Provide ear plugs to the volunteer for acoustic noise reduction.
- Attach the head coil and small foam pads to immobilize the head.
- Attach pillows around the volunteer’s gripping arm at the level of the arm and elbow, to minimize vibrational coupling to volunteer’s own body and to the walls of the MR scanner.
- Attach the communication ball on the volunteer’s chest, instruct them on how to use it and confirm that the communication ball works well before starting the scans.
- Loosely install the MR_CHIROD on the side of the patient opposite to that of their brain lesion using the corresponding bed-slot. With the volunteer’s elbow resting on the table to support the weight of their arm, move the MR_CHIROD handle to the webbing between thumb and forefinger and guide the volunteer to grab the handles of the MR_CHIROD.
- If the MR_CHIROD is on the opposite side of the table from the penetration panel, position the cables and the pneumatic tube so that they pass under the table rather than over the patient.
- Make sure that the grip position is proper for squeezing. Instruct the volunteer to squeeze and push or pull the MR_CHIROD until they have the most comfortable position for squeezing.
- Secure the MR_CHIROD firmly in place by tightening the plastic nuts using an MR-compatible wrench.
NOTE: No scan is being performed at that time. When positioning the MR_CHIROD, the volunteer is resting comfortably on the MR scanner bed outside the magnet. The door to the magnet room may be open.
- Set up the control laptop in the MR control room (adjacent to scanner and support rooms), confirm connection and set for patient force level.
- Turn on the laptop and start the data acquisition/analysis software. Connect the USB cable/repeater assembly to laptop. Turn on the MR scanner room projector. Connect the laptop video output port to the projector connector and set monitor to extend screen onto projector. Connect scanner USB HID trigger cable to the laptop to receive trigger signals from the scanner.
- Run the custom user interface (UI) / control / stimulus program for the MR_CHIROD. Automatically set MR_CHIROD pressure to the (minimal) “setup” level to push the handle to the end-stop, verifying display of motion and force waveforms.
- Instruct the volunteer that the next few squeezes will be to calibrate for maximum strength of squeezing and hence will be difficult.
- Set force level, for example, to 30 N and instruct the volunteer to completely squeeze 2-3 times with a period of approximately 2 s. Observe whether the volunteer can complete a squeeze at that force level.
- Gradually increase the force level and repeat squeeze attempts until the volunteer cannot complete a squeeze. This measurement serves as a maximum of the volunteer’s grip strength. The UI automatically calculates 60%, 40%, and 20% of maximum force levels for use during testing.
3. Enter Volunteer Data and Calibrate the MR Scanner
- Enter the volunteer’s de-identified data as per hospital policy in accordance with HIPAA (United States Health Insurance Portability and Accountability Act of 1996) regulations on the scanner console.
- Move the table and the participant into the scanner and position at isocenter.
4. Run fMRI Session
- Observe the volunteer through the window between the control and scanner rooms and communicate with the volunteer to obtain the participant’s permission to start the fMRI protocol. Instruct them not to hold the MR_CHIROD handle to allow it to rest at the fully open position.
- Shim the magnet and run a localizer scan. Open the fMRI protocol and set slices to cover the volunteer’s brain.
- Instruct the volunteer that the fMRI session is about to begin.
- Using the UI, set the MR_CHIROD to apply the first force level (20% of maximum). The UI program will display a set of instructions on the video projector for the volunteer to remind them how to respond to the visual stimulus. The UI will wait for the scanner to provide a trigger signal to continue.
- Start an echo-planar-imaging protocol for fMRI. Use imaging program MR_CHIROD from folder USERS. Acquisition and reconstruction parameters are already set in the imaging program and should not be changed. The following parameters are employed: in-plane 192 x 192 or 256 x 256 acquisition matrices; TR (repetition time) in the range of 2-3 s; a 30 ms TE (echo time); 5 mm slice thickness, and a spatial resolution of ~1 mm x 1 mm.
NOTE: The UI/data acquisition/stimulus program will wait to receive a trigger pulse from the scanner corresponding with initiation of pre-fMRI scans in the scanner program. The visual stimulus will remove the instructions and show a “fixation cross” that the volunteer will focus on. When the fMRI scan TRs begin, a visual metronome display, in the form of a growing and shrinking circle will be displayed. The volunteer will completely squeeze and release the handle synchronously with the stimulus. Rest periods will separate stimulus periods, during which time the fixation cross will be redisplayed. - During execution of a task, monitor force output and whether the participant is performing the task correctly (i.e., fully completing grips and releases and maintaining synchrony with the visual metronome) by observing live plots of force and displacement on the UI.
- Once the first run is over, confirm continuation of the experiment on the UI, which will change force level to second of three levels. Repeat from step 4.5. Similarly, when the second run is over, confirm continuation to run the final run at the third force level.
- After the third run, the UI will automatically set MR_CHIROD pressure to the low “setup” level.
5. Complete the MRI Session
- Instruct the participant to relax and to let go of the handle. Collect a series of anatomical scans.
6. Take-down
- Remove the participant from the MR scanner room, follow the setup steps in reverse, and proceed to shut down and disconnect the parts of the MR_CHIROD. Transfer MR data to the database and to disk and close the session.
Representative Results
The methodology outlined in the protocol allows the collection of fMRI images while the volunteer is performing the task in real-time in the magnet. Experiments were performed in the Bay 1 facility of the Massachusetts General Hospital Athinoula A. Martinos Center for Biomedical Imaging, using a 3T full-body magnetic resonance scanner. Figure 2 and Figure 3 show the placement of the MR_CHIROD on the table and the patient in place operating it. In Figure 3, a volunteer is in the scanner bore with his/her head placed at the isocenter of the magnet, which is the correct position for brain imaging. Figure 4 shows a schematic of the system components and connections, which are set up during the initial phases of the process. During an fMRI session, not only are the images collected, but also a real-time trace of the actual strokes of the device as the person in the magnet bore is operating it are obtained. Typical results are shown in Figure 5. The use of controlled pneumatic pressure allows precise control of the constant reaction force provided by the MR_CHIROD v3.
Figure 5A–C shows typical areas of activation during gripping/releasing of the device, using the results of the BOLD technique during fMRI scanning. Red arrows show activation in the M1 region (primary motor cortex) and green areas show the SMA (supplementary motor cortex). Figure 5D shows the measured displacement during gripping/releasing, which was performed against the MR_CHIROD’s resistance force. Figure 5E shows activation over time at a single voxel, chosen from within the somato-sensory area. The response corresponds with the subject’s activity, elevated activation occurring during gripping/releasing, and reduced activation when the subject is resting.
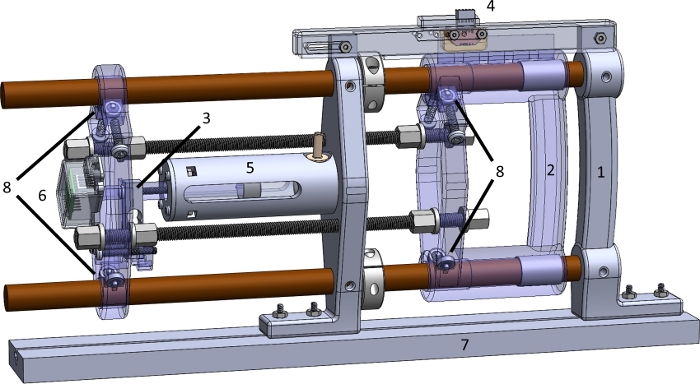
Figure 1: The parts of the MR_CHIROD v3 device. (1) Fixed handle; (2) Sliding handle; (3) Force sensor; (4) Position encoder; (5) Glass-graphite cylinder-piston unit; (6) Shielded load cell amplifier; (7) MR table mounting slot (mockup); (8) Ball bearings with acetyl races and glass balls. Please click here to view a larger version of this figure.
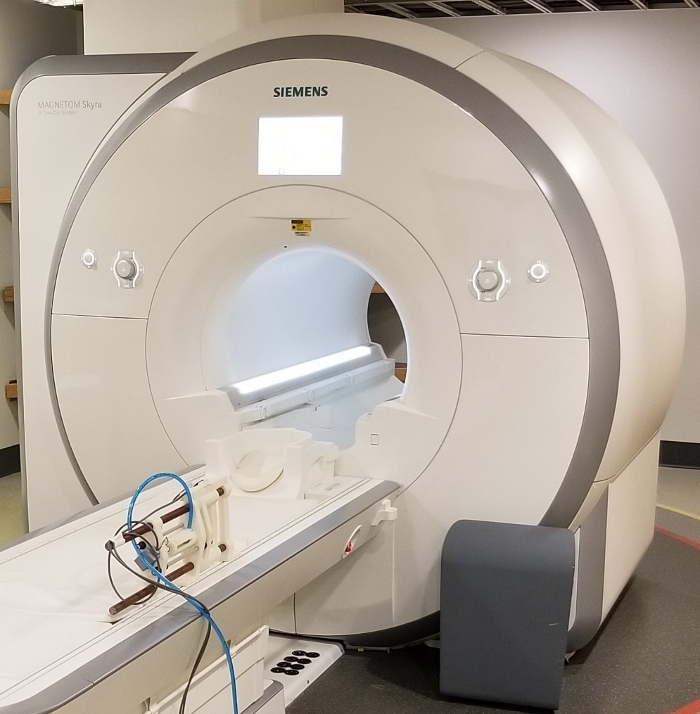
Figure 2: View of the MR_CHIROD v3 securely attached at the scanner bed. This configuration allows the person to operate the MR_CHIROD without supporting any of its weight. The device may be positioned for left or right hand. Shielded cables are grounded at penetration panel, pneumatic tube exits via a pass through tube in the penetration panel. Please click here to view a larger version of this figure.
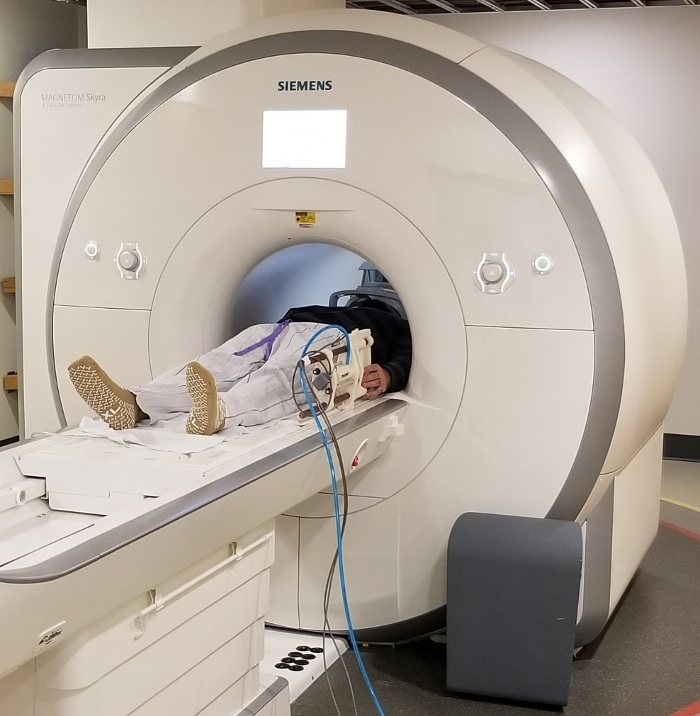
Figure 3: View of the MR_CHIROD v3 relative to a patient. A volunteer is resting with his hand in position near the handles of the device. The volunteer is placed in the correct position at magnet isocenter for brain imaging. Please click here to view a larger version of this figure.
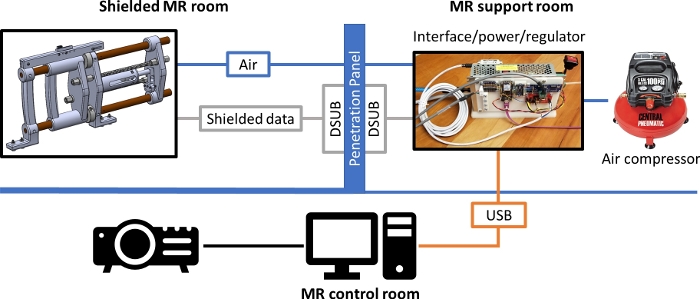
Figure 4: Schematic diagram of MR_CHIROD set up for operation in an MR scanner room. The shielded cables carrying the signals for the position and velocity data and for the force sensor, as well as the pneumatic tubing pass through the penetration panel which serves as the grounding reference level. Please click here to view a larger version of this figure.
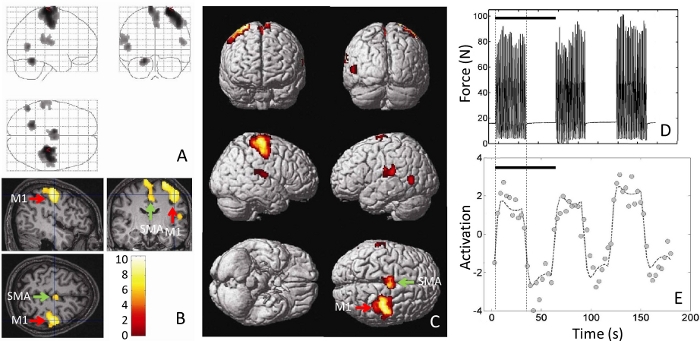
Figure 5: Typical results from performing a motor task (squeezing the handles of a MR_CHIROD). Shown are (A) the fMRI brain activations, superimposed as blobs on an outline of the brain, (B) as pseudo-color on a three-dimensional cross-sectional view of the volunteer’s anatomical brain scan, and (C) as pseudo-color rendered on a brain template. M1 = Primary motor cortex. SMA = Supplementary motor area. (D) Actual force output, measured in units of force (Newton, N) as a function of time. The force output is the actual record of the volunteer’s squeezing and is recorded in real time by the MR_CHIROD. (E) The single-voxel time course of activation is shown, chosen from a voxel at the somatosensory area at the location of the cross-hairs in (B). Black bars in (D) and (E) correspond with a 60 s stimulus/rest period. Please click here to view a larger version of this figure.
Discussion
We present fMRI of a motor task using the latest version of a novel robotic device, the MR_CHIROD1,2,8. The MR_CHIROD has been designed to execute a hand-squeezing grip task which has can be performed by chronic stroke patients and has been studied previously1,2,3,4,5,6,8. The device is further used as a dynamometer, measuring the patient’s maximum grip force, against which experimental force levels are normalized. Activation of the motor cortex is elicited in relation to the force level set during experiments. Further, maximum force is tracked over the course of the study to show improved grip strength. Our earlier iterations of the MR_CHIROD have already proven to be useful in studies showing evidence for neuroplasticity and rehabilitation of chronic stroke patients1,6. We are currently combining the use of the MR_CHIROD with an imaging protocol allowing high sensitivity for fMRI of motor tasks7. Our approach combines functional MRI with a novel MRI-compatible hand-induced robotic device for hand motor function rehabilitation.
The device can be easily used or adapted for use in other MR facilities. Physically, the power/interface/regulation unit and air compressor need to be placed into a support/mechanical room with penetration panel access to the MR scanner room, with a suitable data pass-through and a physical pass through for the compressed air tubing. Connection between the unit and the host computer is currently made using a USB cable with a powered repeater to accommodate an approximately 10 m separation between the two elements. Lastly, the scanner must have an associated projector or similar visualization system to present the instructions, fixation cross and visual metronome to the subject, as well as a means to provide TR trigger information to the UI.
This version of the MR_-CHIROD was specifically developed to support our experimental protocol in the MR scanner and convenience of use by researchers and subjects in a non-MR suite environment. In both sites, the subject grips and releases the handle of the device against a constant restoring force, which can be changed between experimental runs. As such, the pneumatic system was adopted, which allows for presentation of continuous resistive force to the subject (compared with earlier and alternative viscous-braking systems using electro-rheological fluids that present zero force when the subject is not actively gripping or releasing and do not provide a restoring force). The earlier MR_CHIROD iterations and other systems are specifically designed to allow for rapid force changes in response to user interaction and rely on ER fluids to allow for the rapid response2,14, however the cost and complexity of such systems was determined to be undesirable for this application.
The protocol presented represents the now stable version in our research. Results collected to date have shown no unexpected findings that will require alteration of the protocol. Future improvements may be required as needed and might include faster imaging and adaptation of our motor paradigm. In addition, the hardware selected supports not only adjusting control parameters via the serial USB connection without requiring interruption of MR scanning, but also doing so for remote updates of home-based training settings using the microprocessor’s WiFi module.
Offenlegungen
The authors have nothing to disclose.
Acknowledgements
This work was supported by a grant from the National Institute of Neurological Disorders and Stroke (Grant number 1R01NS105875-01A1) of the National Institutes of Health to A. Aria Tzika. This work was performed at the Athinoula A. Martinos Center for Biomedical Imaging. We wish to thank Director Dr. Bruce R. Rosen, M.D., Ph.D. and members of the Martinos Center staff for their support. We further wish to thank Mr. Christian Pusatere and Mr. Michael Armanini for their assistance in running experiments. Lastly, we thank Dr. Michael A. Moskowitz and Dr. Rosen for their guidance in the conception and development of the MR_CHIROD series of devices and the associated stroke studies.
Materials
| Ball bearings, plastic with glass balls (8) | McMaster-Carr | 6455K97 | |
| Bi-directional logic level converter | Adafruit | 395 | |
| Dual LS7366R Quadrature Encoder Buffer | SuperDroid Robots | TE-183-002 | |
| Feather M0 WiFi w/ATWINC1500 | Adafruit | Adafruit 3010 | |
| Flanged nuts, fiberglass, 3/8”-16 (8) | McMaster-Carr | 98945A041 | |
| Garolite rod, ¾” dia, 4’ long | McMaster-Carr | 8467K84 | |
| Laptop | Various | Any laptop with USB2.0 port(s) and MATLAB | |
| Load Cell (20kg) | Robotshop | RB-PHI-119 | |
| Load Cell Amplifier- HX711 | Mouser | 474-SEN-13879 | |
| MATLAB | MathWorks | 2008 version or later with Psychophysics Toolbox | |
| Magnetic resonance imaging scanner | Siemens | Skyra 3T | 3T full body scanner with BOLD and GRAPPA capabilities |
| MR_CHIRODv3 | fabricated in-house | Bespoke plastic & 3D printed structure | |
| Op amp development board | Schmartboard | 710-0011-01 | |
| Panel Mount Power Supply | Delta | PMT-D2V100W1AA | |
| Plastic tubing & tube fittings | McMaster-Carr | various | |
| Pyrex/graphite piston/cylinder module | Airpot | 2KS240-3 | |
| Screws, ¼”-20, nylon | McMaster-Carr | various | |
| Shaft Collars for ¾” dia shaft, nylon (2) | McMaster-Carr | 9410T6 | Stock metal clamping screws replaced with plastic screws |
| Shielded cables (2) | US Digital | CA-C5-SH-C5-25 | |
| Threaded rod, fiberglass, 3/8”-16 | McMaster-Carr | 91315A010 | |
| Transmissive optical encoder code strip | US Digital | LIN-2000-3.5-0.5 | |
| Transmissive Optical Encoder Module | US Digital | EM2-0-2000-I | |
| PTFE sleeve bearings | McMaster-Carr | 2639T32 |
Referenzen
- Mintzopoulos, D., et al. Functional MRI of Rehabilitation in Chronic Stroke Patients Using Novel MR-Compatible Hand Robots. The Open Neuroimaging Journal. 2, 94-101 (2008).
- Khanicheh, A., Mintzopoulos, D., Weinberg, B., Tzika, A. A., Mavroidis, C. MR_CHIROD v.2: Magnetic resonance compatible smart hand rehabilitation device for brain imaging. IEEE Transactions on Neural Systems and Rehabilitation Engineering. 16 (1), 91-98 (2008).
- Astrakas, L. G., Nagyi, S. H., Kateb, B., Tzika, A. Functional MRI using robotic MRI compatible devices for monitoring rehabilitation from chronic stroke in the molecular medicine era (Review). IEEE International Journal of Molecular Medicine. 29 (6), 963-973 (2012).
- Lazaridou, A., et al. fMRI as a molecular imaging procedure for the functional reorganization of motor systems in chronic stroke. Molecular Medicine Reports. 8 (3), 775-779 (2013).
- Lazaridou, A., et al. Diffusion tensor and volumetric magnetic resonance imaging using an MR-compatible hand-induced robotic device suggests training-induced neuroplasticity in patients with chronic stroke. International Journal of Molecular Medicine. 32 (5), 995-1000 (2013).
- Mintzopoulos, D., et al. Connectivity alterations assessed by combining fMRI and MR-compatible hand robots in chronic stroke. NeuroImage. 47, T90-T97 (2009).
- Mintzopoulos, D., et al. fMRI Using GRAPPA EPI with High Spatial Resolution Improves BOLD Signal Detection at 3T. The Open Magnetic Resonance Journal. 2, 57-70 (2009).
- Khanicheh, A., Mintzopoulos, D., Weinberg, B., Tzika, A. A., Mavroidis, C. Evaluation of Electrorheological Fluid Dampers for Applications at 3-Tesla MRI Environment. IEEE/ASME Transactions on Mechatronics. 13 (3), 286-294 (2008).
- Babaiasl, M., Mahdioun, S. H., Jaryani, P., Yazdani, M. A review of technological and clinical aspects of robot-aided rehabilitation of upper-extremity after stroke. Disability and Rehabilitation Assistive Technology. 11 (4), 263-280 (2016).
- Huang, V. S., Krakauer, J. W. Robotic neurorehabilitation: a computational motor learning perspective. Journal of NeuroEngineering and Rehabilitation. 6, 5 (2009).
- Tsekos, N., Khanicheh, A., Christoforou, E., Mavroidis, C. Magnetic Resonance-Compatible Robotic and Mechatronics Systems for Image-Guided Interventions and Rehabilitation: A Review Study. Annual Review of Biomedical Engineering. 9, 351-387 (2007).
- Sivak, M., Unluhisarcikli, O., Weinberg, B., Mirelman-Harari, A., Bonato, P., Mavroidis, C. Haptic system for hand rehabilitation integrating an interactive game with an advanced robotic device. Proceedings of IEEE Haptics Symposium. , (2010).
- Colombo, R., et al. Design strategies to improve patient motivation during robot-aided rehabilitation. Journal of NeuroEngineering and Rehabilitation. 4 (1), 3 (2007).
- Unluhisarcikli, O., et al. A Robotic Hand Rehabilitation System with Interactive Gaming Using Novel Electro-Rheological Fluid Based Actuators. Proceedings of IEEE International Conference on Robotics and Automation. , (2010).

