Chorion and Vitelline Membrane Mechanical Removal: A Method to Prepare Drosophila Oocytes for Direct Observation
Abstract
Source: Perkins, A. T., Bickel, S. E. Using Fluorescence In Situ Hybridization (FISH) to Monitor the State of Arm Cohesion in Prometaphase and Metaphase I Drosophila Oocytes. J. Vis. Exp. (2017).
This video describes a method to mechanically remove the chorion and vitelline membranes from previously fixed mature Drosophila oocytes. The featured protocol shows a detailed demonstration of the procedure yielding oocytes compatible with fluorescent in situ hybridization assays.
Protocol
This protocol is an excerpt from Perkins and Bickel, Using Fluorescence In Situ Hybridization (FISH) to Monitor the State of Arm Cohesion in Prometaphase and Metaphase I Drosophila Oocytes, J. Vis. Exp. (2017).
1. Removal of Chorions and Vitelline Membranes
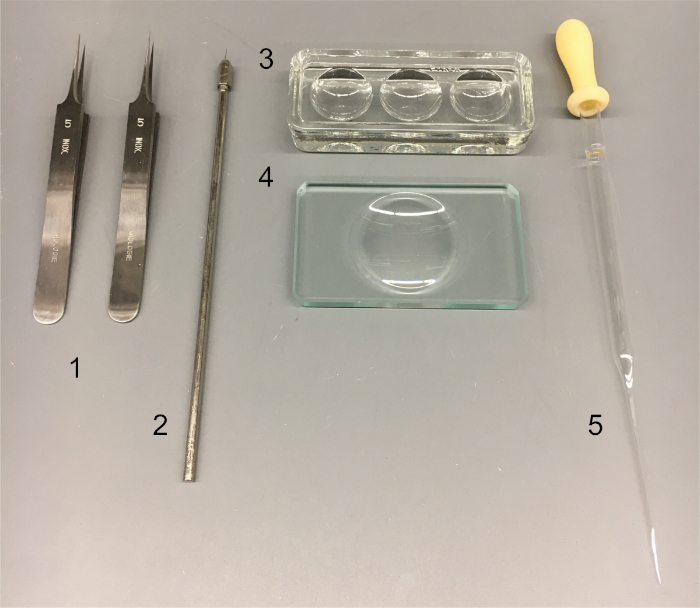
NOTE: See Figure 1 for tools needed.
- Separate late stage oocytes
- Add 1 mL PBSBTx to a shallow dissecting dish. Use a P200 with a BSA coated tip to transfer fixed ovaries (in ~150 µL) into the shallow dish. Pipette ovaries up and down with the BSA coated pipette tip to dislodge the mature oocytes from the less mature oocytes.
- When late stage oocytes are sufficiently separated, transfer all the tissue to a 500 µL microfuge tube. Remove excess liquid with a pulled Pasteur pipette, leaving about 150 – 200 µL in the tube. Repeat section 1.1 for remaining genotypes.
- Prepare for rolling
- Pre-wet a deep well dish with 200 µL of PBSBTx. Cover and set aside. Obtain 3 frosted glass slides and set slide #3 aside. Gently rub the frosted glass regions of slides #1 and #2 together. Rinse them in deionized water to remove any glass shards and dry with a disposable wipe.
- Coat the frosted regions of slides #1 and #2 with PBSBTx by adding 50 µL of PBSBTx to one slide and rubbing this region with the other slide. Remove liquid with a disposable wipe.
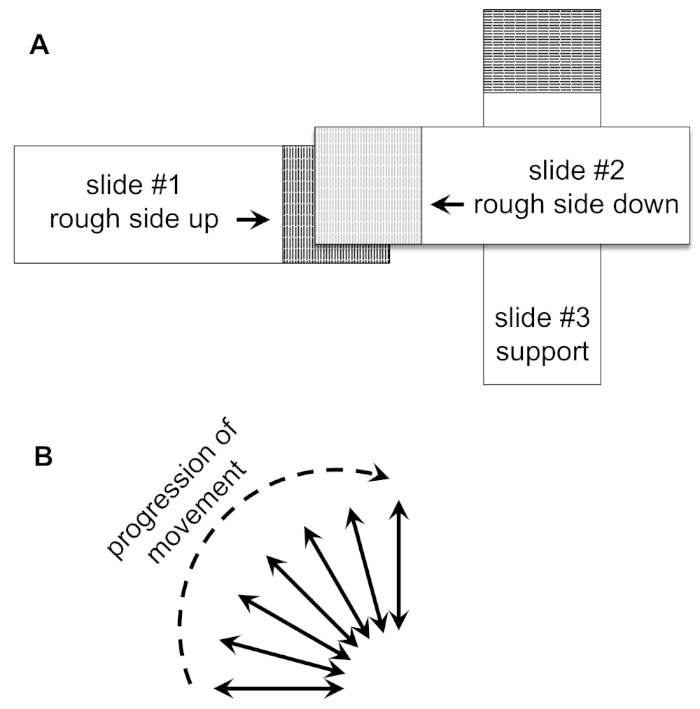
- Place the slides under a dissecting microscope in the configuration shown in Figure 2A. Keep the frosted regions of slides #1 and #2 in contact, with slide #3 supporting slide #2.
- Roll oocytes; ensure that the direction of rolling is always in a straight line and never a circular motion.
- Prewet a P200 pipette tip in PBSBTx and disperse the oocytes in the microfuge tube by pipetting up and down. Transfer 50 µL of liquid containing oocytes to the center of the frosted glass part of slide #1. Lift slide #2 to do this.
- Slowly lower slide #2 until the surface tension of the liquid creates a seal between the two frosted glass regions. There should be enough liquid to cover the frosted area but none should be seeping out. If liquid is overflowing, use a pulled Pasteur pipette to remove excess liquid.
- Hold the bottom slide (#1) in place with one hand and use the other hand to move the top slide (#2) back and forth in a horizontal direction, keeping slide #2 level and supported on slide #3. Perform under a microscope for easy visualization of oocyte movements and progress.
NOTE: This movement will generate friction and cause the oocytes to "roll" and lose their chorions. Minimal pressure should be used and movements should be short and quick. - After a few movements in the horizontal direction, slightly change the angle of movement (Figure 2B). In multiple increments, gradually increase this angle to 90° until movement of the top slide (#2) is perpendicular to the starting direction (Figure 2B). Note that empty chorions will be visible in the liquid and oocytes lacking chorions will appear longer and thinner.
- Repeat steps 1.3.3 – 1.3.4 about 7 – 10 times until the solution becomes slightly cloudy. Stop rolling when the majority of oocytes (75 – 85%) appear to have lost their vitelline membranes.
NOTE: A distinctive pointed end is often visible on oocytes lacking vitelline membranes. Vitelline membranes are more difficult to remove than chorions. Light pressure may be applied to the top slide (slide #2) while rolling to achieve removal of vitelline membranes. Trying to remove vitelline membranes from all the oocytes often results in destruction of other oocytes. - Gently lift the top slide (#2), dragging one of its corners to the center of the frosted region of the bottom slide (#1) so that rolled oocytes accumulate in the center of the frosted region. Rinse oocytes from both slides with PBSBTx into the deep well dish containing PBSBTx.
- Clean slides #1 and #2 with ultrapure water, dry with a disposable wipe, and reset. Repeat steps 1.3.1 – 1.3.6 until all the oocytes of the same genotype have been rolled. This usually requires 3 – 4 rounds of rolling per genotype.
- Remove debris after rolling
- Add 1 mL PBSBTx to a 15 mL conical tube. Swirl the liquid to coat the sides of the tube.
- Using a PBSBTx coated P1000 pipette tip, transfer the rolled oocytes from the deep well dish to the conical tube containing 1 mL of PBSBTx. Add an additional 2 mL of PBSBTx to the conical tube containing the oocytes.
- Let the oocytes begin to settle to the bottom, then remove the top 2 mL of solution containing debris (chorions, vitellines, etc.) with a P1000 and discard. If needed, hold the conical tube against a dark background to see the opaque oocytes as they sink.
- Add an additional 2 mL of PBSBTx to the oocytes, and repeat step 1.4.3. Repeat 1.4.3. for a total of 3 rounds of debris removal.
- Using a PBSBTx coated P1000 pipette tip, transfer oocytes back to the original 500 µL microfuge tube. 20 – 25 females should yield approximately 50 µL of rolled mature oocytes.
- Repeat section 4 for the remaining genotypes using fresh frosted slides, a clean deep well dish, and a new conical tube for each genotype.
- If storage is necessary, transfer oocytes to 1x PBS with 0.1% TritionX-100 and store overnight at 4 °C. Long-term storage is not recommended because formaldehyde crosslinking can be reversed by non-ionic detergents.
Representative Results

Figure 1: Cytology tools. Tools used in protocol: (1) pair of forceps (#5 Dumont); (2) tungsten needle; (3) deep well dish with cover; (4) shallow glass dissecting dish; (5) pulled Pasteur pipette. Please click here to view a larger version of this figure.

Figure 2: Arrangement and movement of slides for rolling oocytes. (A) Diagram of the slide set up for rolling of oocytes as described in the protocol. The darker area denotes the frosted glass part of the slide. (B) Direction of movement vectors for slide #2 during oocyte rolling. Please click here to view a larger version of this figure.
Materials
| Bovine serum albumin (BSA) | Fisher Scientific | BP1600-100 | Prepare 10% stock Freeze aliquots |
| 10% Triton X-100 | Thermo Scientific | 28314 | Surfact-Amps |
| PBSBTx | 1X PBS, 0.5% BSA, 0.1% Trition X-100 | ||
| Forceps | Dumont | #5 INOX, Biologie | |
| 9" Disposable glass Pasteur pipettes | Fisher | 13-678-20C | Autoclave to sterilize |
| Shallow glass dissecting dish | Custom made | ||
| Deep well dish (3 wells) | Pyrex | 7223-34 | |
| Tungsten needle | homemade | ||
| Frosted glass slides, 25 x 75 mm | VWR Scientific | 48312-002 | |
| 15 mL conical tubes | Various | ||
| 500 µl microfuge tubes | Various | ||
| Kimwipes | Various | disposable wipes |

