A Minimally Invasive, Accurate, and Efficient Technique for Intrathymic Injection in Mice
Summary
The present protocol describes an interventional radiology procedure established for intrathymic injection in mice to avoid the risk of open surgery and improve the accuracy of blind percutaneous injections.
Abstract
Intrathymic injection in mouse models is an important technique for studying thymic and immune function, including genetic and acquired T cell disorders. This requires methods for the direct deposition of reagents and/or cells into the thymus of living mice. Traditional methods of intrathymic injection include thoracic surgery or minimally invasive percutaneous blind injections, both of which have significant limitations. Ultra-high frequency ultrasound imaging devices have made image-guided percutaneous injections possible in mice, greatly improving the injection accuracy of the percutaneous injection approach and enabling the injection of smaller targets. However, image-guided injections rely on the utilization of an integrated rail system, making this a rigid and time-consuming procedure. A unique, safe, and efficient method for percutaneous intrathymic injections in mice is presented here, eliminating reliance on the rail system for injections. The technique relies on using a high-resolution micro-ultrasound unit to image the mouse thymus noninvasively. Using a free-hand technique, a radiologist can place a needle tip directly into the mouse thymus under sonographic guidance. Mice are cleaned and anesthetized before imaging. For an experienced radiologist adept at ultrasound-guided procedures, the learning period for the stated technique is quite short, typically within one session. The method has a low morbidity and mortality rate for the mice and is much faster than current mechanically assisted techniques for percutaneous injection. It allows the investigator to efficiently perform precise and reliable percutaneous injections of thymuses of any size (including very small organs such as the thymus of aged or immunodeficient mice) with minimal stress on the animal. This method enables the injection of individual lobes if desired and facilitates large-scale experiments due to the time-saving nature of the procedure.
Introduction
The thymus has an essential role in T cell development and immunity. T cell deficiency, which can be caused by thymic involution, genetic disorders, infections, and cancer treatments, amongst other factors, leads to high mortality and morbidity1,2. Mouse models are indispensable in both basic and translational immunology research and have been used for decades to study thymic biology and T cell development, as well as to develop treatments for those suffering from thymic dysfunction and T cell deficiency3,4,5.
A central part of thymic investigations has been the intrathymic injection of biological materials such as cells, genes, or proteins in mouse models6,7,8,9,10,11,12. Conventional intrathymic injection methods use thoracotomy followed by intrathymic injection under direct visualization or by "blind" percutaneous injection into the mediastinum. The surgical approach significantly increases the pneumothorax risk, amongst others. Moreover, the elevated stress during this surgery results in immunosuppression, thus potentially compromising immunological data13. Experienced researchers, after some practice, can perform the blind injection technique, but this approach is less accurate and therefore, limits experimental subjects to young mice with a big thymus.
The utilization of ultrasound guidance has been introduced as a precise and minimally invasive alternative to traditional intrathymic injection approaches14. However, this procedure is very time-consuming when using the integrated rail system instead of the free-hand technique. Performing injections with the injection mount requires careful imaging optimization and positioning of the transducer with the help of the various attachments such as the transducer stand and mount, the X, Y, and Z positioning system, as well as proficient operation of the micro-manipulation controls and rail system extensions. A simple alternative technique, ultrasound-guided thymic injection, is presented here performed by a radiologist using a free-hand approach15, which is both a rapid and accurate minimally invasive alternative to the above-described methods. Importantly, the current approach can be performed with any high-resolution ultrasound imaging system without needing an injection mount and integrated rail system. It is especially useful for studies requiring the injection of large numbers of mice11, for experiments involving the injection of both thymic lobes, or for the accurate injection of small thymuses in aged, irradiated, or immunocompromised mice12.
Protocol
All procedures were performed in accordance with animal care guidelines at the Center for Discovery and Innovation (IACUC protocol 290). For the present study, C57BL/6 mice (female, 4-6 weeks old), C57BL/6 mice (female, 6 months old), J:NU female mice, NOD scid gamma (NSG) female mice, and B6;CAG-luc, -GFP mice were used as the young mouse model, aged mouse model, athymic nude model, immunodeficient model, and bioluminescence cell source, respectively. The mice were obtained from a commercial source (see Table of Materials). This procedure will typically require two people (one to remain sterile while performing the injections and another to handle the mice).
1. Animal preparation
- Induce anesthesia in the mice using 3%-4% isoflurane gas and maintain anesthesia using 1%-3% isoflurane gas administered via a nose cone and precision-calibrated vaporizer (see Table of Materials).
- Confirm the appropriate anesthetic depth/unconsciousness by unresponsiveness to the hind paw pinch.
- Remove the fur from the anterior chest area of the mice by applying a thin layer of depilatory cream for less than 1 min. Use a wet paper towel to remove the cream completely along with the loose fur.
NOTE: Applying too much cream will result in the chest area skin becoming inflamed. - Place one mouse at a time, supine, on the heated platform of the small animal ultrasound imaging station (see Table of Materials) with the nose cone in place (Figure 1).
- Secure the mouse to the stage with medical adhesive tape at the hind and forelimbs (Figure 1).
- Apply ophthalmic ointment to both eyes to prevent corneal drying.
- Disinfect the fur-free upper thorax skin using a chlorhexidine gluconate applicator (see Table of Materials).
2. Preparation of the ultrasound machine and sterile field
- Activate the highest frequency linear probe available, typically the probe with the highest spatial resolution for the size of the animal being imaged. Activate the probe by tapping the corresponding button after the startup screen.
NOTE: For this application with mice, the probe used is designed specifically for use with mice and small rats (see Table of Materials). - Optimize the ultrasound settings for imaging and injection following the steps below.
- Adjust the depth of the field of view to an appropriate size for the target animal by adjusting the vertically oriented sliders on the right side of the screen (Figure 2). The maximum depth setting will typically be about 6-8 mm for young mice.
- Adjust the grayscale gain by sliding the button along the horizontal bar on the bottom of the screen (Figure 2). The goal is to start with an image that is just slightly darker than a typical "gray" appearance.
- Adjust the focal zone (blue arrow on the right of the screen, Figure 2) to the anticipated level of the thymus. For young mice, this will be around a depth of 4 mm.
- If image capture is desired, test the functionality of the store image and store clip buttons to ensure the images can be appropriately saved throughout the procedure. Perform this by tapping the Save Clip button on the bottom right of the screen or by tapping the Freeze button, and then tapping Save Image (Figure 2).
- Apply a small amount (~1 mL) of ultrasound gel to the transducer surface (see Table of Materials) while it is upright, either resting in the ultrasound machine holder or in the hands of an assistant.
- Prepare a small sterile field next to the heated platform. The optimal positioning for this is usually between the platform and the ultrasound machine.
- Empty these items onto the sterile field: a sterile probe cover, rubber band, sterile gloves, and sterile ultrasound gel (see Table of Materials).
- With the sterile field set up and items in place, put on the sterile gloves.
- Carefully place the sterile probe cover over the ultrasound transducer (as well as over the gel that was initially placed on the probe). Maintain sterility and touch only the sterile cover, nothing else. Slide the sterile rubber band over the sterile probe cover to keep it in place.
NOTE: The air foci, regardless of size, can interfere with ultrasound imaging. Hence, it is essential to apply the ultrasound gel between the transducer and sterile probe cover, and on top of the probe cover to ensure an air-free interface between the ultrasound probe and the animal. - Place a moderate amount (2-3 mL) of sterile ultrasound gel onto the transducer.
NOTE: The user is now ready to image an anesthetized mouse.
3. Imaging and locating the thymus
- While maintaining sterility, place the ultrasound gel-topped probe vertically on the disinfected portion of the anterior chest wall of the mouse for initial imaging.
- Take a moment to look at the ultrasound image and optimize it further. Go back to step 2.2 and adjust to get an appearance similar to that of Figure 3.
- Scan the anterior chest of the mouse in a transverse plane. Perform this by holding the transducer vertically and moving it up and down from the neck to the abdomen in a paintbrush-like or "sweeping" motion.
NOTE: The heart will be the most recognizable structure in the chest due to its rapid motion and "chambered" appearance. Once the heart is localized, this can be used as a reference point to acquire an image of the thymus. - With the heart centered in the field of view, sweep the transducer slightly toward the neck. Just superior to the heart, the thymus is usually encountered.
- Visualize the thymus as a bilobed, pyramidal, hypoechoic ("dark" or "black" appearing on the screen) structure that is centered in the midline, anterior to the aorta and posterior to the sternum (Figure 3A).
- Make a note of the two round paired black (i.e., "hypoechoic") structures on either side of the upper chest.
NOTE: These are the bilateral venae cavae. The aorta is a similar curvilinear hypoechoic structure in the midline between the two venae cavae. These are easily recognizable by their pulsatile motion.
4. Injection of the thymus
- If needed, apply more (2-3 mL) sterile ultrasound gel to the transducer.
NOTE: A relatively large amount of sterile gel on the transducer (compared to the size of the mouse thorax) will act as a "gel pad" around the chest wall of the mouse. This will reduce the number of ultrasound artifacts made by air within the field of view. - Using the ultrasound probe, locate the widest portion of the thymus, which is usually the ideal target site for injection. Anticipate a horizontal needle trajectory in the chosen location.
- Note where the major blood vessels (SVCs and aorta) are located at this site. Avoid these during the injection.
- The blood vessels will be hypoechoic, pulsatile structures, as described in step 3.7. If unsure, use the color Doppler mode to check for flow within the vessels (Figure 4A). Activate the color Doppler mode by tapping the Color button on the screen.
- If one of the major blood vessels (or the heart) is anticipated to be along the expected needle trajectory, choose a new target area or find a different approach/trajectory.
- Hold the transducer in one hand and a 30 G insulin needle (see Table of Materials) with 10 µL of injectate in the other.
NOTE: The injectate will vary based on the experimental design. The present study used phosphate-buffered saline, trypan blue, or D-luciferin (0.1 µg/10 µL). - To begin the injection process, move the transducer laterally so that the thymus is off-center in the ultrasound field of view. Ensure that the other side of the field of view consists of mostly ultrasound gel and nothing else.
- Place the tip of the needle in the gel under the transducer and slowly move the needle until it is visualized adjacent to the skin surface (Figure 4B).
- While continuously imaging the needle under ultrasound, insert the needle into the thymus gland with a percutaneous trajectory, away from blood vessels.
- Use a "cross thymus" horizontal trajectory to place the needle tip in the thymic lobe contralateral to the entry site. This accounts for potential leakage along the needle tract (Figure 5A).
- Once the needle tip is inside the desired portion of the thymus, quickly inject the contents (such as 10 µL of trypan blue or D-luciferin, 0.1 µg/10 µL) from the 30 G syringe while using sonographic visualization.
- To stabilize the syringe during needle insertion and injection, hold the syringe between the thumb and third finger and control the syringe plunger with the index finger.
- Remove the needle after all the contents have been deposited.
5. Post-injection monitoring of animals
- Transfer the animal to an empty cage and observe until it regains sufficient consciousness to maintain sternal recumbency.
NOTE: Full recovery from anesthesia is expected to occur within 2 min. - Monitor the animal for an additional 10 min for signs of distress, labored breathing, or bleeding.
NOTE: Post-injection pain is not expected, and there is typically no need for post-injection analgesia. - Once fully recovered and following an uneventful post-injection observation period, return the injected animal to the company of other animals.
Representative Results
The successful implementation of this technique relies on a few key steps to be followed. First, reliable identification of the thymus gland itself has to be ensured. In young mice, this is straightforward due to the gland's large size (Figure 3A). In older mice or immunodeficient mice, it can be more challenging; however, it is still very feasible with modern ultrasound equipment (Figure 3B,C). Second, it is critically important to set the needle trajectory so it will be visualized continuously during the advancement of the needle tip through the chest wall layers and into the thymus. A successful injection will have the needle visualized entirely while it is being advanced. This assures the operator that the needle has not traversed a critical structure, such as the heart, aorta, or one of the inferior venae cavae (Figure 4). This also applies to the injection itself. The needle tip must always be visualized in its target location during the injection so the intrathymic deposition is confirmed (Figure 5).
Some minor pitfalls exist that, if recognized, can be mitigated relatively easily. When securing the mouse to the stage and nose cone, the thorax of the mouse needs to be made as neutral as possible (i.e., without significant leftward or rightward rotation). If there is too much rotation of the thorax, the correct "approach angle" of the needle may not be easily achievable. Also, if the mouse is not secured in place tightly enough, it may move or slide when trying to advance the needle, distorting the anatomy and making visualization difficult. However, with proper technique and preparation, a successful intrathymic injection can be achieved with consistency, reliability, and reproducibility.
Once the injection is complete, there are multiple ways to confirm the intrathymic location of the injection. The present study used luciferin as an injectate into luciferase transgenic mice. These can then be evaluated immediately following the injection with bioluminescence imaging, confirming the injection's correct location without sacrificing the animal (Figure 6A). This technique has the additional advantage that injected luciferin-tagged cells can be imaged at multiple time points, ensuring the persistence of activity in the thymus. Alternatively, trypan blue can be injected as a visual marker of the injection site, and injection accuracy can then be confirmed ex vivo with necropsy16 (Figure 6B).
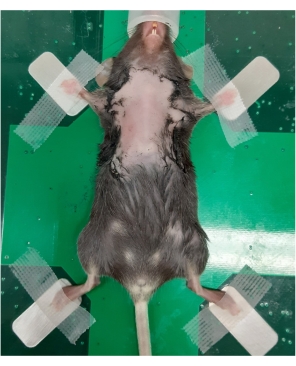
Figure 1: Anesthetized mouse positioned on the imaging stage for ultrasonography of the thymus. A 6-week-old female C57BL/6 mouse with a depilated chest was anesthetized and transferred to the imaging station. The mouse is in a supine position, with the outstretched legs secured by tape. Please click here to view a larger version of this figure.

Figure 2: Ultrasound machine settings. Image of the ultrasound machine control panel (touch screen). The main adjustments of the settings to optimize imaging will be adjusting the depth (red arrow), the focal zone (circled in yellow), and the gains (red asterisk). Please click here to view a larger version of this figure.
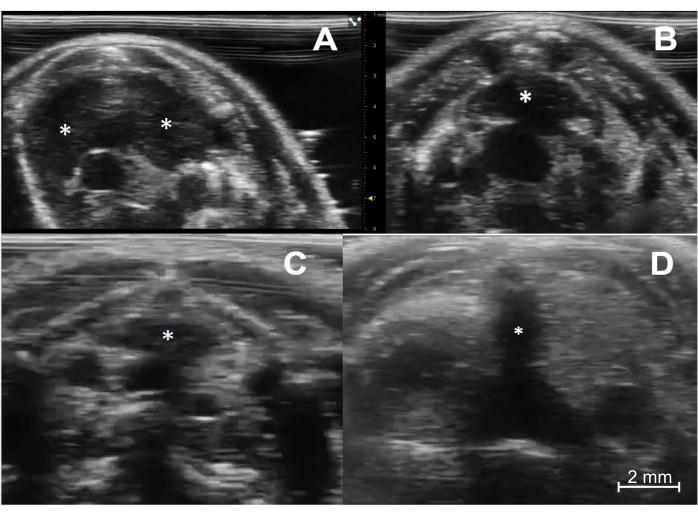
Figure 3: Ultrasound imaging of the thymus in immunocompetent and immunodeficient young and aged mice. (A) Immunocompetent young mouse (C57BL/6, female, 4 weeks old, n = 5). The transverse sonographic view shows the thymus's right and left lobes (asterisks). (B) Immunocompetent aged mouse (C57BL/6, female, 6 months old, n = 5). The thymus (asterisk) is smaller but maintains its typical location and pyramidal shape. (C) Immunodeficient young mouse (NOD scid gamma, female, 4 weeks old, n = 5). Note the much smaller size of the thymus (asterisk) compared to the normal young mouse. (D) Athymic nude mouse (female, 8 weeks old, n = 1). There is a complete absence of thymic tissue. Of note, the dark (hypoechoic) vertical line in the middle of the image (asterisk) is a shadowing artifact from the sternum, with no true thymic tissue. Please click here to view a larger version of this figure.
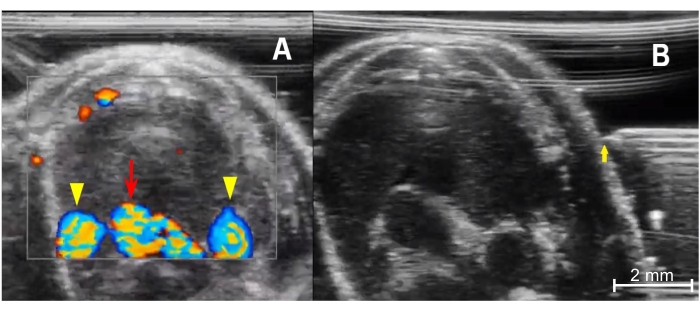
Figure 4: Preparing for injection. (A) Color Doppler image of the anterior thorax demonstrates the thymus's relationship with the mediastinal vessels. The bottom center is the aortic arch (red arrow), and the rounded vessels on either side are the right and left superior venae cavae (yellow arrowheads). Blood flowing toward the imaging probe is encoded in red, and blood flowing away from the transducer is encoded in blue. (B) Needle placement from prior to advancement into the chest from a left-sided approach. The needle tip (yellow arrow) must be in line with the ultrasound transducer and the tip level with the mid portion of the thymus. Please click here to view a larger version of this figure.
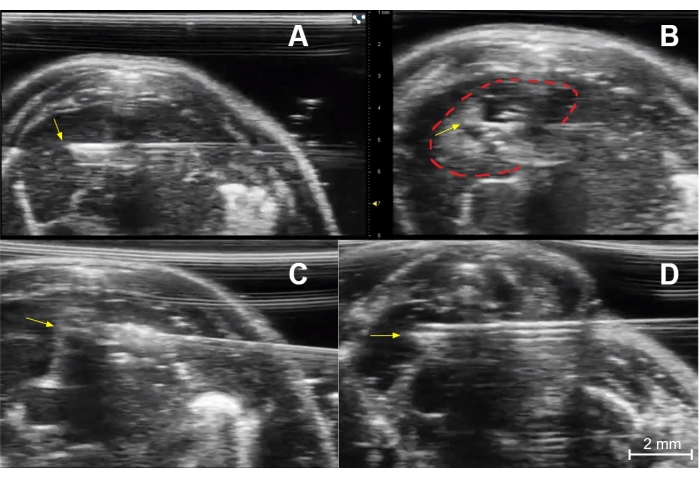
Figure 5: Injection technique. (A) Needle placement for injection of the right thymic lobe of an immunocompetent young mouse. The needle tip (yellow arrow) is in the central portion of the right lobe. (B) Post-injection image of the right lobe showing a collection of dark (hypoechoic) fluid and small bright (echogenic) air bubbles at the injection site (dashed red line). The yellow arrow indicates the needle tip. (C) Needle placement (yellow arrow at needle tip) for injection of the left thymic lobe of an immunocompetent young mouse. (D) Needle placement (yellow arrow) for injection of the right lobe of an immunocompetent young mouse. Please click here to view a larger version of this figure.
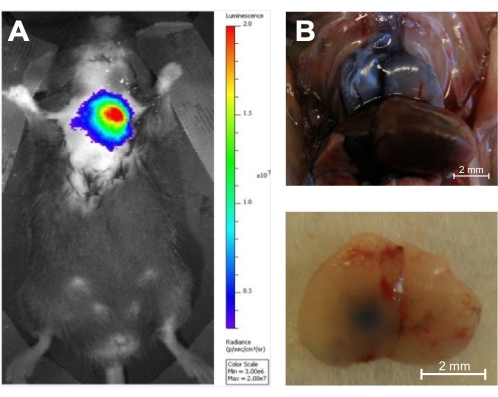
Figure 6: In vivo and ex vivo verification of accuracy. (A) Injection of D-luciferin (0.1 μg/10 μL) into the thymus of an 8-week-old luciferase transgenic mouse followed by 1 s of in vivo bioluminescence imaging using an in vivo bioluminescence imaging system (n = 3). The color coding shows the total bioluminescence radiance (photons·s−1·cm−2·steradian−1) as indicated by the color bar on the right. (B) The thymus of two 5-week-old C57BL/6 mice was injected with trypan blue, and the injection accuracy was demonstrated by necropsy (n = 3). Top panel: Dorsal surface of a Trypan Blue-stained injected thymus in situ. Bottom panel: Ventral surface of a Trypan Blue-stained thymus ex situ after injection of the left lobe. Reproduced with permission from Tuckett et al.1. Please click here to view a larger version of this figure.
Discussion
An ultrasound-guided free-hand injection is a highly accurate technique for delivering study materials to the thymus in an efficient and aseptic fashion. Following the initial sterilization of the skin at the injection site, sterility is maintained during the procedure owing to the use of sterile gloves, sterile ultrasound probe covers, and sterile ultrasound gel. In contrast to the blind percutaneous approach10,17 or relying on surgical incisions for direct visualization of the thymus18,19, which are the commonly used methods for intrathymic injections in mice, utilizing free-hand ultrasound guidance combines a high degree of safety and quickness with tremendous precision of the procedure. Conducting ultrasound-guided injections using the rail platform14 offers a similar level of safety and accuracy, but this cumbersome approach typically takes at least 5 min per injection from the moment the mouse has been anesthetized and positioned on the imaging platform, compared to the free-hand technique that makes it possible for an expert to complete injections in around 20-30 s per mouse15.
Significant experience and training are prerequisites for achieving a high proficiency level in all the various methods for intrathymic injection, including the ultrasound-guided free-hand injection technique. However, a radiologist with clinical experience in ultrasound-guided procedures can become proficient in the intrathymic injection of mice within a 1 hr practice session.
The flexibility of the free-hand injection method allows the investigator to inject either one thymic lobe, both thymic lobes in one injection pass, or both thymic lobes in two separate injections, depending on the specific experimental needs of the study. Of note, injecting individual thymic lobes with placebo versus study material can be used as a strategy to reduce the number of study subjects needed by using the placebo-injected lobe as an internal control. By contrast, the rigid setup of the integrated rail system allows injection into one thymic lobe per injection period. Injection of a second lobe would require dismounting the syringe holder attachment, installing it on the reverse side of the mouse, and carefully adjusting the micro-manipulation controls until the trajectory of the needle is correct before the next injection can proceed. These issues substantially increase anesthesia exposure and the time needed to complete the experiment.
A unique advantage of the free-hand ultrasound intrathymic method when compared to the blind intrathymic injection procedure is the relative ease of accurately injecting small thymuses such as the thymuses of older mice (6 months or older), which are much smaller in size than those in younger mice (4-10 weeks old). This advantage, combined with the ease of scale-up, allows immunologists to conduct intrathymic injection-based studies in a wide range of preclinical mouse models.
In conclusion, the observations provide ample evidence supporting the free-hand technique for safe, fast, and precise injections targeting individual thymic lobes. This minimally invasive method, therefore, represents a highly efficient and accurate option for thymus research, facilitating large-scale preclinical investigations in mice with thymuses ranging from large to extremely small.
Declarações
The authors have nothing to disclose.
Acknowledgements
We would like to thank Raymond H. Thornton for his insightful and comprehensive early work on this technique.This study was funded by grant support from the National Cancer Institute (NCI 1R37CA250661-01A1), the Children's Leukemia Research Association, the Hackensack Meridian School of Medicine, and the HUMC Foundation/Tackle Kids Cancer.
Materials
| Aquasonic 100 Ultrasound Gel | Parker Laboratories (Fairfield, NJ, USA) | 01-01 | Sterile Ultrasound Transmission Gel |
| B6;CAG-luc, -GFP mouse | The Jackson Laboratory (Bar Harbor, ME, USA) | 025854 | Bioluminescence cell source |
| BD Insulin Syringes with needle | Becton Dickinson (Franklin Lakes, NJ, USA) | 328431 | Ultra-fine needle – 12.7 mm, 30 G |
| C57BL/6 mouse – aged | The Jackson Laboratory (Bar Harbor, ME, USA) | 000664 | age 6 months old; aged model |
| C57BL/6 mouse – young | The Jackson Laboratory (Bar Harbor, ME, USA) | 000664 | age 4-6 weeks; young model |
| Chloraprep One-step 0.67 mL | CareFusion (El Paso, TX, USA) | 260449 | chlorhexidine gluconate applicator |
| Curity Cotton Tipped Applicator | Cardinal Health (Dublin, OH, USA) | A5000-2 | Sterile, 6" |
| D-Luciferin | Gold Biotechnology (St Louis, MO, USA) | LUCK-1G | |
| Isoflurane | Henry Schein (Melville, NY, USA) | 1182097 | |
| IVIS Lumina X5 | PerkinElmer (Melville, NY, USA) | n/a | In vivo bioluminescence imaging system |
| J:NU mouse | The Jackson Laboratory (Bar Harbor, ME, USA) | 007850 | Athymic nude model |
| Kendall Hypoallergenic Paper Tape | Cardinal Health (Dublin, OH, USA) | 1914C | |
| Kimtech Surgical Nitrile Gloves | Kimberly-Clark Professional (Irving, TX, USA) | 56892 | Sterile Gloves |
| Nair Hair Remover Lotion | Church and Dwight (Trenton, NJ, USA) | n/a | Depilatory agent |
| NOD scid gamma (NSG) mouse | The Jackson Laboratory (Bar Harbor, ME, USA) | 005557 | Immunodeficient model |
| Phosphate-Buffered Saline (PBS), 1x | Corning (Corning, NY, USA) | 21-040-CV | |
| Puralube Vet Ointment | Med Vet International | PH-PURALUBE-VET | Eye ointment |
| Sheathes | Sheathing Technologies (Morgan Hill, CA, USA) | 10040 | Sterile Ultrasound Probe Covers |
| Sure-Seal Induction Chamber | Braintree Scientific (Braintree, MA, USA) | EZ-17 85 | Anesthesia induction chamber |
| Transducer MX550D | FUJIFILM VisualSonics (Toronto, ON, Canada) | n/a | Vevo 3100 imaging probe (25-55 MHz, Centre Transmit: 40 MHz) |
| Trypan Blue, 0.4% solution in PBS | MP Biomedicals (Solon, OH, USA) | 91691049 | |
| Vevo 3100 Imaging System | FUJIFILM VisualSonics (Toronto, ON, Canada) | n/a | Ultrasound imaging system |
| Vevo 3100 Lab Software | FUJIFILM VisualSonics (Toronto, ON, Canada) | n/a | Version 3.2.7 for imaging and analysis |
| Vevo Compact Dual Anesthesia System | FUJIFILM VisualSonics (Toronto, ON, Canada) | n/a | Tabletop isoflurane-based anesthesia unit |
| Vevo Imaging Station | FUJIFILM VisualSonics (Toronto, ON, Canada) | n/a | Procedural platform |
Referências
- Chinn, I. K., Blackburn, C. C., Manley, N. R., Sempowski, G. D. Changes in primary lymphoid organs with aging. Seminars in Immunology. 24 (5), 309-320 (2012).
- Gruver, A. L., Sempowski, G. D. Cytokines, leptin, and stress-induced thymic atrophy. Journal of Leukocyte Biology. 84 (4), 915-923 (2008).
- Masopust, D., Sivula, C. P., Jameson, S. C. Of mice, dirty mice, and men: Using mice to understand human immunology. Journal of Immunology. 199 (2), 383-388 (2017).
- Mukherjee, P., Roy, S., Ghosh, D., Nandi, S. K. Role of animal models in biomedical research: a review. Laboratory Animals Research. 38 (1), 18 (2022).
- McCaughtry, T. M., Hogquist, K. A. Central tolerance: What have we learned from mice. Seminars in Immunopathology. 30 (4), 399-409 (2008).
- Zlotoff, D. A., et al. CCR7 and CCR9 together recruit hematopoietic progenitors to the adult thymus. Blood. 115 (10), 1897-1905 (2010).
- Vukmanovic, S., Grandea, A. G., Faas, S. J., Knowles, B. B., Bevan, M. J. Positive selection of T-lymphocytes induced by intrathymic injection of a thymic epithelial cell line. Nature. 359 (6397), 729-732 (1992).
- Schwarz, B. A., Bhandoola, A. Circulating hematopoietic progenitors with T lineage potential. Nature Immunology. 5 (9), 953-960 (2004).
- Marodon, G., et al. Induction of antigen-specific tolerance by intrathymic injection of lentiviral vectors. Blood. 108 (9), 2972-2978 (2006).
- Adjali, O., et al. In vivo correction of ZAP-70 immunodeficiency by intrathymic gene transfer. Journal of Clinical Investigation. 115 (8), 2287-2295 (2005).
- Tuckett, A. Z., et al. Image-guided intrathymic injection of multipotent stem cells supports life-long T cell immunity and facilitates targeted immunotherapy. Blood. 123 (18), 2797-2805 (2014).
- Tuckett, A. Z., Thornton, R. H., O’Reilly, R. J., vanden Brink, M. R. M., Zakrzewski, J. L. Intrathymic injection of hematopoietic progenitor cells establishes functional T cell development in a mouse model of severe combined immunodeficiency. Journal of Hematology & Oncology. 10 (1), 109 (2017).
- Hogan, B. V., Peter, M. B., Shenoy, H. G., Horgan, K., Hughes, T. A. Surgery induced immunosuppression. Surgeon. 9 (1), 38-43 (2011).
- Blair-Handon, R., Mueller, K., Hoogstraten-Miller, S. An alternative method for intrathymic injections in mice. Laboratory Animals. 39 (8), 248-252 (2010).
- Tuckett, A. Z., Zakrzewski, J. L., Li, D., vanden Brink, M. R., Thornton, R. H. Free-hand ultrasound guidance permits safe and efficient minimally invasive intrathymic injections in both young and aged mice. Ultrasound in Medicine and Biology. 41 (4), 1105-1111 (2015).
- Küker, S., et al. The value of necropsy reports for animal health surveillance. BMC Veterinary Research. 14 (1), 191 (2018).
- Sinclair, C., Bains, I., Yates, A. J., Seddon, B. Asymmetric thymocyte death underlies the CD4:CD8 T-cell ratio in the adaptive immune system. Proceedings of the National Academy of Sciences of the United States of America. 110 (31), 2905-2914 (2013).
- Manna, S., Bhandoola, A. Intrathymic injection. Methods in Molecular Biology. 1323, 203-209 (2016).
- de la Cueva, T., Naranjo, A., de la Cueva, E., Rubio, D. Refinement of intrathymic injection in mice. Laboratory Animals. 36 (5), 27-32 (2007).

