Quantitative Analysis of Vacuum Induction Melting by Laser-induced Breakdown Spectroscopy
概要
During vacuum induction melting, laser-induced breakdown spectroscopy is used to perform real-time quantitative analysis of the main-ingredient elements of a molten alloy.
Abstract
Vacuum induction melting is a popular method for refining high purity metal and alloys. Traditionally, standard process control in metallurgy involves several steps, include drawing samples, cooling, cutting, transport to the laboratory, and analysis. The whole analysis process requires more than 30 minutes, which hinders on-line process control. Laser-induced breakdown spectroscopy is an excellent on-line analysis method that can satisfy the requirements of vacuum induction melting because it is fast and noncontact and does not require sample preparation. The experimental facility uses a lamp-pumped Q-switched laser to ablate melted liquid steel with an output energy of 80 mJ, a frequency of 5 Hz, a FWHM pulse width of 20 ns, and a working wavelength of 1,064 nm. A multi-channel linear charge coupled device (CCD) spectrometer is used to measure the emission spectrum in real time, with a spectral range from 190 to 600 nm and a resolution of 0.06 nm at a wavelength of 200 nm. The protocol includes several steps: standard alloy sample preparation and an ingredient test, smelting of standard samples and determination of the laser breakdown spectrum, and construction of the elements concentration quantitative analysis curve of each element. To realize the concentration analysis of unknown samples, the spectrum of a sample also needs to be measured and disposed with the same process. The composition of all main elements in the melted alloy can be quantitatively analyzed with an internal standard method. The calibration curve shows that the limit of detection of most metal elements ranges from 20-250 ppm. The concentration of elements, such as Ti, Mo, Nb, V, and Cu, can be lower than 100 ppm, and the concentrations of Cr, Al, Co, Fe, Mn, C, and Si range from 100-200 ppm. The R2 of some calibration curves can exceed 0.94.
Introduction
Due to its unique features, such as remote sensing, fast analysis, and no need for sample preparation, laser-induced breakdown spectroscopy (LIBS) offers unique capabilities for on-line concentration determination1,2,3. Although the use of the LIBS technique in different fields has been investigated4,5,6, a considerable attempt to develop its capabilities in industrial applications is ongoing.
Analysis of molten material contents during the course of industrial processes can effectively improve the product quality, which is a promising development direction of LIBS. Experimental findings have been reported about the application of LIBS in the industrial field, such as findings about argon oxygen liquid steel7,8,9,10,11, molten aluminium alloy12, molten salt13, and molten silicon14. The majority of these materials exist in the environment of air or an assistant gas. However, vacuum induction melting (VIM) is another good application field of LIBS to realize processing control. A VIM furnace can realize smelting at temperatures higher than 1,700 °C for alloy refining; it is the most popular method for refining high-purity metal and alloys such as iron-base or nickel-base alloys, high purity alloys, and clean magnetic alloys. During the course of melting, the pressure in a furnace is always in the region of 1-10 Pa, and the composition of air in the furnace mainly includes the air absorbed on the sample or the inner wall of the furnace and some vaporous oxide or nitride metal. These working situations induce quite different LIBS measurement situations for smelting in air. Here, we report an experimental investigation of the analysis of molten alloy during the course of VIM by LIBS.
An optical window is added to a furnace for laser ablation and radiant light detection. A silica glass with a diameter of 80 mm serves as the window. An emitting laser and gathering of radiant light employ the same window; it is a co-axial optical structure that focuses on the same point. The working focal length is approximately 1.8 m, and the focusing length of the experimental setup can be adjusted from 1.5 to 2.5 m.
Based on the practicality of industrial online analysis, precision, repeatability and stability is more important than the low limit of detection (LOD) during molten alloy ingredient analysis. The technical route of a four-channel linear CCD spectrometer is chosen, the spectral range of the spectrometer ranges from 190 to 600 nm, the resolution is 0.06 nm, and the wavelength is 200 nm. A laser diode pumped Q-switched laser (constructed in house) is used to ablate molten alloy, with an output energy of 100 mJ, a frequency of 5 Hz, an FWHM pulse width of 20 ns, and a working wavelength of 1064 nm. The remaining part will present the VIM LIBS-analysing process and live measurement, followed by an introduction of the data processing results.
Protocol
1. Preparation of Standard Samples
NOTE: This step is not essential.
- Prepare raw material (Table 1). To make a 100 kg of sample #1, add 12.82 kg of Cr, 3.39 kg of Mo, 4.79 kg of Al, 1.00 kg of Ti, 0.60 kg of Cu, and approximately 77.4 kg of Ni to the crucible. During the melting process, some elements will be burned. The final ingredient is determined by the melting temperature, melting duration, and other working parameters. The ingredient test shows the quantity of each element inside the alloys.
- Perform vacuum induction melting at approximately 1,700 °C for approximately 45 min for each standard sample. The furnace used to make standard samples can melt approximately 100 kg alloys each time for 2 sets of standard samples.
- Pour all molten liquid steel into a sticky mold to make standard samples, and naturally cool for at least 4 h. The size of the standard samples is determined by the furnace in the experiment. Use rod-shaped standard samples in the experiments with a rod diameter of 100 mm. The shape of the crucible in the furnace is a frustum cone with a cup-like container. The diameter of the rim is 150 mm, the bottom is 100 mm, and the depth is 200 mm. Chunked standard samples can also be employed.
- Use an electric saw to cut standard samples for the experiment. The length of the standard rod sample is determined by the furnace. Use a length of 150 mm for the experimental smelting system. Melt a piece of the samples for each experiment.
- Repeat these steps and make all standard samples. Ten samples are employed in this experiment.
2. Test Ingredient of Standard Alloy Samples
- Use a chemical analysis method to test the composition of all standard alloy samples. Test all elements in each sample.
NOTE: We strongly recommend sending these samples to an authority organization to perform the analysis. These samples are sent to the Central Iron & Steel Research Institute of China for the ingredients test. The test results for these samples are listed in Table 2.
3. Smelt Samples
- Check the security of the smelting system, which includes the power supply, availability of each pump, vacuum hold ability of the experimental furnace, cooling water, and current.
- Place the standard samples into the smelting system. To ensure that a small amount of each sample is ablated by the laser, use small samples for the experiment. Due to the size of the crucible in the furnace, smelt approximately 10 kg samples each time.
- Open the vacuum pump until the pressure is lower than 0.1 Pa. Use 2 levels of pump to make the vacuum: mechanical pump and diffusion pump. The mechanical pump can reach approximately 1 Pa in 15 min, and the diffusion pump can reach 0.01 Pa after 40 min.
- Melt samples. Increase the furnace working current to approximately 130 A; this parameter is determined by the ingredients of the samples and the size of the furnace. A standard sample requires approximately 15 min to become molten. Due to oxidation or nitridation, the ingredients of liquid steel slowly change during the course of smelting.
- To ensure precision of the experiment, determine the spectrum within 15 min after the standard samples are molten.
4. Determine Laser Breakdown Spectra of Standard Samples
- Check availability of laser focusing and spectrum gathering system, laser generator, and spectrometer.
- Set the spectrometer and laser generator to work synchronously. Use a spectrometer output synchronization signal and laser passive working method in the system. The method of laser generator synchronization signal or method of synchronizer output synchronization signal can also be employed to control the laser generator and spectrometer.
- Open the laser generator and spectrometer; prepare to generate the pulse laser. The pulse width is 20 ns, the frequency is 5 Hz, and the energy of each pulse is 90 mJ.
- Use spectrum deposit software to trigger the laser output and gather the spectrum. Set the integration time of the spectrometer to 10 ms, and each laser pulse generates a frame of the spectrum. If the integration time is too short, the spectrum signal intensity will be too weak. If the integration time is too long, more background signals will be gathered.
- Adjust the laser focusing position, and effectively ablate the sample. Optimize the focusing position until the strongest spectrum signal is obtained. This process is used to adjust the focusing point. The spectrometer numerical divided signal intensity ranges from 0 to 65,535. In most cases, the intensity of a signal should exceed 15% of the saturation signal, which indicates that the highest peak intensity should exceed 10,000. If the signal intensity is too small, the quantitative analysis will have low precision.
- Optimize the delay time. Choose the delay after bremsstrahlung, and the strength of the signal need with the optimized delay time should be sufficient.
- Use the spectrometer to gather a spectrum for the analysis. Gather 20 frames of the spectrum, and obtain the average for LIBS analysis.
- Shut off the working current of the furnace and cool the samples. Solidification of the samples requires approximately 15 min.
- Inject nitrogen into the experimental furnace to break the vacuum.
- Open the lid of the experimental furnace and remove the solidification samples.
- Repeat step 3.3 to 4.10 until all samples are measured.
5. Construct Calibration Curve of Quantitative Analysis
- Spectrum pretreatment
- Background correction. Delete the background effect caused by braking radiation. The method of baseline correction is employed in the experiment.
- Spectrum-peak searching. Use a two-order derivative method to identify peaks of each element; local minimum points are weighted.
- Spectrum fitting. Apply a Lorentz spectra overlay to the selected peaks to prevent self-corrosion or overlap. The spectral peak intensity, stretch status, and center wavelength is obtained by a fitting algorithm.
- Import the chemical ingredient analysis results of all standard samples.
- Construct the calibration curve.
- Choose an inner relative standard wavelength. The main element spectral lines are always selected.
- Choose a calibration wavelength. Select from the NIST spectrum database15.
- Fit the curve. Use linear fitting or quadratic fitting.
- Achieve analysis precision. Calculate the fitting factor and relative standard error after fitting. A program is used to automatically select the best relative standard wavelength and calibration wavelength from the wavelength base of NIST15.
6. Elemental Composition Analysis of Molten Alloy
NOTE: The experimental setup has been divided to two parts, namely, the detector head and the control cabinet, as shown in Figure 1. The same laser and spectrometer parameters, moulting, and spectrum gathering process employed in the previous process are utilized to ensure accurate quantitative analysis results.
- Put the unknown sample into the smelting system.
- Vacuum the experimental system.
- Increase the smelting current until the sample is molten. The melting temperature is approximately 1,700 °C, and the melting time is approximately 45 min.
- Open the laser generator and realize the pulse laser output. Use the following laser parameters: pulse width is 20 ns, frequency is 5 Hz, and energy of each pulse is 90 mJ.
- Open the spectrometer and the spectrum deposit software to determine the spectrum. Employ the same spectrometer with a spectral range from 190 to 600 nm and resolution of 0.06 nm at a wavelength of 200 nm. The integration time of the spectrometer is 10 ms. The spectrometer is used to trigger the laser and determine the spectrum.
- Adjust laser focusing position. Optimize focusing position until the strongest spectrum signal is attained; the value of the highest peak should exceed 10,000.
- Determine laser breakdown spectrum. Each laser pulse generates a frame of the spectrum; 20 frames of the spectrum are obtained and averaged for the analysis.
- Spectrum pretreatment. Perform background correction, such as deleting the background effect caused by braking radiation, as mentioned in 5.1.3, to perform spectrum fitting.
- Elemental concentration calculation. Perform analysis elemental concentration by the internal standard method from the calibration curve.
Representative Results
Ten nickel-based alloy samples (#1-#10) are used to construct internal-standard calibration curves. The compositions of all samples are listed in Table 1. The elemental concentrations of these samples are orthogonally designed to avoid signal interference. The concentration of each element in all samples is measured with chemical analysis methods.
Nickel is the internal standard element. The calibration curves of Cu, Ti, Mo, Al, and Cr are constructed. Figure 2 に Figure 6 show the calibration results. In these figures, the X-axis represents the concentration of the calibrated elements, and the Y-axis represents the relative signal intensity ratio of the calibrated element after the disposal process of background correction and peak fitting. The error bar of each point in these figures shows the fluctuation range of the signal strength with twenty frame measurements. The calibration parameters of these elements are listed in Table 3 に Table 7. The linear curve fitting results, including the residual sum of squares, Pearson's r, and the linear fitting coefficient R2, are shown from Figure 2 に Figure 6. The intercept and slope of the coefficient of determination are also shown in these figures. The calibration curves show a near-linear relationship between the concentration of the element and the peak intensity. The spectral lines used for each element were introduced in the legend of these figures. These lines are searched by a method of filtration. All signal peaks are filtered by the signal intensity, the central of wavelength, and the Lorenz fitting effect. These selected peaks are chosen by a permutation-combination analysis of the fitting factor R2.
According to the standard of International Union of Pure and Applied Chemistry (IUPAC), 3σ limit of detection (LOD) of Cu, Ti, Mo, Al and Cr are calculated and listed in Table 8. Other elements, such as Si, C, and Nb, are analyzed. The RSD ranges from 4-6%, and the R2 exceeds 0.93. The precision can be improved if a better relative standard is employed.
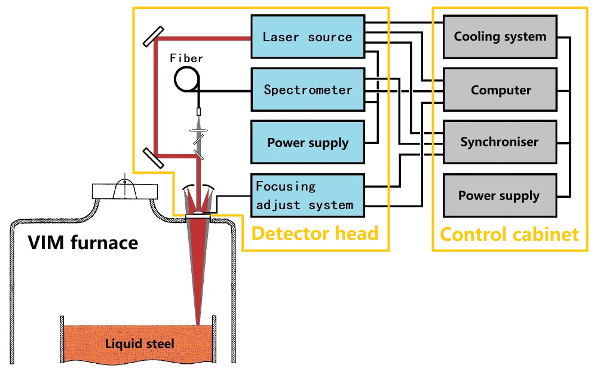
Figure 1: Experimental setup of quantitative analysis in the process of vacuum induction melting by laser-induced breakdown spectroscopy. Please click here to view a larger version of this figure.
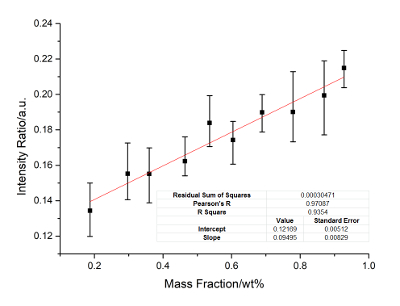
Figure 2: Calibration curves of Cu. Internal standard lines include Cu: 224.70 nm, Ni: 241.61 nm and 233.75 nm. Please click here to view a larger version of this figure.
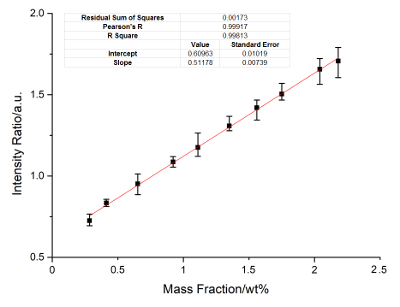
Figure 3: Calibration curves of Ti. Internal standard lines include Ti: 444.38 nm and 337.22 nm, Ni: 445.90 nm and 313.41 nm. Please click here to view a larger version of this figure.
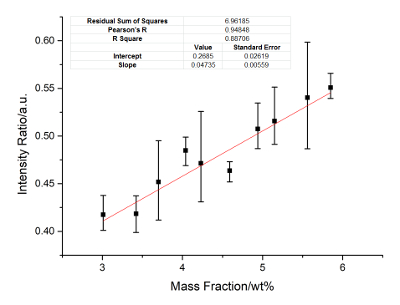
Figure 4: Calibration curves of Mo. Internal standard lines include Mo: 342.23 nm, 346.02 nm, and 277.44 nm, Ni: 440.16 nm and 336.68 nm. Please click here to view a larger version of this figure.
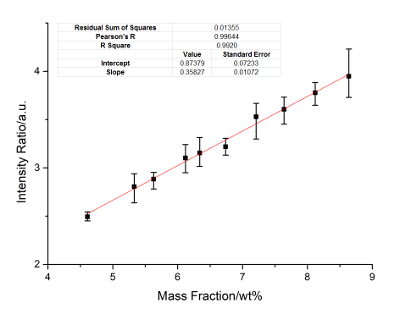
Figure 5: Calibration curves of Al. Internal standard lines include Al: 272.31 nm, 231.22 nm, and 334.85 nm, Ni: 221.65 nm, 332.23 nm, and 440.16 nm. Please click here to view a larger version of this figure.
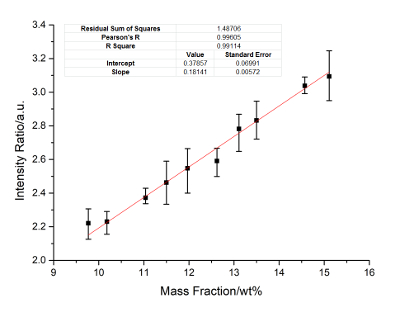
Figure 6: Calibration curves of Cr. Internal standard lines include Cr: 286.51 nm, 302.67 nm and 342.12 nm, Ni: 224.27 nm, 233.75 nm, and 350.08 nm. Please click here to view a larger version of this figure.
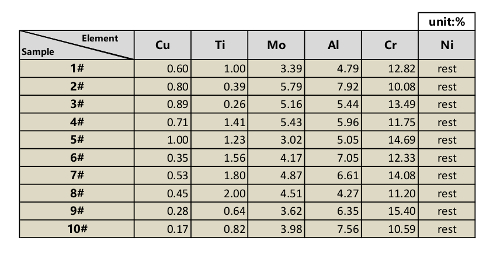
Table 1: Raw material ingredients in the experiment.
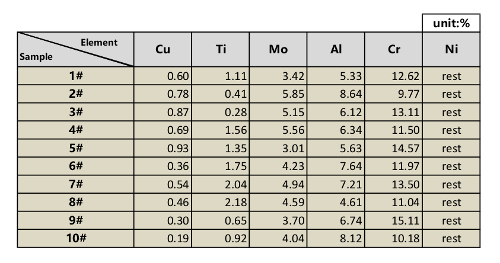
Table 2: Standard nickel-based alloy samples ingredient measured results.

Table 3: Calibration data of Cu.
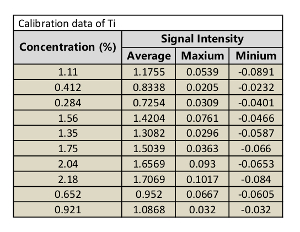
Table 4: Calibration data of Ti.
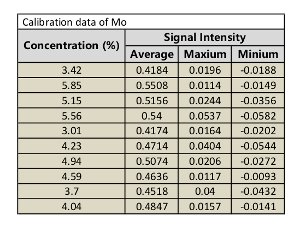
Table 5: Calibration data of Mo.
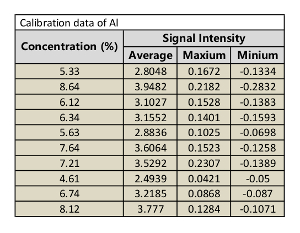
Table 6: Calibration data of Al.
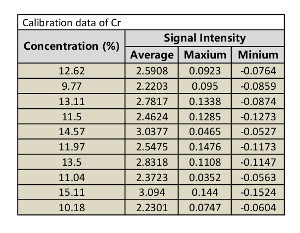
Table 7: Calibration data of Cr.

Table 8: Limit of detection of Cu, Ti, Mo, Al, and Cr.
Discussion
For elemental analysis, popular methods are X-ray fluorescence (XRF), spark discharge optical emission spectrometry (SD-OES), atomic absorption spectroscopy (AAS), and inductive couple plasma (ICP). These methods are mainly suited for a laboratory and industrial online application for molten alloys, which is determined by the characters of these technologies, is difficult. XRF uses X-rays to shock samples, and SD-OES makes sparks on the samples. The working distance of these two methods are always in the range of several centimetres. AAS and ICP yields liquid or powder samples, which requires several tens of minutes for preparation. These methods are not suitable for high-temperature samples or measurements from a distance of several metres. Compared with these analysis methods, LIBS has the advantages of long-distance analysis, fast analysis, and the need to prepare samples. LIBS is the only good method for realizing melting alloys ingredient online analysis.
The protocol includes three critical steps: using a laser to burn the molten alloy, using a spectrometer to determine the spectrum of the plasma, and quantitatively analyzing the elemental composition with the calibration curve. Preparation of the samples with gradient components and construction of the calibration curve to demonstrate the relation between the laser breakdown spectrum intensity and the elemental content are preparative steps.
Use of the LIBS to analyze the elemental composition of molten alloy has some limitations. The precision of the quantitative analysis is the most important problem. The precision of LIBS is expected to improve by an order of magnitude. The gas pressure, surface status of the samples, and focusing precision have a distinct influence on the precision; however, compensation of these errors is difficult1,2,6.
Use of the LIBS system for on-line analysis of elemental composition during vacuum melting is proven by experiments. The experimental results have shown that the plasma spectrum can be determined in a typical industrial vacuum melting furnace situation. The calibration results show that the major components of molten alloys can be quantitatively analysed.
開示
The authors have nothing to disclose.
Acknowledgements
This study was financially supported by the National Key Scientific Instrument and Equipment Development Projects (Grant No. 2014YQ120351), the Youth Innovation Promotion Association of CAS (Grant No. 2014136), and the China Innovative Talent Promotion Plans for Innovation Team in Priority Fields (Grant No. 2014RA4051).
Materials
| Laser source | Gklaser Co.,Ltd. | ||
| Molten alloy to be measured | |||
| Smelting furnace | Tianyu Co.,Ltd. | ||
| Spectrometer | Avantes | ||
| standard samples | Well known of its composition |
参考文献
- Radziemski, L., Cremers, D. A brief history of laser-induced breakdown spectroscopy: From the concept of atoms to LIBS 2012. Spectrochimica Acta Part B: Atomic Spectroscopy. 87, 3-10 (2013).
- El Haddad, J., Canioni, L., Bousquet, B. Good practices in LIBS analysis: Review and advices. Spectrochimica Acta Part B: Atomic Spectroscopy. 101, 171-182 (2014).
- Mueller, M., Gornushkin, I. B., Florek, S., Mory, D., Panne, U. Approach to Detection in Laser-Induced Breakdown Spectroscopy. Analytical Chemistry. 79 (12), 4419-4426 (2007).
- Noll, R., Fricke-Begemann, C., Brunk, M., Connemann, S., Meinhardt, C., Schsrun, M., Sturm, V., Makowe, J., Gehlen, C. Laser-induced breakdown spectroscopy expands into industrial applications. Spectrochimica Acta Part B: Atomic Spectroscopy. 93, 41-51 (2014).
- Leon, R., David, C. A brief history of laser-induced breakdown spectroscopy: From the concept of atoms to LIBS 2012. Spectrochimica Acta Part B: Atomic Spectroscopy. 87, 3-10 (2013).
- El Haddad, J., Canioni, L., Bousquet, B. Good practices in LIBS analysis: Review and advices. Spectrochimica Acta Part B: Atomic Spectroscopy. 101, 171-182 (2014).
- Gonzaga, B. F., Pasquini, C. A compact and low cost laser induced breakdown spectroscopic system: Application for simultaneous determination of chromium and nickel in steel using multivariate calibration. Spectrochimica Acta Part B: Atomic Spectroscopy. 69, 20-24 (2012).
- Peter, L., Sturm, V., Noll, R. Liquid steel analysis with laser-induced breakdown spectrometry in the vacuum ultraviolet. Applied Optics. 42 (30), 6199-6204 (2003).
- Hubmer, G., Kitzberger, R., Mörwald, K. Application of LIBS to the in-line process control of liquid high-alloy steel under pressure. Analytical and Bioanalytical Chemistry. 385 (2), 219-224 (2006).
- Sun, L. X., Yu, H. B. Automatic estimation of varying continuum background emission in laser-induced breakdown spectroscopy. Spectrochimica Acta Part B: Atomic Spectroscopy. 64, 278-287 (2009).
- Lin, X. M., Chang, P. H., Chen, G. H., Lin, J. J., Liu, R. X., Yang, H. Effect of melting iron-based alloy temperature on carbon content observed in laser-induced breakdown spectroscopy. Plasma Science & Technology. 17 (11), 933-937 (2015).
- Rai, A. K., Yueh, F. Y., Singh, J. P. Laser-induced breakdown spectroscopy of molten aluminum alloy. Applied Optics. 42 (12), 2078-2084 (2003).
- Hanson, C., Phongikaroon, S., Scott, J. R. Temperature effect on laser-induced breakdown spectroscopy spectra of molten and solid salts. Spectrochimica Acta Part B: Atomic Spectroscopy. 97, 79-85 (2014).
- Darwiche, S., Benrabbah, R., Benmansour, M., Morvan, D. Impurity detection in solid and molten silicon by laser induced breakdown spectroscopy. Spectrochimica Acta Part B: Atomic Spectroscopy. 74, 115-118 (2012).
- Linstrom, P. J., Mallard, W. G. NIST Chemistry WebBook, NIST Standard Reference Database Number 69. National Institute of Standards and Technology. , 20899 (2018).

