A Method for Obtaining Serial Ultrathin Sections of Microorganisms in Transmission Electron Microscopy
概要
This study presents reliable and easy procedures for obtaining serial ultrathin sections of a microorganism without expensive equipment in transmission electron microscopy.
Abstract
Observing cells and cell components in three dimensions at high magnification in transmission electron microscopy requires preparing serial ultrathin sections of the specimen. Although preparing serial ultrathin sections is considered to be very difficult, it is rather easy if the proper method is used. In this paper, we show a step-by-step procedure for safely obtaining serial ultrathin sections of microorganisms. The key points of this method are: 1) to use the large part of the specimen and adjust the specimen surface and knife edge so that they are parallel to each other; 2) to cut serial sections in groups and avoid difficulty in separating sections using a pair of hair strands when retrieving a group of serial sections onto the slit grids; 3) to use a ‘Section-holding loop’ and avoid mixing up the order of the section groups; 4) to use a ‘Water-surface-raising loop’ and make sure the sections are positioned on the apex of the water and that they touch the grid first, in order to place them in the desired position on the grids; 5) to use the support film on an aluminum rack and make it easier to recover the sections on the grids and to avoid wrinkling of the support film; and 6) to use a staining tube and avoid accidentally breaking the support films with tweezers. This new method enables obtaining serial ultrathin sections without difficulty. The method makes it possible to analyze cell structures of microorganisms at high resolution in 3D, which cannot be achieved by using the automatic tape-collecting ultramicrotome method and serial block-face or focused ion beam scanning electron microscopy.
Introduction
Proper serial ultrathin sectioning technique is indispensable to study cells and cell components three-dimensionally at the electron microscopic level. We have studied the dynamics of spindle pole body in the cell cycle of yeast cells, and revealed morphological changes of their ultrastructure during the cell cycle and the time of duplication1,2,3,4,5. In 2006, we coined a new word 'structome' by combining 'structure' and '-ome', and defined it as the 'quantitative and three-dimensional structural information of a whole cell at the electron microscopic level' 6, 7.
By structome analysis, which requires serial ultrathin sectioning technique, it was found that a yeast cell of Saccharomyces cerevisiae and Exophiala dermatitidis had about 200,000 ribosomes7, 8, an Escherichia coli cell had 26,000 ribosomes9, a Mycobacterium tuberculosis cell had 1,700 ribosomes10 and Myojin spiral bacteria had only 300 ribosomes11. This information is useful in not only estimating the growth rate in each organism, but also in identification of species9.
Further, structome analysis led to the discovery of a new organism; Parakaryon myojinensis was found in the deep sea off the coast of Japan, whose cell structure were an intermediate between those of prokaryotes and eukaryotes12,13,14,15. At present, serial ultrathin sectioning technique is considered to be so difficult that it would take a long time to master. In this study, we have developed a reliable method in which anybody can perform serial ultrathin sectioning without difficulty.
Protocol
NOTE: The specimens used in this study were microorganisms, rapidly frozen with propane in liquid nitrogen, freeze substituted in acetone containing 2% osmium tetroxide, and embedded in epoxy resin1,2,3,4,5,6,7,8,9,10,11,12,13,14,15,16,17,18.
1. Preparation of support film (Figure 1-3)
NOTE: Silver-colored Formvar support film is prepared using the cast-on-glass method19.
- Add 100 mL of 1.5% Formvar in ethylene dichloride to a Formvar-making apparatus (Figure 1). Dip one-half of a glass slide (76 mm x 26 mm x 1.3 mm) in Formvar solution in the upper column of the apparatus by pressing the solution with air through 'a' using a rubber ball19.
- Drain the solution from the column by opening the three-way stopcock and releasing air through 'b' to reduce pressure. Take out the glass slide from the apparatus and dry in air to form a film on the surface of the glass slide. Use an incandescent lamp to accelerate drying of the Formvar film.
- After scraping off the four edges of the film on the glass slide with a razor blade (Figure 2a), and breathing onto the slide to facilitate the separation of the film from the slide20, float off the film on water by immersing the glass slide into the water slowly at a low horizontal angle (about 10°, Figure 2b).
- Scoop up the Formvar film from the water using an aluminum rack (30 mm x 25 mm x 3 mm) with holes (4 mm in diameter) (Figure 3a). Keep the rack with the Formvar film in a desiccator until use (Figure 3b).
2. Trimming the specimen block with an ultrasonic trimming blade and a razor blade 21 under a stereomicroscope (Figure 4)
- Make sure that there are cells on the surface of the block by observing the tip of the block with a light microscope (Figure 4a).
- Mount the specimen block in the chuck (block holder), and mount the chuck on a trimming stage21 (Figure 4b). This trimming stage has an illumination mechanism from the back of the specimen.
- Trim the block to a size of 0.7 mm x 1.0 mm (Figures 4c, 5d). Since the epoxy resin is very hard, trim the blocks first using an ultrasonic trimming blade. The ultrasonic trimming blade is a newly introduced machine, and the blocks are easily trimmed. Then trim the block further with a razor blade. Cut one shoulder to mark the direction of cutting (see Figure 5d, Figure 8).
3. Trimming the specimen block with diamond knife using the microtome (Figure 5)
- Set the specimen block chuck in the specimen holder of the ultramicrotome. Place the specimen 90° counterclockwise against the actual position when serial ultrathin sectioning is performed (See Figure 5d).
- Cut the surface of the block with a diamond trimming knife (See Figure 5d). Set the diamond knife edge parallel to the specimen block face, and cut the minimum amount of specimen surface so as not to lose any specimen (Figure 5d).
NOTE: This step is done to smoothen the specimen surface. The part of specimen surface of the slim part is left intact (therefore this part is not shining like a mirror, Figure 5d), so as not to lose any part of the specimen for serial sectioning. This is because the specimen is exposed on the surface of the block. - Place a mirror (Mesa cut, M) on the knife stage to monitor the cutting of the specimen block (Figure 5c).
- Cut the left edge (this becomes the upper side, Figure 5d, of the sample in serial sectioning) of the block using trimming knife by rotating the knife stage 30° to the left (Figure 5a).
- Cut the block face at about 100 µm from the left edge of the specimen (this becomes the lower side of the specimen in serial sectioning, Figure 5d) by rotating the knife stage 30° to the right (Figure 5b).
NOTE: The serial sections will be cut from the slim part of the specimen of about 90 nm x about 1 mm in size. The large part will be used to adjust the specimen surface and the knife edge such that they are parallel. After adjusting the specimen surface to be parallel to the knife edge, the large part will be removed with a razor blade. By cutting the upper and lower sides of the specimen using the microtome, both sides of the specimen become smooth and exactly parallel to each other (Figure 5d), which is necessary to get straight and unbroken ribbon sections.
4. Adjusting the specimen surface and knife edge so that they face parallel to each other 21
- Remove the trimming knife, and rotate the specimen block 90° clockwise.
- Set an ultrathin sectioning knife to the knife stage.
- Adjust the specimen surface and the knife edge so that they face parallel to each other using the large part of the specimen surface.
NOTE: The large part of the specimen is used for adjustment because the cutting face of serial sectioning is so small, making it difficult to adjust specimen surface and knife edge using this part only, especially in vertical direction. Thus, using the large part of the specimen makes adjustment easy.
5. Spreading neoprene solution on the specimen block (Figure 6)
- To place the specimen chuck at exactly the same position as the original position, apply tape on the chuck and the chuck holder of the microtome and cut at the boundary (Figure 6a).
- Take the specimen chuck out from the microtome, and place it under the stereomicroscope (Figure 6b). Cut off the large part of the specimen with a razor blade, leaving the slim part, from which serial sections will be obtained.
- Using a Pasteur pipette, drop about 1 µL 0.5% neoprene solution (Figure 6b) onto the specimen to be used for serial sectioning, to make the section sides adhesive.Cover the whole specimen with neoprene solution. Absorb excess neoprene solution immediately with a piece of filter paper placed near the specimen. Getting a ribbon of sections is essential for taking pictures of serial cell sections, and neoprene glue is very useful for sticking the sections together.
- Prepare 3-slit grids (Sizes of slits: middle, 0.4 mm x 2.2 mm, both sides 0.2 mm x 2.2 mm) (Figure 6c) for picking up serial sections by bending the handle of the grids to 60°, treating the grids with 0.5% neoprene solution, and making the grids hydrophilic by glow discharge22.
6. Making serial sections (Figure 7-9)
- Place the specimen block chuck back in the microtome at the same position as 5.1 (Figure 6a) by aligning the taped parts. This keeps the block face and the knife edge perfectly parallel to each other. Then bring the knife close to the specimen.
- Fill the knife boat with water.
- Cover the microtome with a plastic cover to prevent airflow (Figure 7).
NOTE: Airflow during ultrathin sectioning and retrieval of sections often cause problems. The plastic cover has three holes: one hole is for the binocular lenses, and the other two holes are for the arms to allow operation while the cover is on. The wooden armrest is used for placing arms while doing delicate work, such as retrieving serial sections with grids. The wooden armrest is placed on different tables from the microtome table (Figure 7, arrows), so as not to transmit the vibration of the operator's hands to the microtome. - Start cutting the specimen at 200 nm section thickness (Figure 8). Setting at 200 nm thickness will save time in bringing the knife to the surface of the specimen.
- After the first section is cut, set the section thickness to 70 nm (Figure 8).
- When the number of serial sections reaches 20 (precisely speaking, after the ribbon reaches about 1.8 mm; the number of sections varies depending on the width of sections), set the section thickness to 10 nm (Figure 8) while continuing to cut.
NOTE: Since the microtome cannot cut 10 nm-thick sections, no new section appears, and the previously cut sections become separated from the knife edge. It is important to get separated section groups (Figure 9) for picking up serial sections to avoid difficulty in separating sections manually using a pair of hair strands. Since the field of view in the transmission electron microscope is 2.0 mm, sections should be 1.8 mm long at most. - Set the section thickness to 60 nm (Figure 8). This will produce 70 nm sections (Figure 8) because the machine will add the previous 10 nm thickness.
- Set the section thickness back to 70 nm (Figure 8) and continue cutting until 1.8-mm-long sections are obtained.
- Repeat 6.6-6.8 until five 1.8 mm long sections are obtained (Figure 9). We usually make five section groups since there are five specimen holders in the transmission electron microscope available in our lab, but five is not the limit.
7. Picking up serial sections (Figure 10-12)
- Place the 'Section-holding loop'23 (Inner diameter of the loop: 5.0 mm) (Figure 10a) on the third section group (Figure 10b).
NOTE: It is necessary to retrieve the sections in the order of their sectioning to take pictures in the proper order. However, since there are five section groups on the knife boat, it often gets confusing which groups are which. By placing the loop on the third group, it becomes clear that the two groups near to the operator are the first and second, and the distant two from the operator are the fourth and fifth groups (Figure 10b). This will prevent mixing up the order. - Place 'Water-surface-raising loop'23 (WSRL, inner diameter of the loop: 4.0 mm) (Figure 11a) on the knife stage (Figure 11b). The WSRL will stand firmly on the knife stage because it is equipped with a magnet in the bottom.
- Place the loop of the WSRL just above the serial sections by moving its shaft and handle. Lower the loop of the WSRL onto the water surface so that the loop encircles the sections.
- Push the loop down by turning the screw downwards so that the water surface will raise by surface tension (Figures 11c-d). Move the section to the center of the loop, position it on the apex of the water, and adjust the direction of the section by using a hair strand21.
- Pick up section groups by touching it with a bare slit-grid, which is held by tweezers and kept parallel to the water surface (Figure 11d). It is important for sections to touch the grid first, not the water, to place sections precisely on the center of the grid (Figure 11d).
- Place the grids with sections along with a tiny drop of water on the Formvar support film16 (Figure 12), and remove excess water using filter paper.
NOTE: Wrinkling of the support film is often a problem when sections are picked up using a grid with support film because membrane (sections) touches membrane (support film) directly. The problem of getting wrinkles on the support film is significantly reduced by placing a section-bearing grid along with a tiny drop of water on the Formvar support film16.
8. Staining sections16, 24 (Figure 13)
- After the sections are completely dried, tear the Formvar film from around the grids, and remove the grids bearing the sections.
- Set the grids in the groove of the staining tube16 in the proper order (Figure 13), and stain sections with uranyl acetate and lead citrate24.
NOTE: There is a groove 0.6 mm deep along the long axis of the tube cut with a razor blade. The tube is useful for preventing accidental breakage of support films when using tweezers, since direct handling of grids is not necessary during the staining and washing process16.
9. Observation of serial sections (Figure 14)
- Set the 5 grids in the multi-specimen holder in the proper order (Figure 14a), orienting the long axis of the grid slit perpendicular to the specimen holder axis. The handles (arrowheads) of the grids do not have to be cut, because the 'grid-fixers' will not touch the handles.
- Fix the grids with 'grid-fixers' (Figure 14b) and insert the specimen holder into the transmission electron microscope.
NOTE: It is often useful to take low magnification images of all cell sections (Figure 15) to find interesting microorganisms or cells in good condition with no contamination and with good fixation, before taking pictures of the target cell. - Take pictures of the target cells in all the cell sections at high magnification.
Representative Results
In this protocol, three-slit grids were used for picking up serial sections. The grids are made of nickel or copper. The serial sections are placed on the middle slit. The slits on both sides are necessary to view the sections when picking them up with the grid. To keep the grids parallel with the serial sections when picking them up with tweezers (Figure 11d), the handle is bent (Figure 6c, right). A small handle is advantageous to prevent bending of the main part of the grid, which causes serious problems in picking up sections, and to prevent dropping the sections during staining. This grid has advantages over the conventional 2.0 mm x 1.0 mm single-hole grid. Namely, sections are supported directly by two metal bars 0.4 mm apart (narrower than 1.0 mm) and by the Formvar support film in a three-slit grid, while sections are supported only by the support film in a conventional single-hole grid. Specimen drift can therefore be prevented in photographing at high magnification using a three-slit grid.
Figure 15 shows a low magnification view of five grids that carry serial sections. Since each section sticks together, it is easy to find the same cell in the next section even at higher magnification. Figure 16 and 17 are examples of serial images of cell sections. Because sections are securely supported on 3-slit grids, photos at high magnification (x 50,000) are easily taken without specimen drift. Fibers of DNA 2 nm in diameter were photographed in these studies9, 12.
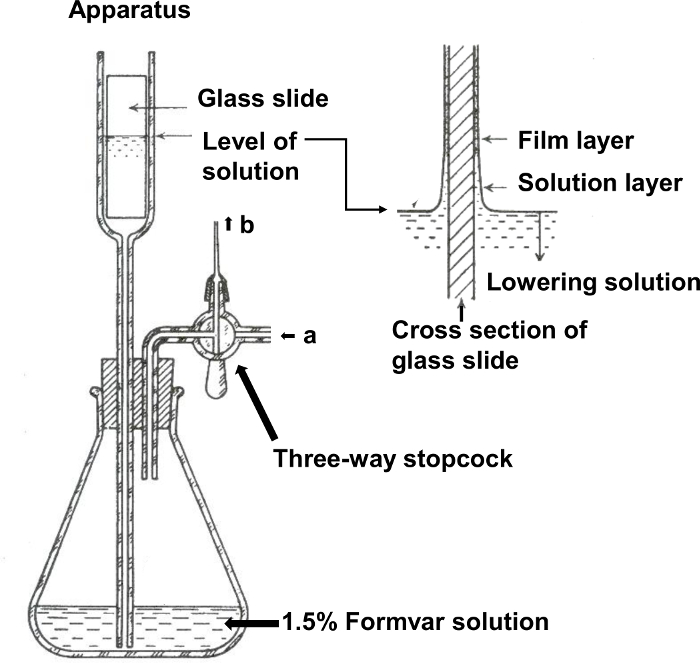
Figure 1. Formvar support film-making apparatus. One-half of the glass slide is dipped in Formvar solution in the upper column of the apparatus by pressing the solution with air through 'a' using a rubber ball. The solution is drained from the column by opening the three-way stopcock and releasing air through 'b' to reduce pressure. (Reproduced from Yamaguchi and Adachi, 201119 with permission). Please click here to view a larger version of this figure.
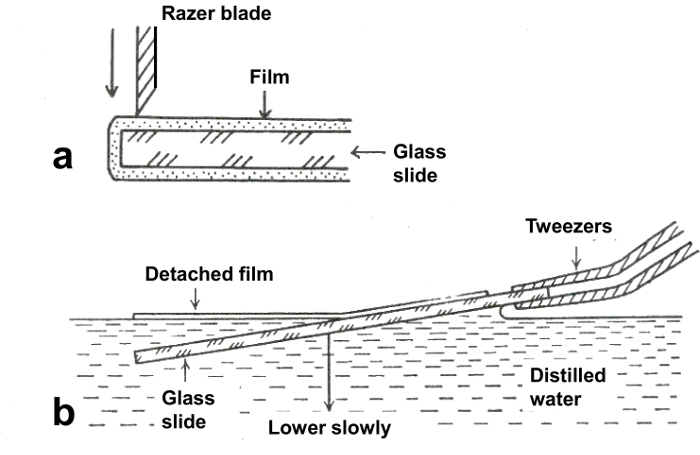
Figure 2. Method for releasing the film from the glass slide on water. (a) The four edges of the film on the glass slide are scraped off using razor blade. (b) Formvar film is floated off on the water by lowering the glass slide slowly at a low angle. (Reproduced from Yamaguchi and Adachi, 201119 with permission). Please click here to view a larger version of this figure.
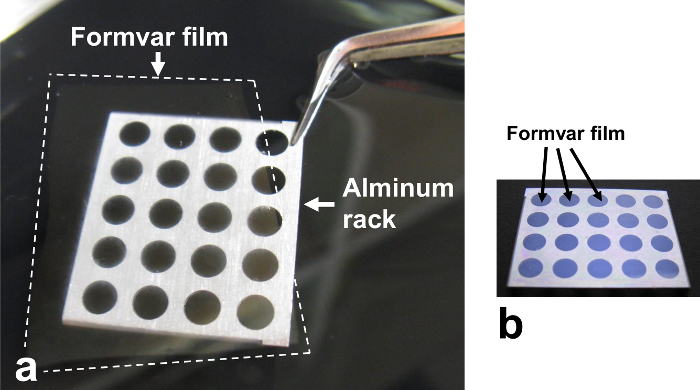
Figure 3. Formvar support film on an aluminum rack. (a) The Formvar film is scooped up from the water with an aluminum rack. (b) The rack is kept in the desiccator until use. Please click here to view a larger version of this figure.
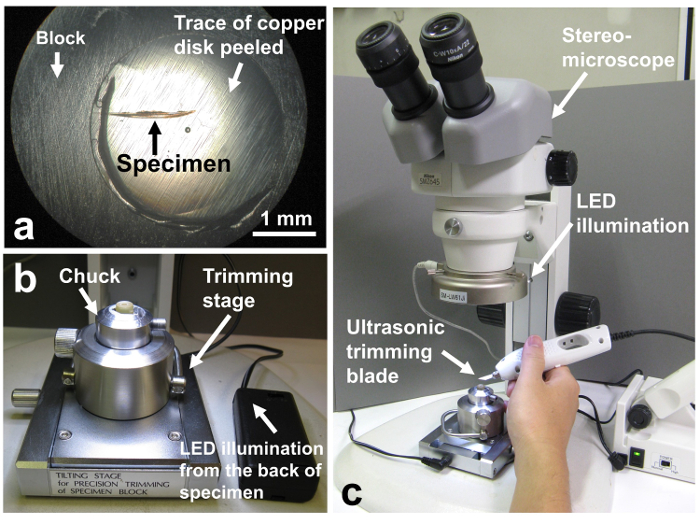
Figure 4. Trimming of the specimen block with an ultrasonic trimming blade and a razor blade under a stereomicroscope. (a) The presence of the specimen is confirmed by observing the specimen block under a light microscope. The block shown in the figure contained microorganisms associated with a scale-worm chaeta (about 1.7 mm in length) collected from the deep sea12, 14. (b) Trimming stage. (c) Whole image of a stereomicroscope. Please click here to view a larger version of this figure.
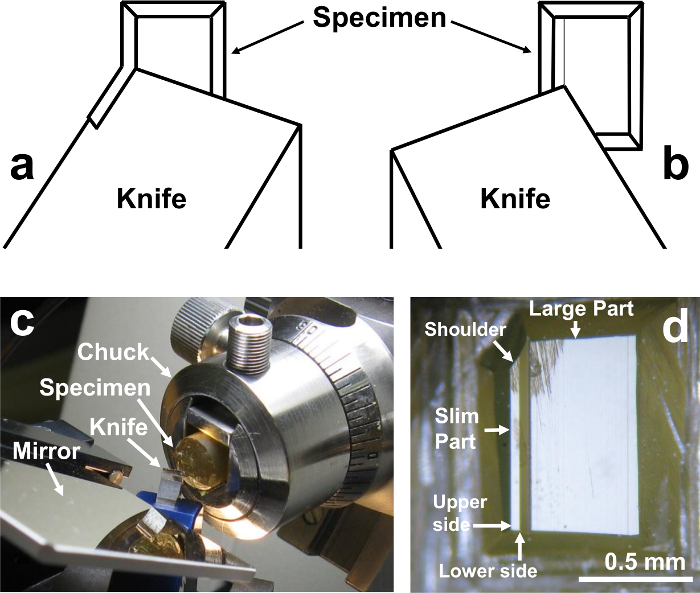
Figure 5. Trimming of the specimen block with diamond knife using microtome. (a) Illustration for cutting the left edge. (b) The block face is cut at a position of about 100 nm from the left edge of the specimen. (c) A mirror (Mesa cut, M) placed on the knife stage. (d) Specimen surface. Note that the upper side and the lower side of the slim part are smooth and perfectly parallel. Also note that the shoulder is cut to mark the direction of cutting (see Figure 8). Please click here to view a larger version of this figure.
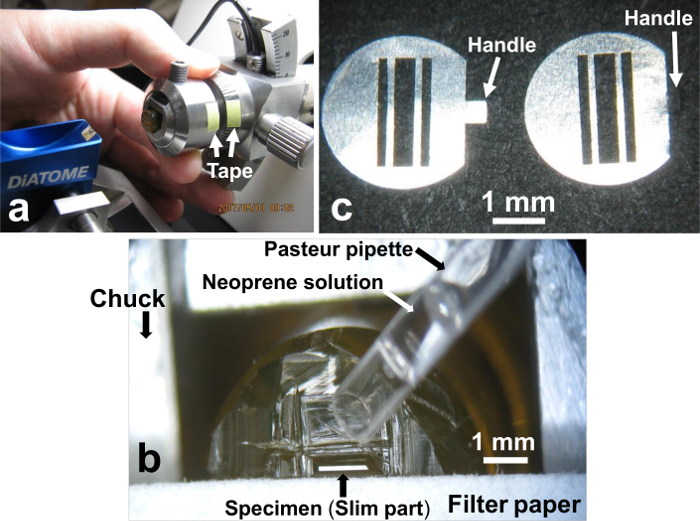
Figure 6. Neoprene treatment on the specimen surface. (a) In order to place the specimen chuck back at exactly the original position, the chuck and the chuck holder of the microtome are marked with a tape and cut at the boundary. (b) Wetting the specimen with neoprene solution using Pasteur pipette. (c) Three-slit grids for picking up serial sections. The handle is bent to 60 degrees (c, right). Please click here to view a larger version of this figure.
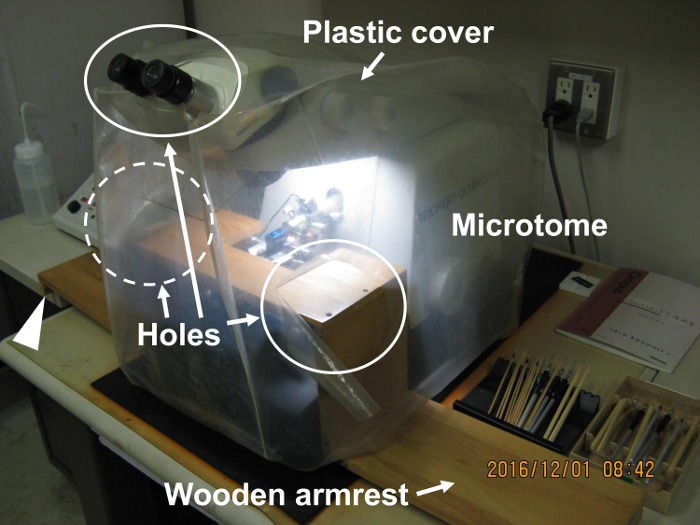
Figure 7. Plastic cover of the microtome and wooden armrest. The plastic cover is useful to prevent airflow during ultrathin sectioning. The wooden armrest is used for doing delicate work such as retrieving serial sections. Please click here to view a larger version of this figure.
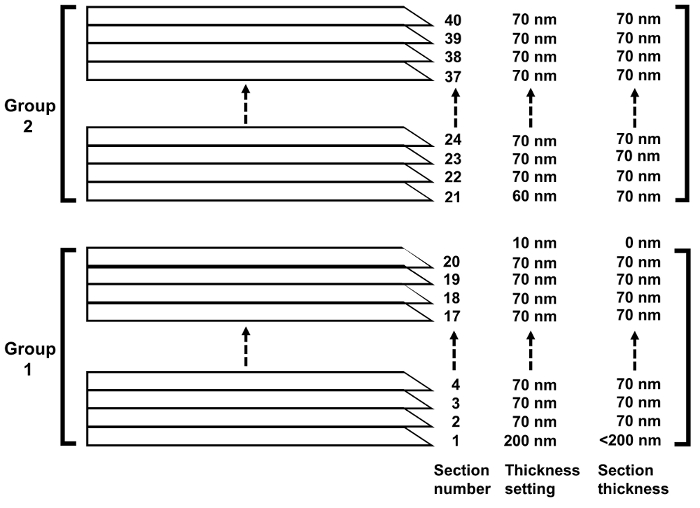
Figure 8. Setting section thickness and obtaining sections at the proper thickness. After the number of serial sections has reached 20, section thickness is set to 10 nm. Since the microtome cannot cut 10 nm-thick sections, no new section appears, and the previously cut sections become separated from the knife edge. Please click here to view a larger version of this figure.
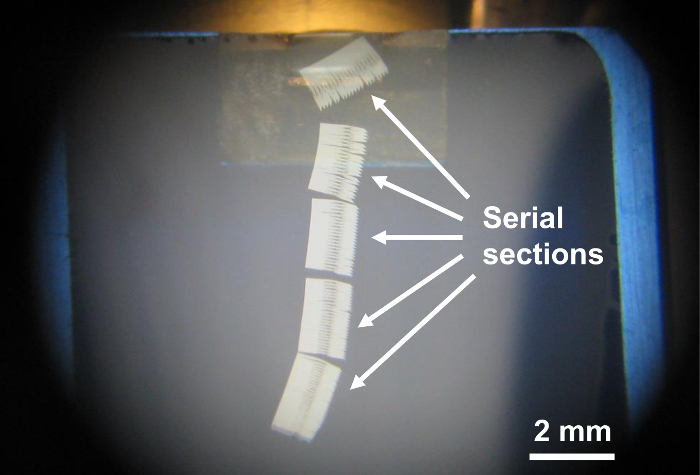
Figure 9. Example of ultrathin sections obtained through the protocol. Note that the five groups of serial sections of about 1.8 mm long are already separated after cutting. In this particular case, the color of the center of the ultrathin sections is yellowish due to the presence of the specimen. The other parts of the section, which do not contain the specimen and consist of resin only, are silver in color. Please click here to view a larger version of this figure.
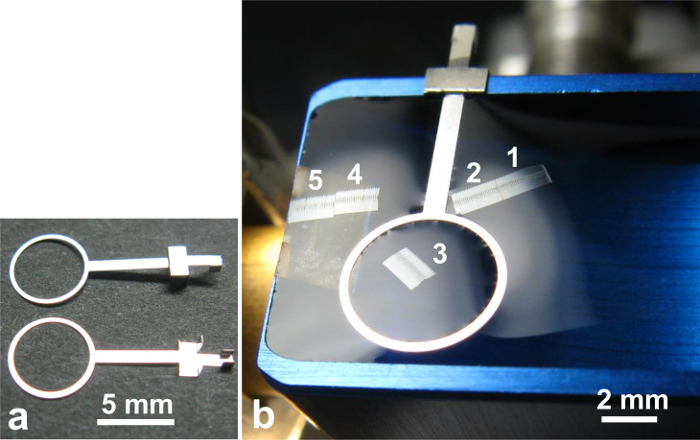
Figure 10. 'Section-holding loop'. (a) Top view (upper part) and bottom view (lower part of photo) of the loop. (b) The Section-holding loop is used to hold the third group of serial sections. Please click here to view a larger version of this figure.
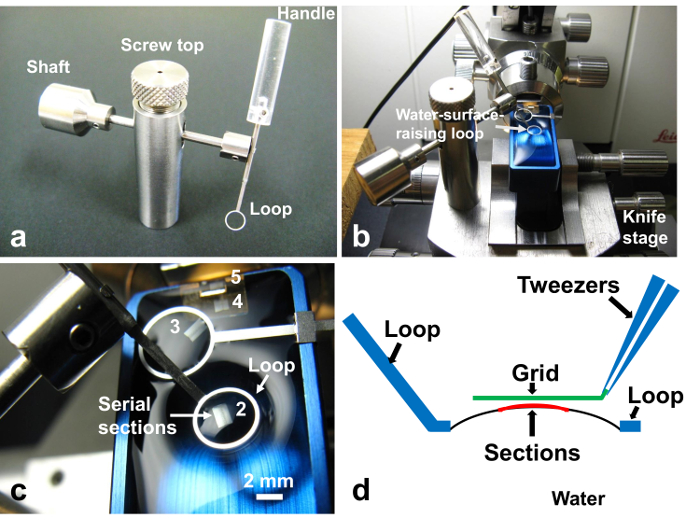
Figure 11. Retrieval of serial sections. (a) 'Water-surface-raising loop' (WSRL). The handle of the loop can be removed from the shaft, which is movable. The loop can also be moved up and down by turning the screw top. (b) The WSRL is fixed on the knife stage by a magnet. (c) Closer view of (b). (d) Diagram of the loop, water surface, sections, and grid during retrieval (side view). Ultrathin sections can be retrieved precisely to the slit grid by lowering the bare grid parallel to the ultrathin sections. Please click here to view a larger version of this figure.
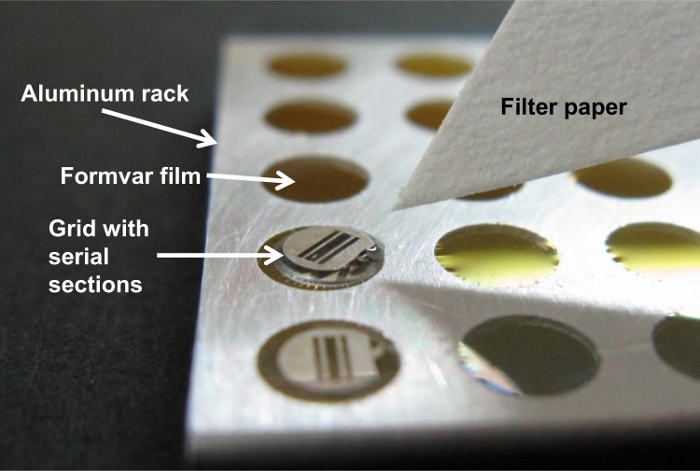
Figure 12. Placing the grid on Formvar film. The grid holding the sections is placed along with a tiny drop of water on the Formvar film on aluminum rack. Please click here to view a larger version of this figure.

Figure 13. Staining tube16. A groove 0.6 mm deep is made along the long axis using a razor blade. Grids are placed in the groove in the proper order. One end of the tube is cut (arrow head) to mark its direction. Please click here to view a larger version of this figure.
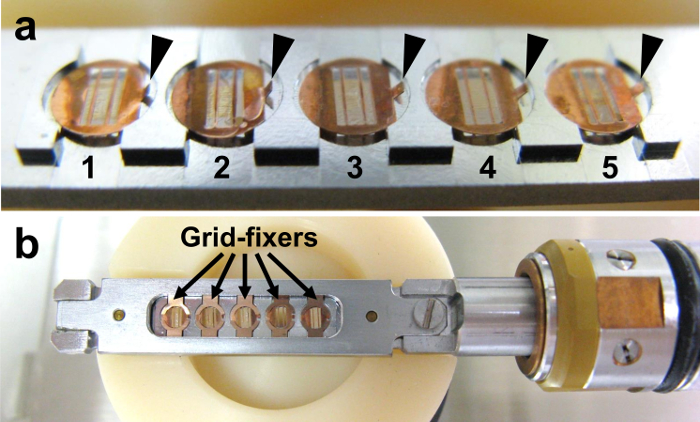
Figure 14. Placing the grids in the specimen holder. (a) The grids are placed in the specimen holder in the proper order. (b) The grids are then fixed with 'grid-fixers'. Please click here to view a larger version of this figure.
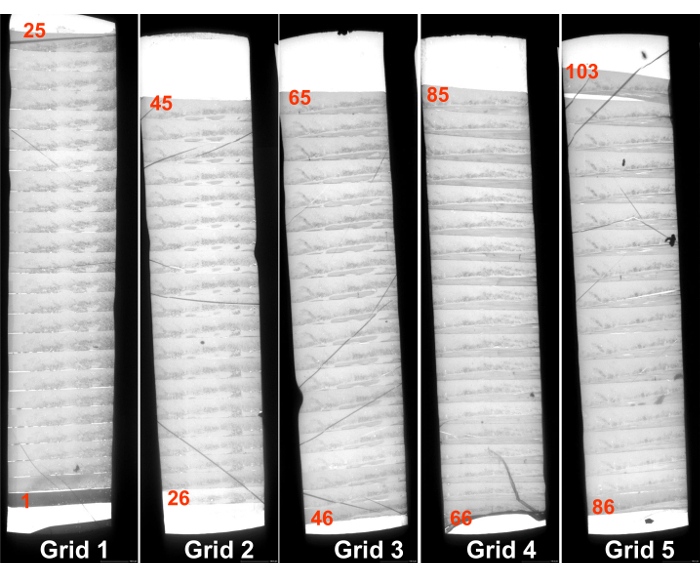
Figure 15. Serial sections mounted on slit grids. The figure shows 18 to 25 sections mounted on one grid. The numbers in each slit indicate the sequence number beginning from the first section. The first section is thicker than the others (see Figure 8). Note that the sections are attached together and have the same thickness. Please click here to view a larger version of this figure.
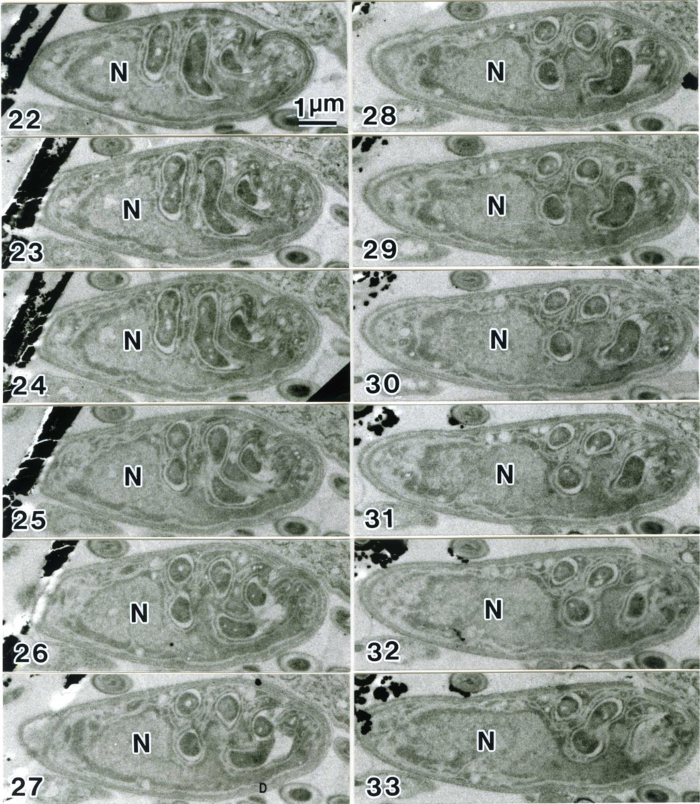
Figure 16. Serial sections of Parakaryon myojinensis12. The numbers at the lower left indicate the sequence relative to the first section. The figure shows 12 out of 67 complete sections. This cell was found to have a large nucleoid consisting of naked DNA fibers, with a single nucleoid membrane, and endosymbionts that resemble bacteria, but no mitochondria. Thus, this organism appears to be an intermediate life form evolving from prokaryote to eukaryote12. N, nucleoid. Reproduced from Yamaguchi and Worman, 2014.14 with permission. Please click here to view a larger version of this figure.
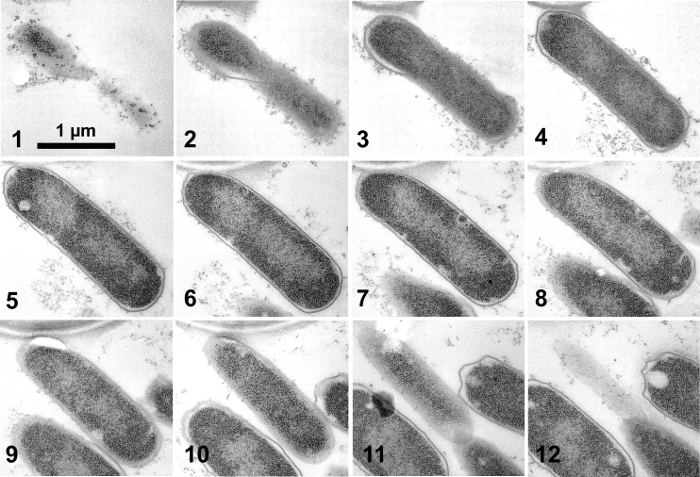
Figure 17. Serial sections of Escherichia coli9. The numbers at the lower left indicate the sequence relative to the first section. The figure shows 12 complete sections. This cell was found to contain 21,700 ribosomes9. Please click here to view a larger version of this figure.
Discussion
The method presented here requires no expensive equipment. It requires only an aluminum rack (Figure 3), three-slit grids (Figure 6c), section-holding loops (Figure 10a), water-surface-raising loop (Figure 11a), and a staining tube (Figure 13). There are many features of the present method. The large part of the specimen is used to adjust the specimen surface and knife edge so that they face parallel to each other. Serial sections are cut in groups to avoid difficulty in separating sections using a pair of hair strands when retrieving a group of serial sections onto the slit grids. A 'section-holding loop' is used to avoid mixing up the order of the section groups. A 'Water-surface-raising loop' is used to make sure the sections are positioned on the apex of the water and that they touch the grid first, in order to place them in the desired position on the grids. Formvar support film on an aluminum rack is used to make it easier to recover the sections on the grids and to avoid wrinkling of the support film. A staining tube is used to avoid accidentally breaking the support films with tweezers.
Recently, an automatic tape-collecting ultramicrotome was developed25 to collect sections automatically for scanning electron microscopy (SEM) imaging on electron-opaque plastic tapes. This method can reliably cut thousands ultrathin sections26, which is not possible by the present method. Also, serial block face (SBF) 27 and focus ion beam (FIB)-SEM28 are used to collect 3D information of cells and tissues of animals. In these methods, the sectioning with a diamond knife or focus ion beam is integrated inside the SEM microscope, and carried out in a fully automatic manner that requires no special techniques. Although these methods are useful, the apparatus is so expensive that not many institutions buy these machines. Also, since these methods employ SEM to photograph sections, resolution of the micrographs is inferior to the present method that employs transmission electron microscopy (TEM). These methods cannot resolve the individual ribosome particles, microtubules, microfilaments, and DNA fibers at present.
For structome analysis of microorganisms and for ultrastructural study of unknown microorganisms, it is necessary to observe cells and cell components such as cell wall, plasma membrane, mitochondria, nucleus, nuclear membranes, endoplasmic reticulum, chloroplasts, plastids, Golgi apparatus, ribosomes, and filamentous elements at high resolution. TEM observation of serial ultrathin sections is one of a few methods to make such analysis possible in three dimensions. Because ultrathin sections remain after observation in this method, the same area can be observed repeatedly; this is not possible in SBF or FIB-SEM, since the observed area is lost after observation. This feature is important to study deep-sea microorganisms where it is necessary to search interesting organisms at low magnification first, and then take pictures serially on the target organism at high magnification.
In conclusion, serial ultrathin sectioning method can now be performed in an easy, inexpensive, and relaible way by the present study, which is essential for 3D ultrastructual study of microorganisms at high resolution in electron microscopy.
開示
The authors have nothing to disclose.
Acknowledgements
We sincerely thank Shigeo Kita for his valuable suggestions and discussion. We also thank John and Sumire Eckstein for their critical reading of the manuscript.
Materials
| Formvar making apparatus | Nisshin EM Co. Ltd., Tokyo | 652 | W 180 x D 180 x H 300 mm |
| Glass slide | Matsunami Co. Ltd., Osaka | – | 76 x 26 x 1.3 mm |
| Aluminum rack with 4-mm holes | Nisshin EM Co. Ltd., Tokyo | 658 | W 30 x D 25 x H 3 mm, Refer to this paper |
| Stereomicroscope | Nikon Co. Ltd., Tokyo | – | SMZ 645 |
| LED illumination for stereomicroscope | Nikon Co. Ltd., Tokyo | – | SM-LW 61 Ji |
| Trimming stage | Sunmag Co.Ltd., Tokyo | – | Tilting mechanism equipped, Refer to this paper |
| LED illumination for trimming stage | Sunmag Co.Ltd., Tokyo | – | Refer to this paper |
| Ultrasonic trimming blade | Nisshin EM Co. Ltd., Tokyo | 5240 | EM-240, Refer to this paper |
| Diamond knife for trimming | Diatome Co. Ltd., Switzerland | – | 45° |
| Diamond knife for ultrathin sectioning | Diatome Co. Ltd., Switzerland | – | 45° |
| Ultramicrotome | Leica Microsystems, Vienna | – | Ultracut S |
| Mesa cut | Leica Microsystems, Vienna | – | Mirror |
| 0.5% Neoprene W solution | Nisshin EM Co. Ltd., Tokyo | 605 | |
| Special 3-slit nickel grid | Nisshin EM Co. Ltd., Tokyo | 2458 | Refer to this paper |
| Special 3-slit copper grid | Nisshin EM Co. Ltd., Tokyo | 2459 | Refer to this paper |
| Section-holding loop | Nisshin EM Co. Ltd., Tokyo | 526 | Refer to this paper |
| Water-surface-raising loop | Nisshin EM Co. Ltd., Tokyo | 527 | Refer to this paper |
| Staining tube | Nisshin EM Co. Ltd., Tokyo | 463 | Refer to this paper |
| Multi-specimen holder | JEOL Co. Ltd., Tokyo | – | EM-11170 |
| JEM-1400 | JEOL Co. Ltd., Tokyo | – | Transmission electron microscope |
参考文献
- Yamaguchi, M., et al. The spindle pole body duplicates in early G1 phase in a pathogenic yeast Exophiala dermatitidis: an ultrastructural study. Exp. Cell Res. 279, 71-79 (2002).
- Yamaguchi, M., et al. The spindle pole body of the pathogenic yeast Exophiala dermatitidis: variation in morphology and positional relationship to the nucleolus and the bud in interphase cells. Eur. J. Cell Biol. 82, 531-538 (2003).
- Yamaguchi, M. Quantitative and dynamic ultrastructure of yeast cells by electron microscopy. Recent Res. Dev. Microbiology. 8, 219-243 (2004).
- Yamaguchi, M., Biswas, S. K., Ohkusu, M., Takeo, K. Dynamics of the spindle pole body of the pathogenic yeast Cryptococcus neoformans examined by freeze-substitution electron microscopy. FEMS Microbiol. Lett. 296, 257-265 (2009).
- Yamaguchi, M., et al. The spindle pole body of the pathogenic yeast Cryptococcus neoformans: variation in morphology and positional relationship with the nucleolus and the bud in interphase cells. J. Electron Microsc. 59, 165-172 (2010).
- Yamaguchi, M. Structome of Exophiala yeast cells determined by freeze-substitution and serial ultrathin sectioning electron microscopy. Curr. Trends Microbiol. 2, 1-12 (2006).
- Yamaguchi, M., et al. Structome of Saccharomyces cerevisiae determined by freeze-substitution and serial ultrathin sectioning electron microscopy. J. Electron Microsc. 60, 321-335 (2011).
- Biswas, S. K., Yamaguchi, M., Naoe, N., Takashima, T., Takeo, K. Quantitative three-dimensional structural analysis of Exophiala dermatitidis yeast cells by freeze-substitution and serial ultrathin sectioning. J. Electron Microsc. 52, 133-143 (2003).
- Yamada, H., et al. Structome analysis of Escherichia coli. cells by serial ultrathin sectioning reveals the precise cell profiles and the ribosome density. Microscopy. 66, 283-294 (2017).
- Yamada, H., Yamaguchi, M., Chikamatsu, K., Aono, A., Mitarai, S. Structome analysis of virulent Mycobacterium tuberculosis, which survives with only 700 ribosomes at density per 0.1 fl cytoplasm. PLoS ONE. 10, e0117109 (2015).
- Yamaguchi, M., et al. High-voltage electron microscopy tomography and structome analysis of unique spiral bacteria from the deep sea. Microscopy. 65, 363-369 (2016).
- Yamaguchi, M., et al. Prokaryote or eukaryote? A unique microorganism from the deep-sea. J. Electron Microsc. 61, 423-431 (2012).
- Yamaguchi, M. Ultrathin sectioning of the Myojin parakaryote discovered in the deep sea. Cytologia. 78, 333-334 (2013).
- Yamaguchi, M., Worman, C. O. Deep-sea microorganisms and the origin of the eukaryotic cell. Jpn. J. Protozool. 47, 29-48 (2014).
- Yamaguchi, M. An electron microscopic study of microorganisms: from influenza virus to deep-sea microorganisms. JSM Mycotoxins. 65, 81-99 (2015).
- Yamaguchi, M., Okada, H., Namiki, Y. Smart specimen preparation for freeze-substitution and serial ultrathin sectioning of yeast cells. J. Electron Microsc. 58, 261-266 (2009).
- Yamaguchi, M., Biswas, S. K., Suzuki, Y., Furukawa, H., Takeo, K. Three-dimensional reconstruction of a pathogenic yeast Exophiala dermatitidis cell by freeze-substitution and serial sectioning electron microscopy. FEMS Microbiol. Lett. 219, 17-21 (2003).
- Kozubowski, L., et al. Ordered kinetochore assembly in the human pathogenic basidiomycetous yeast, Cryptococcus neoformans. mBio. 4, e00614-e00613 (2013).
- Yamaguchi, M., Adachi, K., The Japanese Society of Microscopy, Specimen support. Guide Book for Electron Microscopy. , 52-57 (2011).
- Hayat, M. A. Support films. Principles and Techniques of Electron Microscopy: Biological Application. , 216 (2000).
- Yamaguchi, M., Kita, S., The Japanese Society of Microscopy, Ultrathin sectioning. Guide Book for Electron Microscopy. , 40-52 (2011).
- Yamaguchi, M., Aoyama, T., Yamada, N., Chibana, H. Quantitative measurement of hydrophilicity/hydrophobicity of the plasma-polymerized naphthalene film (Super support film) and other support films and grids in electron microscopy. Microscopy. 65, 444-450 (2016).
- Kita, S. Reliable method for obtaining serial ultrathin sections using new small tools. Kenbikyo. 46, 253-257 (2011).
- Yamaguchi, M., Shimizu, M., Yamaguchi, T., Ohkusu, M., Kawamoto, S. Repeated use of uranyl acetate solution in section staining in transmission electron microscopy. Plant Morphology. 17, 57-59 (2005).
- Hayworth, K. J., Kasthuri, N., Schalek, R., Lichtman, J. W. Automating the collection of ultrathin serial sections for large volume TEM reconstructions. Microsc. Microanal. 12, 86-87 (2006).
- Hildebrand, D. G. C., et al. Whole-brain serial-section electron microscopy in larval zebrafish. Nature. 545, 345-349 (2017).
- Denk, W., Horstmann, H. Serial block-face scanning electron microscopy to reconstruct three-dimensional tissue nanostructure. PLoS Biol. 2, e329 (2004).
- Heymann, J. A. W., et al. Site-specific 3D imaging of cells and tissues with a dual beam microscope. J. Struct. Biol. 155, 63-73 (2006).

