Embryo Transfer Into Rabbit: A Procedure for Laparoscopy-Guided Transfer of Embryos Into Oviduct of Ovulating Recipient Female Rabbit Model
Abstract
Source: Garcia-Dominguez, X. et al., Minimally Invasive Embryo Transfer and Embryo Vitrification at the Optimal Embryo Stage in Rabbit Model. J. Vis. Exp. (2019)
This video describes the technique of transferring embryos into the oviduct of a recipient female rabbit via Laparoscopy. It allows embryo remodeling in rabbits during its migration through the oviduct, eventually helping in successful implantation. This technique can also be used for stored embryos with good efficiency.
Protocol
1. Embryo Transfer
- Preparation of recipient females
- Use only sexually mature females (> 4.5 months old).
- One week before ET, adapt females to a 16 h light/8 h dark regime to initiate follicular growth and enhanced female receptivity.
- Select the recipient females, observing the turgidity and color of the vulva. If the vulva is turgid and reddish, the female is receptive.
- Induce pseudopregnancy (ovulation) by a single intramuscular injection of 1 µg of buserelin acetate (synthetic analogue of Gonadotropin-releasing hormone) regardless of body weight.
NOTE: Normally, 0.8 µg is a suitable dose for ovulation induction in medium-size rabbits (4-5 kg), so 1 µg generally guarantees the ovulation. - Induce ovulation as many days beforehand as the age of the embryos to be transferred (for example, 70-72 h before fresh morula ET).
- Anesthesia and analgesia
- Weigh the rabbit and load the following anesthetics and analgesics.
- In a 1 mL syringe with a 30G needle: load xylazine (5mg/kg) and buprenorphine hydrochloride (0.03 mg/kg). In another 1 mL syringe with a 23G pericranial needle, load ketamine hydrochloride (35 mg/kg).
- Hold the rabbit and inject the xylazine-buprenorphine mixture intramuscularly.
- Insert the pericranial needle with ketamine in the marginal ear vein, slowly introducing all the syringe contents intravenously.
- Fix the needle and leave it inserted throughout the remaining steps to administer more anesthesia if necessary.
- Leave the rabbit in the cage (clean and without any other animals) on a warm stage.
- Once unconscious, apply eye ointment to avoid dryness of the eye and check for the absence of the palpebral freflex.
NOTE: This protocol provides a surgical anesthesia plane for a minimum of 30 min. If a longer time is required, inject additional dosages with half of the amount of ketamine hydrochloride described in 1.2.1 after 30 min. - Monitor the depth of anesthesia by checking the pedal reflex and breathing movement. Changes in the breathing pattern to an irregular and faster rate indicate loss of the proper plane of anesthesia.
- Monitor the color of the mucous membranes (eyes, lips, etc.), respiratory rate (30-60 breaths per minute), heart rate (120-325 beats per minute) and rectal temperature (38-39.6 °C).
- Eight hours before transfer, withhold food from animals to avoid the greater gut size and activity until the ET process is finished. Leave free access to water.
- Weigh the rabbit and load the following anesthetics and analgesics.
- Embryo preparation
- Warm the embryo manipulation media to 25 °C: Base Medium (BM), consisting of Dulbecco's Phosphate-Buffered Saline (DPBS) supplemented with 0.2% (w/v) of Bovine Serum Albumin.
- Working under a stereomicroscope, rinse fresh or thawed (Step 2) embryos with BM.
- Using sterile gloves, attach an appropriately configured 17G epidural catheter to a 1 mL syringe.
- Aspirate 1 cm of BM into the catheter, followed by a small air bubble.
- Aspirate 5-7embryos in a volume of 10 µL of BM, followed by another small air bubble.
- Finish loading the catheter by aspirating 1 cm of BM.
- Embryo transfer
- Consider the use of sterile gloves, gown and mask to ensure an aseptic environment.
- Sterilize surgical instruments, clean the surfaces where surgery will be performed, and wipe them with 70% ethanol.
- Perform anesthesia as previously detailed (step 1.2), checking for loss of reflexes.
- Shave the fur from the ventral abdomen with an electric razor.
- Prepare the ventral abdomen aseptically.
- Clean the surgical area and remove any remaining hair. Wash the surgical area with a chlorhexidine gluconate soap. Sanitize the area with chlorhexidine solution and ethanol 96º (3 times).
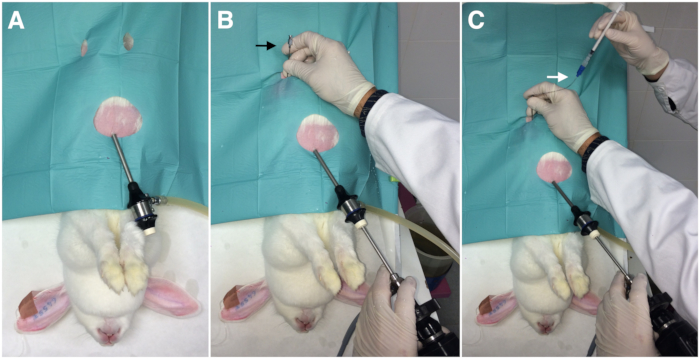
- Place the animal on a warm surgical table, in Trendelenburg's position (head down at 45°) to ensure that the stomach and intestines are cranially located. Consider the evacuation of the bladder if it is turgid. If any viscera are damaged in the process, the animal may die. It is therefore important to have them properly located (Figure 1).
- Cover the area using a sterile towel, with a hole (fenestration) exposing the shaved area, to separate the surgical site from any potential contaminating areas.
- Insert one endoscopic trocar 5 cm into the abdominal cavity, 2 cm caudal to the xiphoid process, and insufflate through it the peritoneal cavity with a pressure-regulating mechanical insufflator.
NOTE: The intra-abdominal pressure should be 8-12 mmHg with CO2 (Figure 1A). - Insert the endoscope camera through the endoscopic trocar (Figure 1B).
NOTE: Identify the reproductive tract, determining the status and position of the infundibulum and ampulla before ET to facilitate the next steps. - Insert the 17-G epidural needle into the inguinal region between 2-3 cm from the infundibulum (Figure 1B).
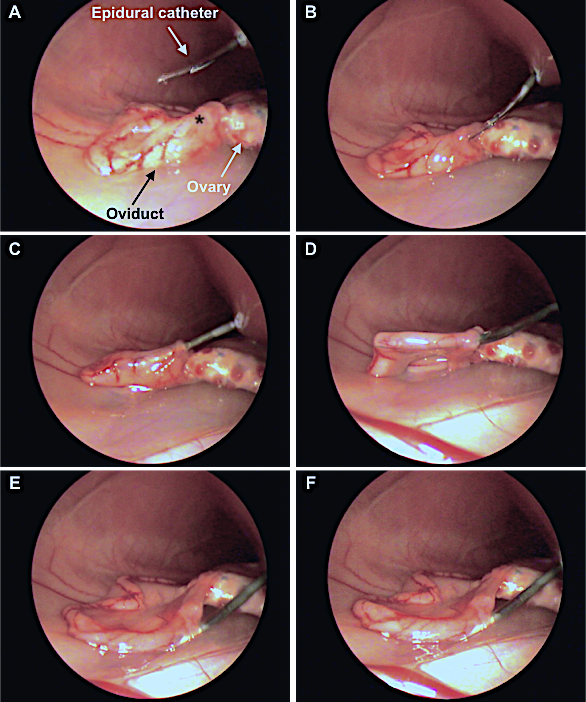
- Identify the entrance of the infundibulum (Figure 2A, 2B).
- Insert the loaded catheter (step 1.3) through the epidural needle into the abdomen (Figure 1C).
- Locate the oviduct and insert 1-2 cm of the epidural catheter through the infundibulum in the ampulla (Figure 2A-2C). Do not progress very far into the oviduct to prevent damage and hemorrhage.
- Release the embryos into the oviduct by gently pressing the plunger of the syringe coupled to the catheter (Figure 2D-2F). Both air bubbles must exit the catheter.
- Remove the catheter just after the embryos have been released.
- Rinse the catheter, aspirating and releasing manipulating medium to check the absence of the embryos and confirm their successful transfer.
- Repeat steps 1.4.11 to 1.4.16 in the other side of the uterus, if desired.
- Remove the epidural needle and endoscope camera.
- Release CO2 through the endoscopic trocar. If excess gas remains in the abdomen of the animal, it will have pain and discomfort.
- Remove the endoscopic trocar from the abdominal cavity. Remove the surgical towel.
- Discontinue anesthesia.
- Clean the incision made by the trocar with chlorhexidine solution. Close the incision made by the trocar with a micronized aluminum and a plastic dressing.
Representative Results

Figure 1: Laparoscopic embryo transfer assisted by Laparoscopy (External view). A) Insertion of the endoscopic trocar (one port). B) Insertion of the endoscopic camera and the epidural needle (black arrow). C) Insertion of the embryo transfer catheter (white arrow) through the epidural needle.

Figure 2: Laparoscopic embryo transfer assisted by Laparoscopy (Internal view). A: Insertion of the catheter through the epidural needle into the abdominal zone. Asterisk indicates the infundibulum. B, C, D: The catheter loaded with the embryos is inserted into ampulla region across the infundibulum. E, F: Release of the embryos, confirmed by the visualization of a swollen oviduct. This figure has been adapted from Marco-Jiménez et al.
Divulgazioni
The authors have nothing to disclose.
Materials
| Bovine Serum Albumin (BSA) | VWR | 332 | |
| Buprenorphine hydrochloride | Alvet Escartí | 626 | To be ordered by a licensed veterinarian. |
| Buserelin Acetate | Sigma Aldrich | B3303 | |
| CO2 | Air Liquide | 99921 | CO2 N48. |
| Dulbecco’s phosphate-buffered saline (DPBS) | Sigma Aldrich | D5773 | Without calcium chloride |
| Electric razor | Oster Golden A5 | 078005-140-002 | |
| Endoscope camera | Optomic Spain S.A | OP-714 | |
| Endoscope trocar with silicone leaflet valve | Karl Storz Endoscopia Ibérica S.A. | 30114GK | Lightweight trocar model. |
| Clorhexidine digluconate soap | Alvet Escartí | 0265DCCJ500B | |
| Epicraneal needle 23G | Alvet Escartí | 514056353 | Smaller needles can be also used. |
| Epidural catheter | Vygon corporate | 187.1 | |
| Epidural needle | Vygon corporate | 187.1 | |
| Eye ointment | Alvet Escartí | 5273 | |
| Laparoscopy equipment | Karl Storz Endoscopia Ibérica S.A. | 26003 AA | Hopkins® Laparoscope, 0º-mm straight-viewing laparoscope, 30- cm length, 5-mm working channel. |
| Light source | Optomic Spain S.A | Fibrolux 250 | |
| Mechanical CO2 insufflator | Karl Storz Endoscopia Ibérica S.A. | Endoflator® | |
| Silicone tube for insufflato | r Karl Storz Endoscopia Ibérica S.A. | 20400040 | |
| Stereomicroscope | Leica | MZ16F | There are cheaper options such as Leica MZ8 or Nikon SMZ-10 or SMZ-2B, to name a few. |
| Rabbits | Universitat Politècnica de València | Line A | Other maternal lines, such as Line V or Line HP can be used. |

