Isolating Enteric Glial Cells From the Submucosa and Lamina Propria of a Mouse
Abstract
Source: Wang, Z. et al., Isolation of Enteric Glial Cells from the Submucosa and Lamina Propria of the Adult Mouse. J. Vis. Exp. (2018).
This video demonstrates a method for isolating enteric glial cells from the submucosa and lamina propria of the mouse intestine. It outlines the steps involved in extracting submucosa and lamina propria tissue, isolating the enteric glial cells from them, and culturing the cells on a coated well-plate to establish an enteric glial cell culture.
Protocol
All procedures involving sample collection have been performed in accordance with the institute's IRB guidelines.
1. Preparation of Sterile Poly-D-lysine (PDL) and Laminin Solutions
- At least one day prior to cell isolation, prepare poly-D-lysine (PDL) and laminin-coated plates.
NOTE: Both 6-well and 12-well plates were prepared depending on the experimental goals. Typically, 12-well plates were used for the quantitative analysis using western blots, whereas 6-well plates were used to hold autoclaved (sterile) coverslips for immunohistochemistry. 24-well plates were used to culture enteric glial cells (EGCs) for Ca2+ flux imaging. - Dilute stock solutions with ultrapure tissue culture grade, DNase-free, and RNase-free water in a tissue culture hood with HEPA-filtered air.
- Sterilizing glass coverslips
- Hold the coverslip with sterile forceps and immerse coverslips in a beaker of 100% ethanol for 15 min. Allow the ethanol to evaporate in the tissue culture hood and then place it in the 6-well plates.
- Alternatively, place several coverslips individually on 2 mm thick blotting paper in a plastic container and then autoclave.
2. Coating Plates
NOTE: Perform these steps under a sterile tissue culture laminar flow hood.
- Thaw 1 mg/mL PDL stock and dilute 1:10 with sterile, tissue culture-grade water so that the final concentration is 100 µg/mL. Use 2 mL per well to coat 6-well plates, 1 mL to cover one well of a 12-well plate, and 0.5 mL for one well in the 24-well plates. Store the remaining diluted PDL in 12 mL aliquots at -20 °C.
- After allowing the PDL to coat the wells for at least 1 h, remove the PDL with a sterile pipette. Allow the plates to air dry completely under a tissue culture laminar flow hood.
NOTE: After removing the PDL solution with a sterile pipette, it can be used twice more within 1 week after passing through a 0.22 µm filter and storing at 4 °C. - Thaw the laminin stock on ice to avoid gel formation.
NOTE: Undiluted laminin becomes solid when warmed above 8 °C. - Dilute the laminin stock (0.5 mg/mL) 1:50 with sterile Dulbecco's Phosphate Buffered Saline (DPBS) to obtain a final concentration of 10 µg/mL. Store the diluted laminin in 12 mL aliquots at -20 °C.
- Add diluted laminin to the wells containing dried PDL. Use 1 mL to cover the 6-well surface and 0.5 mL to cover the bottom of the 12-well plates. For coverslips, add 400 µL of diluted laminin to the coverslips to achieve surface coverage.
- Incubate the coated plates at 37 °C for 2 h, if the plate is used the same day (quick coating). If not, seal the plates with plastic wrap and store them overnight at 4 °C (slow coating).
NOTE: Sealing is critical to avoid drying and contamination. - Remove the laminin solution carefully with a pipette to avoid scratching the surface. Gently wash the wells three times with sterile DPBS.
- Add complete glial growth media to each well and maintain the plates at 37 °C until ready to add the EGC suspension.
NOTE: Poly-D lysine and laminin-coated plates can be stored for 3 days at 4 °C. Coat the plates several days ahead and then store at 4 °C; wash the plates with sterile Dulbecco's Phosphate Buffered Saline (DPBS) three times. Add 2 mL of sterile DPBS to each well after the final wash. Seal the plate with parafilm and store at 4 °C. It is essential to ensure that the laminin does not dry out.
3. Preparation of Isolation Solutions
- Prepare the EDTA/HEPES/DPBS dissociation solution. For 500 mL of the solution, use sterile DPBS (without calcium and magnesium) to make a final solution of 10 mM HEPES and 5 mM EDTA. To 490 mL of the DPBS, add 5 mL of 1 M HEPES buffer and 5 mL of 0.5 M EDTA stock solution. Store at 4 °C until use.
- Prepare the glial cell resuspension media using the reagents listed in Table 1.
- Prepare glial growth media using the reagents listed in Table 2.
NOTE: Glial growth media containing GDNF can be stored for one week at 4 °C.
4. Removal of the Intestinal Segment
NOTE: Mice were allowed free access to food and water prior to euthanization by the isoflurane drop method and removal of a vital organ. C57BL/6 mice greater than 8 weeks of age were used. Both genders were used without noticeable differences in the preparation.
- Euthanize the mouse with an overdose of isoflurane and place it supine in a dissecting tray. Pin the extremities and sterilize the abdomen with 70% ethanol. Tent the skin with forceps and then open the abdomen with scissors.
- Lift the liver and identify the distal stomach/pylorus. Then, remove 7 cm of the proximal intestine. Be careful not to tear the intestine.
- Hold the pylorus with forceps while snipping away the mesentery.
- Use blunt dissection with the back of the scissor to scrape away the adherent pancreas.
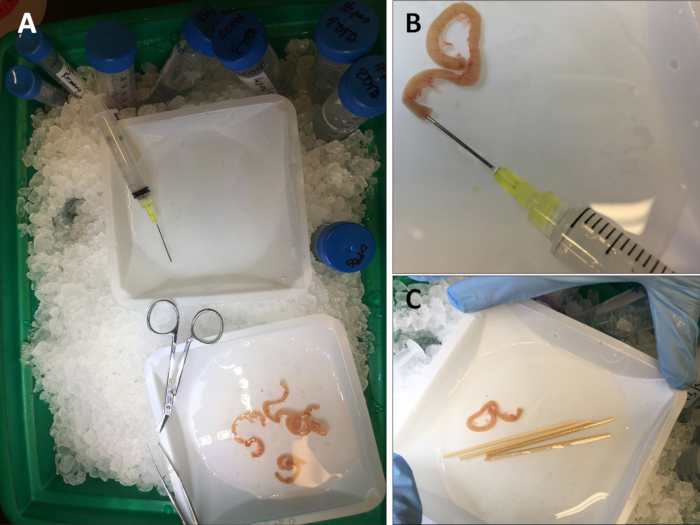
- Place the intestinal segment into ice-cold DPBS without Ca2+ or Mg2+ (Figure 1A).
NOTE: Other segments of the intestine or colon can also be removed using the same technique.
- Use a 5- or 10-mL syringe attached to a blunt end 20 G needle to flush out the fecal contents with ice-cold DPBS (Figure 1B).
- Divide the intestine into 3 cm segments to remove the longitudinal muscle. NOTE: Intestinal segments from up to two mice are used per 30 mL of the HEPES/EDTA/DPBS isolation solution.
- Break off about 4 cm to separate the wooden stick from the cotton tip. Soak the wooden stick in DPBS (Figure 1C).
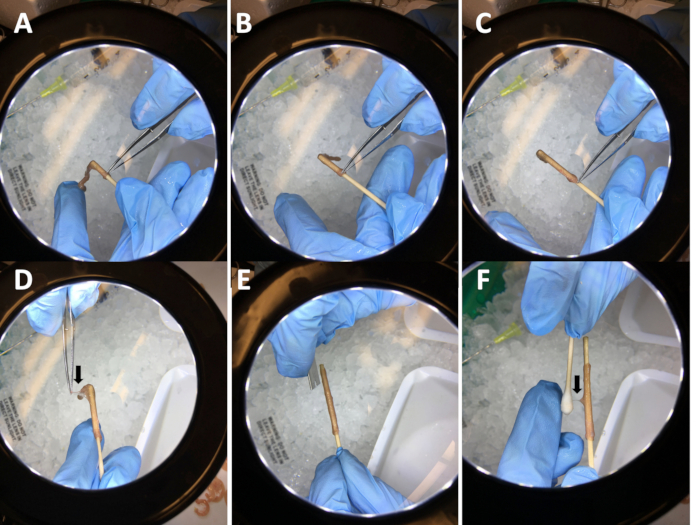
- Slip one of the intestinal segments smoothly onto the wetted stick (Figure 2A-C).
- Remove the adherent mesentery that is still attached using needle-nose forceps (Figure 2D).
- Use a clean razor blade or scalpel to make two longitudinal nicks along the intestine where the mesentery was attached (Figure 2E).
- Wet the cotton tip with DPBS. Rub the wetted cotton tip longitudinally along the muscle to loosen the longitudinal muscle/myenteric plexus (LMMP). Then, move the cotton tip horizontally to tease away the LMMP from the circular muscle along the length of the intestinal segment during LMMP removal.
- Hold the tip of the stick between the thumb and forefinger while stabilizing the segment with the middle and fourth finger (Figure 2F). When complete, the LMMP will easily peel off the intestinal segment.
- Discard the LMMP stripped from the intestinal tube and attached to the cotton swab unless harvesting EGCs from the myenteric plexus is desired.
- Use a razor blade to flay open the intestinal segment longitudinally to remove from the wooden stick.
- Store the stripped intestinal tissue (predominantly mucosa and submucosa plus circular muscle) in DPBS on ice. Repeat steps 4.4–4.11 until all intestinal segments are prepared.
5. Removal of the Epithelial Mucosa
- Cut the intestines into smaller pieces of ~0.5 cm with fine scissors.
- Place the tissue in a sterile 50 mL conical centrifuge tube containing 30 mL of ice-cold EDTA/HEPES/DPBS solution.
- Rock the tissue-containing solution at 4 °C for 10 min at ~60 tilts per min.
- Pre-moisten a 5 mL plastic pipette by pipetting the EDTA/HEPES/DPBS buffer up and down one time, and then use the pre-moistened pipette to pipette the tissue and buffer suspension up and down (trituration) 20 times to dislodge the epithelial mucosa.
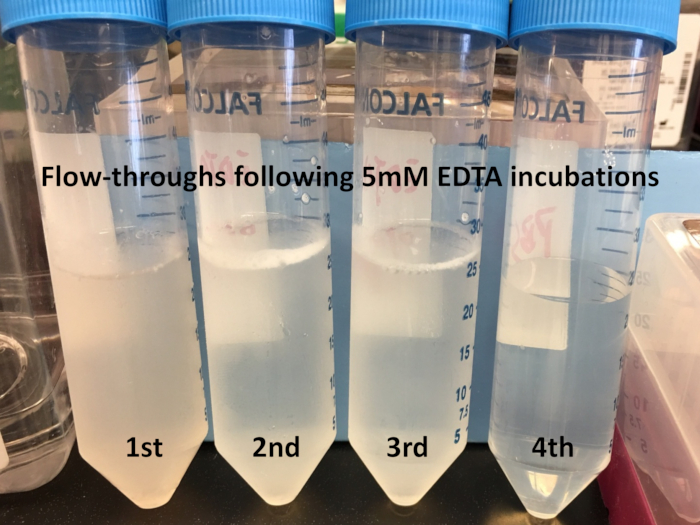
- Collect the tissue from the EDTA incubation by pouring the mixture through a 100 µm nylon cell strainer. Discard the turbid mucous-filled flow-through (Figure 3).
- Place the tissue retained in the strainer into a new 50 mL conical centrifuge tube containing 30 mL of ice-cold EDTA/HEPES/DPBS using needle-nose forceps.
- Repeat the EDTA/HEPES/DPBS incubation a second time by rocking the tissue at 4 °C for 10 min at ~60 tilts per minute to strip off additional epithelial mucosa.
- Pre-moisten a 5 mL pipette with the buffer and then pipette the tissue suspension up and down 20 times to dislodge the mucous cells.
NOTE: The tissue will tend to stick to the inside of the pipette as more of the epithelium is removed. - Collect the tissue after the second incubation by pouring the mixture through a 100 µm nylon cell strainer and discard the flow through. The second flow-through should be noticeably less turbid than the first (Figure 3).
- Repeat the 10 min EDTA incubations until the solution is nearly clear (about 3 to 4 incubations depending on the amount of tissue and the effectiveness of the trituration) (Figure 3).
6. Collection of Enteric Glial Cells from the Lamina Propria and Submucosa
- Transfer the tissue from the nylon strainer to a 15 mL conical centrifuge tube containing 5 mL of the commercially available cell recovery solution and rock for 25–30 min at 4 °C.
- Triturate gently 10x to dissociate the enteric glial cells from the lamina propria.
- Filter through a 40 µm filter and collect the filtrate in a clean 50 mL tube.
- Rinse the tissue on the nylon filter with 1 mL of DPBS.
- Discard the tissue and transfer the ~5–6 mL of filtrate to a clean 15 mL conical centrifuge tube.
- Spin the filtrate at 2,000 x g in a swinging bucket centrifuge for 5 min at 4 °C.
- Re-suspend the glial cell-containing pellet in at least 1 mL of resuspension buffer by gently pipetting the pellet up and down with a 500 µL pipette tip. Avoid introducing bubbles.
NOTE: Adjust the resuspension volume as needed for the number of wells and plates. For example, 1.2 mL for one 6-well plate, 2.4 mL for two 6-well plates, 2.4 mL for one 12-well plate. - Pipette 200 µL of the cell suspension into each well of the 6-well or 100 µL for a 12-well PDL-laminin coated plates containing glial growth media.
- Do not disturb the dishes after adding the cells to the plates and placing in the 37 °C incubator to allow the maximum number of cells to adhere.
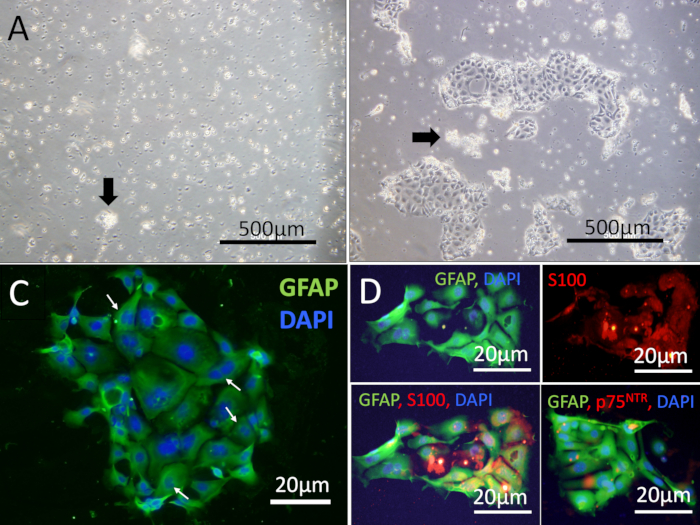
NOTE: A healthy preparation of cells will attach within 6–8 h, but wait for at least 24 h before changing the media by gently pipetting off the media along with non-adherent cells. - Use the cells for experiments 3–4 days after they are placed into culture (Figure 4).
Table 1. Composition of Glial Cell Resuspension Media.
| Components | Volume to be added | Final Concentration |
| DMEM/F12 | 44.5 mL | _ |
| Fetal Bovine Serum (FBS) | 5 mL | 10% |
| Penicillin-Streptomycin | 500 µL | 100 IU/mL Pen |
| Streptomycin | 100 µg/mL Strep | |
| Gentamicin (50 mg/mL stock) | 20 µL | 20 µg/mL |
Table 2. Composition of Glial Cell Growth Media
| Components | Volume to be added | Final Concentration |
| DMEM/F12 | 44 mL | _ |
| Fetal Bovine Serum (FBS) | 5 mL | 10% |
| Penicillin-Streptomycin (100x) | 500µL | 100 IU/mL (Pen) |
| 100 µg/mL (Strep) | ||
| Gentamicin (50 mg/mL stock) | 20 µL | 20 µg/mL |
| GDNF (10 µg/mL stock) | 50 µL | 10 ng/mL |
Representative Results

Figure 1: Set up and preparation of mouse intestines. (A) Picture of isolation set up on ice including extracted intestines. (B) Picture of 5 mL-syringe attached to a 20 G blunt end needle to flush out fecal contents. (C) Engineered end of a wooden cotton swab (~4 cm) soaking in the DPBS buffer.

Figure 2: Steps used to clean intestines and remove the longitudinal muscle/myenteric plexus (LMMP). (A-C) Sliding an intestinal segment onto a wetted wooden stick. (D) Removal of adherent mesentery. (E) Nicking the intestine with a razor blade. (F) Removing the LMMP with a damp cotton swab.

Figure 3: Sequential Flow-throughs after EDTA incubations. Shown are examples of the flow-throughs from 4 sequential incubations using three 7 cm intestinal segments incubated for 10 min with 5 mM EDTA/10mM HEPES in DPBS and then the triturated 20 times. Representative flow-throughs after pouring through a 100 µm nylon mesh strainer are shown.

Figure 4: EGC images 24 h after plating. Light microscopic examination of resuspended cells 24 h after plating. (A) Shown is a representative example of a poor prep showing floating epithelial cell clumps (arrow) and debris. No adherent EGCs were observed after 24 h. (B) Shown is a representative example of an excellent prep 24 h after the cell isolation and resuspension in which patches of EGCs adhered to the PDL/Laminin coated plates. Images were captured on an inverted fluorescent microscope with a digital camera. Scale bars = 500 µm (A-B). (C) High power view of a patch of EGC cells stained with GFAP antibody (green) showing cells at the periphery with a higher intensity of labeling. Several of the cells showed double nuclei (arrowhead, DAPI, blue). (D) Colocalization of GFAP (green) with S100 (red) or p75NTR (red). Scale bars = 20 µm (C-D). The cells were mounted with an antifade reagent and DAPI (blue nuclei).
Divulgations
The authors have nothing to disclose.
Materials
| Poly-D lysine (1 mg/ml stock) | Sigma | A-003-E | Dilute 1:10 |
| Laminin (0.5 mg/ml stock) | Sigma | L4544 | Dilute to 10 µg/mL on ICE |
| EDTA (0.5M) | Lonza | 51201 | Dilute 1:100 in DPBS |
| HEPES (1 M) | Corning | 36216004 | Dilute 1:100 in DPBS |
| Cell Recovery Solution | Corning | 354253 | |
| Dulbecco's Phosphate Buffered Saline (DPBS) | HyClone | SH30028.02 | |
| DMEM/F-12 | Thermo Fisher Scientific | 11320033 | |
| Penicillin-Streptomycin (100X) | Life Technologies | 15140-122 | |
| Gentamicin (50mg/mL stock) | Life Technologies | 15750060 | |
| GDNF (10 µg stock) | Sigma | SRP3200 | |
| L-Glutamine (200 mM stock) | Life Technologies | 25030-081 | |
| Nylon Mesh Celll Strainer (100 µm) | Fisher Scientific | 22363549 | |
| Nylon Mesh Celll Strainer (40 µm) | Fisher Scientific | 22363547 | |
| Disposable Serologic Pipet 5 ml | Fisher Scientific | 13-678-11D | |
| 0.25% Trypsin-EDTA (1X) | Life Technologies | 25200-056 |

