Revealing Neural Circuit Topography in Multi-Color
Summary
We provide a practical guide for delivering tracers in vivo and use the spinocerebellar pathway as a model system to demonstrate essential steps for successful neuronal circuit analysis in mice. We describe in detail our versatile tracing protocol that exploits wheat germ agglutinin (WGA) conjugated to Alexa fluorophores.
Abstract
Neural circuits are organized into functional topographic maps. In order to visualize complex circuit architecture we developed an approach to reliably label the global patterning of multiple topographic projections. The cerebellum is an ideal model to study the orderly arrangement of neural circuits. For example, the compartmental organization of spinocerebellar mossy fibers has proven to be an indispensable system for studying mossy fiber patterning. We recently showed that wheat germ agglutinin (WGA) conjugated to Alexa 555 and 488 can be used for tracing spinocerebellar mossy fiber projections in developing and adult mice (Reeber et al. 2011). We found three major properties that make the WGA-Alexa tracers desirable tools for labeling neural projections. First, Alexa fluorophores are intense and their brightness allows for wholemount imaging directly after tracing. Second, WGA-Alexa tracers label the entire trajectory of developing and adult neural projections. Third, WGA-Alexa tracers are rapidly transported in both retrograde and anterograde directions. Here, we describe in detail how to prepare the tracers and other required tools, how to perform the surgery for spinocerebellar tracing and how best to image traced projections in three dimensions. In summary, we provide a step-by-step tracing protocol that will be useful for deciphering the organization and connectivity of functional maps not only in the cerebellum but also in the cortex, brainstem, and spinal cord.
Protocol
1. Delivering tracers in vivo using sterile surgery (Sections 1.1-1.16)
Throughout the procedure we advise that standard sterile surgical techniques be used. This includes using sterile gloves, gown, and facemask. Tools should either be autoclaved before use or cleaned thoroughly with water and then ethanol. During the surgery, and especially between animals, clean tissue fragments off the tools and dry sterilize instruments with a hot bead sterilizer (Steri 250 Cat. # 18000-45, Fine Science Tools). In addition, it is critical that you organize your work space such that you have areas designated for animal preparation (shaving etc), the surgery, and a recovery area where the animal can be easily monitored, warmed, and supplied with analgesics as needed. The key to successful survival surgeries is to reduce the risk of infection and maintain an aggressive post-operative care strategy. Please refer to the Table where you can find all the necessary equipment and reagents for this protocol.
- Anesthetize adult mice with freshly prepared Avertin (2,2,2-Tribromoethanol, Sigma, St. Louis MO; Cat. # T48402) via an intraperitoneal (i.p.) injection with a dosage of 0.2ml/10grams body weight. Other anesthetics such as isoflurane or ketamine/xylazine are equally effective but ensure that your laboratory has the required institutional and federal approval before use. If you are using pups (P0 – P10) you can anesthetize them on crushed ice for 10-15 minutes. Ensure that the skin of each pup is not in direct contact with the ice (for example, by placing them in the fingers of latex gloves) as the cold water will quickly induce a lethal level of hypothermia. Confirm that the animal is under an acceptable plain of anesthesia by performing a toe pinch with forceps or fingers to the animals’ hind paws. If there is a pedal reflex, wait until the animal is unresponsive to this stimulus as an indication of a deeper plain of anesthesia.
- Once the animal is completely anesthetized lay it with its dorsal side up on a sterile gauze pad with its head facing away from you and its tail facing towards you. Shave the fur with hair clippers in order to give yourself a clear surgical field that is wide enough to gain access to the central nervous system. Wipe the shaved region with two sets of alcohol wipes, then 70% alcohol/betadine, and then clean once more with alcohol wipes. Use an inside to outside circular pattern when cleaning the surgical area. You may choose to clearly demarcate your surgical field by cutting a small hole into a sterile gauze pad and placing the opening over your shaved and clean surgical site. Although maintaining the sterile surgical field can be tricky when operating on small animals, doing so will help reduce the risk of infection.
- Lift the skin using forceps and make an incision with scissors at the midline directly above the lower thoracic-upper lumbar region. The lower thoracic region-upper lumbar region can be identified by running your finger along the vertebrae to feel for a hump in the vertebral column (Fig. 1).
- Cut the fascia and superficial spinal muscles. If necessary, stop any bleeding by cauterizing the blood vessels (Fine Science Tools, Foster City, CA; Cat. # 18000-00). In pups, applying gentle pressure around the incision with cotton swabs is sufficient to stop bleeding.
- Perform a dorsal laminectomy by removing the spinous processes of one or two segments of the lower thoracic – upper lumbar spinal cord after cutting the lamina on both sides of the vertebral column, midway between the articular process and the dorsal spinous process (Fig. 2). Be careful not to damage the spinal cord with your scissors and always remove the small bone fragments as they could lacerate the spinal cord. Note that the vertebral column in early postnatal pups is not completely ossified, which means that the bones are very soft and can be cut very easily. Therefore, be careful not to cut too deep as you may damage the spinal cord.
- If you prefer not to perform a dorsal laminectomy in adult mice, we have found that you can cut the soft tissue between vertebral segments to expose a small region of the spinal cord without cutting any bone. Although both methods are effective routes of entry into the spinal cord, avoiding a dorsal laminectomy can ensure that the spinal cord remains undamaged.
- Fill a pulled glass electrode (Borosilicate glass capillaries; Cat. # 300056, Harvard Apparatus, Holliston, MA; Dual stage Glass Micropipette Puller from Narishige Model 001-PC-10) with your tracer using a micrometer syringe (0.2mL; Gilmont Instruments Cat. # GS-1100) or an equivalent delivery apparatus.
- Tighten the glass microelectrode into place on a micromanipulator and insert the electrode 0.1-0.5mm into the lower thoracic-upper lumbar region of the spinal cord halfway between the midline and the lateral edge of the spinal cord. The animal may be held in a stereotaxic apparatus for accurate identification of injection loci and for stabilizing the animal (Small Animal Stereotaxic Instrument Model 940-A and Electrode Manipulator Model 960 from Kopf Instrumentation). Alternatively, if your anesthetic regime can be tailored to achieve a steady plane without significant movements due to deep breathing, gently taping the animal down will suffice.
- Pressure inject into the spinal cord over 3-5 minutes approximately 0.5μl of a 2% solution of WGA-Alexa 488 (wheat germ agglutinin, Alexa Fluor 488 conjugate; Cat. #W11261, Invitrogen, Carlsbad, CA), WGA-Alexa 555 (wheat germ agglutinin, Alexa Fluor 555 conjugate; Cat. #W32464, Invitrogen, Carlsbad, CA), WGA-Alexa 350 (wheat germ agglutinin, Alexa Fluor 350 conjugate; Cat. #W11263, Invitrogen, Carlsbad, CA), WGA-HRP (wheat germ agglutinin horseradish peroxidase; Sigma, St. Louis, MO Cat # L7017) or 0.5μl of 10% BDA (biotinylated dextran amine; Cat. #D1956, Invitrogen, Carlsbad, CA) in phosphate buffered saline (PBS; Sigma, St. Louis, MO; Cat # P4417). Injecting these volumes of tracers results in labeling a large number of fibers. Smaller volumes will need to be injected for targeting smaller nuclei (or sub-regions of individual nuclei) and each investigator should empirically determine the ideal volume to deliver. Iontophoresis should be considered for accurate nanoliter delivery for precise injections. We typically supplement all tracer solutions with 0.5% Fast Green (Sigma, St. Louis, MO; Cat # F7252) to visualize the injection spot during surgery.
- We add 1μl of corn oil (Sigma, St. Louis, MO; Cat # C8267) to every 10μl of BDA solution before injecting to prevent the mixture from sticking to the walls of the pulled pipettes. If you do have trouble ejecting the tracer out of the pipette, slowly retract the tip to create a small pocket in the tissue then try injecting again. It is not unusual for the microelectrode tip to clog. In most cases the pocket also helps create a reservoir from which the surrounding neurons can absorb the tracer. Remember to always eject the tracer slowly to avoid massive tissue damage in the vicinity of your needle.
- Gently close the skin with wound clips and tissue glue. Alternatively, you can use sutures to close the wound.
- Note that with practice the surgical procedure, at least up until this point, can be completed in less than 20 minutes.
- Place the animal in a recovery chamber (Vetcare chamber model 9.16.0 Cat. # 340508 from Harvard Apparatus) on a heating pad (Heating Pad Cat. # 341241 from Harvard Apparatus) to avoid hypothermia and speed up recovery. Alternatively, you can use one of many makes and models of heating chambers. Monitor the breathing rate and check for signs that the animal is attempting to move. Most animals are usually responsive within 10-15 minutes post-surgery.
- After the animals recover from the anesthesia, provide them with water and food ad libitum and analgesics as required. It is of utmost importance to keep a close eye on your animals as part of your post-operative care regime. Routinely check for signs of pain, discomfort, infection, adequate eating and drinking etc. Again, please discuss your needs with your institutes animal welfare officers and veterinarians to develop the best protocol to successfully complete your experiments and to maintain the necessary care for all your animals.
- WGA-Alexa 555, WGA-Alexa 488, and WGA-HRP are rapidly transported in neurons and we have found that in both early postnatal and adult mice the Alexa conjugate tracers robustly label long fiber tracts within 24 hours (Reeber et al. 2011). WGA-Alexa 350 is also rapidly transported although compared to the other Alexa dyes its visibility is highly dependent on the quality and sensitivity of the filter sets (data not shown; Reeber et al. 2011)
- BDA typically requires longer survival times to fully trace neural projections and therefore for complete mapping of spinocerebellar projections animals will need to be sacrificed after approximately 11 days.
2. Detection of anterogradely traced mossy fibers
- After the respective survival periods anesthetize the mice with Avertin (or your preferred anesthetic).
- Once there are no reflexes the blood should be flushed through the heart by perfusing with 0.1M PBS (pH7.2). Then, fix the tissue by perfusing the animal with 4% paraformaldehyde (PFA) in PBS. In addition to the regions you will analyze, it is always necessary to acquire tissue from the injection site for retrospective analysis of how large the injection was, an indication of the extent of tissue damage caused by the electrode, and for identifying possible labeling in fibers of passage (Fig. 3; see Mesulam, 1982; Reeber et al. 2011).
- Postfix the brains from perfused mice for 24-48 hours in 4% PFA and then cryoprotect them in buffered sucrose solutions diluted in PBS (15% for ˜2 hours or until the tissue sinks to the bottom of the container and then 30% overnight or until the tissue sinks). The tissue is then removed from the sucrose, gently dabbed dry with paper towels and then immersed in a tissue mold containing OCT (Optimal Cutting Temperature; Sakura Finetech USA Inc, CA). The tissue is then frozen using a -80 °C freezer and stored at the same temperature until its ready to be cut.
- The Alexa fluorophores are visible directly after labeling and do not require additional staining. Therefore, after perfusion the WGA-Alexa traced tissue can be cut and mounted for imaging or directly imaged in 4% PFA as a wholemount preparation. We found that imaging the tissue in 4% PFA gave the best refractive index for imaging the topography of traced projections in wholemounts. For sections, cut serial 40μm thick coronal sections on a cryostat and collect them as free-floating sections in PBS. Given the toxicity of PFA, ensure that an appropriate facemask is worn during perfusion and imaging, keep the area well ventilated, and when not in use immediately return any PFA or PFA-fixed tissue to sealed containers. It is ideal if your microscope is located in a suitable fume hood.
- WGA-HRP labeled fibers can be revealed using tetramethylbenzidine (TMB) as a chromogen. We will not describe the HRP staining protocol here since it has previously been described in detail (Vogel and Prittie 1994; Sillitoe et al. 2010)
- For BDA labeled fibers incubate free-floating tissue sections for 2 hours in Streptavidin-CY3 (Cat. #434315, Invitrogen, Carlsbad, CA) or Streptavidin-Alexa Fluor 488 or 555 (Cat. #S11223 for 488 and Cat. #S21381 for 555, Invitrogen, Carlsbad, CA), wash in PBS and then mount with FLUORO-GEL. For DAB, incubate tissue sections overnight in ABC reaction buffer (Cat. #PK-4000, Vector Laboratories, Inc. Burlingame, CA), rinse 3 times in PBS and then react for 5-10 minutes in DAB (0.5mg/ml, Vector Laboratories Inc., Burlingame, CA) supplemented with 10μl of 30% H2O2 for every 50ml DAB solution.
3. Immunohistochemistry
- Immunohistochemistry was carried out as described previously (Sillitoe et al. 2008). Briefly, incubate tissue sections in 0.1M PBS containing 10% NGS (NGS; Sigma, St. Louis MO), 0.1% Tween-20 and primary antibodies (see below) for 16-18 hours at room temperature. Wash the tissue sections three times in PBS and then incubate them in secondary antibodies (see below) for a maximum of 2 hours at room temperature. Rinse the tissue again and reveal the immunoreactivity as described below.
- To determine the relationship between Purkinje cells and mossy fibers we co-labeled free floating tissue sections using conventional methods of double staining. We used WGA-Alexa 555 for tracing and Alexa 488 conjugated donkey anti-mouse secondary antibodies (Invitrogen/ Molecular Probes Inc., Carlsbad, CA) to detect ZebrinII (1:250; Kind gift from Dr. Richard Hawkes, University of Calgary, Calgary, Canada). ZebrinII is a mouse monoclonal antibody and was used directly from spent hybridoma culture medium. The fluorophore conjugated secondary antibodies were used at a dilution of 1:1500. After staining the tissue sections were mounted on charged glass slides and then coverslipped with FLUORO-GEL in Tris buffer (Electron Microscopy Sciences, Hatfield, PA) or with Vectashield hardset mounting medium with DAPI (Cat. # H-1200, Vector Laboratories, Burlingame, CA) for triple color fluorescence imaging.
- We tested the specificity of the secondary antibodies by processing the tissue sections in the absence of primary antibodies. No signal was detected in such control experiments, indicating that the staining we observed was not due to nonspecific signals from the Alexa-conjugated antibodies (data not shown).
4. Microscopy and data analysis
- We capture photomicrographs of tissue sections using Leica DFC360 FX (fluorescence) and DFC490 (DAB and TMB reacted tissue sections) cameras mounted on a Leica DM5500 microscope.
- We acquire and analyze the images of tissue sections using Leica Application Suite and Leica Application Suite FX software packages.
- Photomicrographs of wholemounts are captured using a Leica DFC3000 FX camera mounted on a Leica MZ16 FA stereomicroscope running Leica Application Suite FX software.
- Both of our microscopes are equipped with Leica CY3 (model # 11600231) and FITC (model # 11513880) filters, and the DM5500 with an additional A4 DAPI/UV filter (model # 11504162).
- Images are acquired after optimizing for under/over-exposure as determined using the Leica software. We import all raw data into Adobe Photoshop CS4 and if necessary we correct the entire field of each image for sharpness, brightness, contrast or levels only. Other photo editing softwares can be used as preferred.
- The schematics presented here were drawn in Adobe Illustrator CS4.
- Alexa 555 and CY3 stained neurons, which are detected as red using our filters, were pseudo-colored magenta in the images presented throughout the manuscript.
Animals
All animal studies were carried out under an approved IACUC animal protocol according to the institutional guidelines at Albert Einstein College of Medicine. Male and female outbred Swiss Webster (Taconic, Albany, NY) or inbred C57BL6J (JAX, Bar Harbor, ME) mice were maintained in our colony and used for all studies. Noon on the day a vaginal plug was detected was considered embryonic day 0.5.
5. Representative Results:
Spinocerebellar afferents terminate into parasagittal bands in the cerebellum (Fig. 3; Voogd et al. 1969; Grishkat and Eisenman 1995; Vogel and Prittie 1994; Vig et al. 2005; Apps and Hawkes 2009; Sillitoe et al. 2010; Reeber et al. 2011). We injected WGA-Alexa tracers into the lower thoracic-upper lumbar spinal cord to demonstrate: 1) that these tracers can be used to consistently label specific subsets of terminals in the cerebellum (Fig. 3; Reeber et al. 2011), 2) that WGA-Alexa tracers are intensely bright and can be used to visualize the overall pattern of mossy fiber topography in whole cerebella (Fig. 3; Reeber et al. 2011), 3) that WGA-Alexa 488 and 555 can be used in combination for tracing multiple tracts in the same animal (Fig. 4), and 4) that WGA-Alexa tracers are compatible with immunohistochemical staining (Fig. 5). In recent work we showed that WGA-Alexa tracers label terminals in the cerebellum as early as 6 hours after delivering the tracer into the spinal cord and are an excellent choice for tracing the architecture of developing pathways (Reeber et al., 2011).
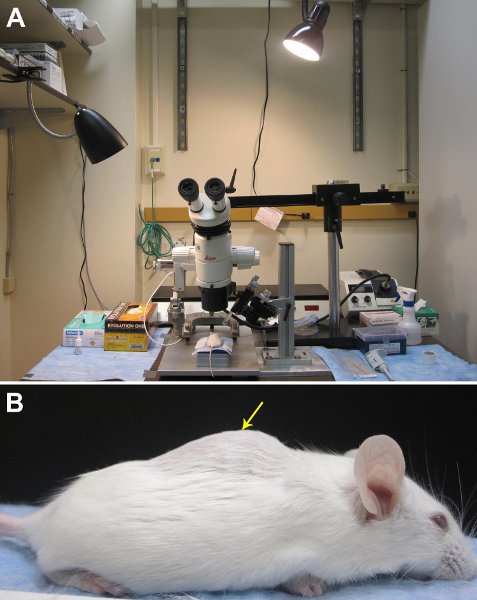
Figure 1. Setup of equipment for delivering tracers in vivo. A. An Image of our surgical area. B. The lower thoracic-upper lumbar region can be identified by running your fingers along the vertebrae to feel for a hump in the vertebral column. The dorsal laminectomy should be performed roughly in the middle of the “hump”, which is indicated by the yellow arrow.
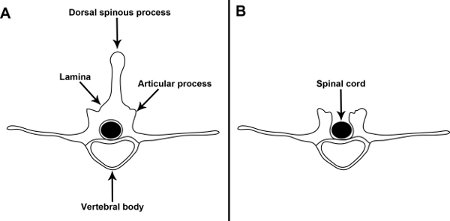
Figure 2. Illustration of a lower thoracic – upper lumbar vertebral segment before and after dorsal laminectomy. A. Schematic of an intact vertebral segment from the lower-thoracic-upper lumber region of the mouse vertebral column. B. A dorsal laminectomy is performed by removing the spinous processes of one or two vertebral segments, after cutting the lamina midway between the articular process and the dorsal spinous process.
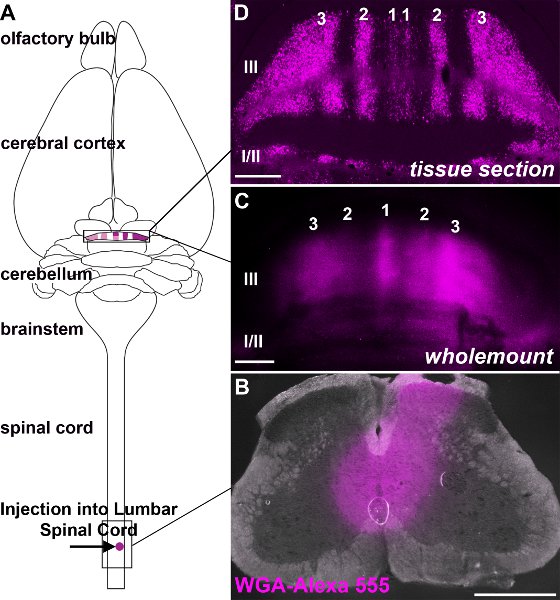
Figure 3. WGA-Alexa tracers are intensely bright and can be used to visualize afferent projection topography at high resolution. A. The schematic illustrates the origin and termination of WGA-Alexa 555 labeled spinocerebellar neurons. B. Image of an injection site after delivering WGA-Alexa 555 into the lower thoracic upper lumbar region of the adult spinal cord. C. Wholemount image of the anterior lobules following an injection of WGA-Alexa 555 into the lower thoracic-upper lumbar region of the spinal cord. D. WGA-Alexa 555 anterograde tracing of the spinocerebellar tract reveals bands of mossy fibers as seen on a coronal tissue section. The lobules are defined by Roman Numerals and the numbers label mossy fiber bands on either side of the midline (applies to all images). Scale bars: B, 500 μm C, 500 μm D, 200 μm.
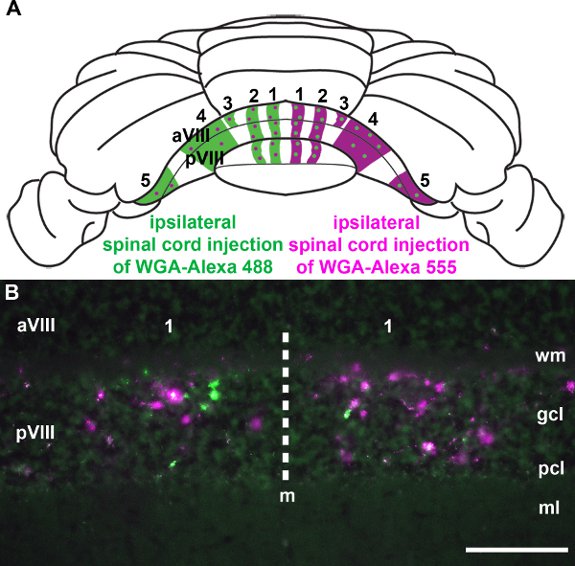
Figure 4. WGA-Alexa tracers are efficient for labeling multiple neural pathways in the same animal. A. Wholemount schematic of the mouse cerebellum summarizing the overall pattern of spinocerebellar mossy fiber bands. WGA-Alexa 555 was injected into the right side of the lumbar spinal cord and WGA-Alexa 488 into the same segment on the left side. B. As seen on a coronal tissue section cut through the posterior lobules, both WGA-Alexa tracers were transported to the cerebellum and successfully labeled distinct subsets of terminals (see also Reeber et al. 2011). Abbreviations: molecular layer (ml); Purkinje cell layer (pcl); granule cell layer (gcl); white matter (wm). Scale bars: B, 100 μm.
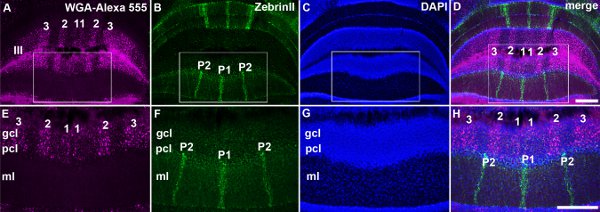
Figure 5. WGA-Alexa tracers can be used in combination with immunohistochemistry and histology for triple labeling of neurons and projections. A. WGA-Alexa 555 is deposited in mossy fiber terminals in lobule III. B. ZebrinII staining reveals an array of Purkinje cell stripes in lobule III. C. DAPI staining of neuronal and glial nuclei. D. Merged image of panels A, B, and C showing triple labeling of afferent bands, Purkinje cell stripes, and general cytoarchitecture. E-H. High magnification images of the boxed regions shown in panels A-D. Purkinje cell stripes are numbered as previously described (reviewed in (Apps and Hawkes 2009)). Abbreviations: molecular layer (ml); Purkinje cell layer (pcl); granule cell layer (gcl). Scale bars: D, 500 μm (for A-C); H, 500 μm (for E-G).
Discussion
We have described the surgical and technical details required for successful axonal and dendrite tracing using a novel fluorescent-based approach for rapidly labeling neural projections in developing and adult mice. Using WGA-Alexa we show how tracers and markers can be used for analyzing patterned circuit topography at high resolution and in three dimensions.
Many tracers are available for tracing neuronal circuits including Cholera toxin subunit B, Biocytin, Neurobiotin, Phaseolus vulgaris leucoagglutinin (PHAL), fluororuby, fluoremerald and fluorogold. In addition, recent genetic and viral based tracers have demonstrated that molecularly distinct neuronal subsets are topographically connected to their targets with great precision. Note that although some neural tracers are predominantly transported in either the anterograde or retrograde direction (e.g. BDA 10,000 mw versus 3000 mw), tracer molecules are often transported in both directions. In our studies, we introduce WGA-Alexa based tracers as reliable neuroanatomical tools for analyses of topographic projection patterns. We show that WGA-Alexa fluoresces brightly, is transported rapidly, and is versatile enough to be paired with immunohistochemical markers including those for cerebellar sagittal compartments (Fig. 3).
We have found several limitations of using WGA-Alexa in comparison to other available neuroanatomical tracers. In contrast to BDA (Wu et al. 1999), we previously showed that WGA-Alexa (and WGA-HRP) does not reveal the entire morphology of complex terminal endings (Reeber et al. 2011). However, we improved the value of the anatomical information gained from traced terminals by pairing WGA-Alexa tracing with immunohistochemical staining for vesicular glutamate transporter 2 (VGLUT2) and cocaine and amphetamine regulated transcript peptide (CART) immunohistochemistry (Reeber et al. 2011; Reeber and Sillitoe, 2011). Another shortcoming of WGA-Alexa is that the signal degrades relatively quickly on tissue sections, despite being mounted in media that protect the fluorescent signal. Therefore, we typically image the tissue immediately after cutting, although imaging within 2 days of cutting still allows labeled fibers and terminals to be successfully imaged. There is a tendency for the WGA-Alexa signal to lose intensity during immunostaining of the tissue sections. Using fewer and shorter washes during staining can minimize this problem. Another recommendation is to always mount and image one set of the traced tissue sections on the day of cutting for a reference set to compare with adjacent sections that will be processed for immunohistochemistry. In our hands OCT (Tissue-Tek, Sakura Finetek, Torrance, CA) embedded tissue blocks kept at -80 °C after perfusion and cryoprotection can be stored for extended periods of time without any loss of tracer intensity.
Our approach of tracing fibers could be easily adapted for tracing neural maps in cortical, brainstem, and spinal pathways. We are currently exploring the possibility of using WGA-Alexa tracers for in vivo imaging of circuit formation in genetically modified animals and for studying the dynamics of circuit formation after selective tract lesions and pharmacological manipulations. Since the rapid transport of WGA-Alexa tracers allows for short-term analysis our approach has the potential for revealing the dynamic changes that occur during structural plasticity of topographic circuits.
Divulgaciones
The authors have nothing to disclose.
Acknowledgements
This work was supported by new investigator start-up funds from Albert Einstein College of Medicine of Yeshiva University to RVS.
Materials
| Equipment/Reagents | Model/Catalogue number | Company |
| Bead sterilizer | Model Steri 250 Cat. # 18000-45 | Fine Science Tools |
| Cauterizer | Cat. # 18000-00 | Fine Science Tools |
| Borosilicate glass capillaries | Cat. # 300056 | Harvard Apparatus |
| Dual stage Glass Micropipette Puller | Model 001-PC-10 | Narishige |
| Micrometer syringe | Cat. # GS-1100 | Gilmont Instruments |
| Small Animal Stereotaxic Instrument | Model 940-A | Kopf Instrumentation |
| Electrode Manipulator | Model 960 | Kopf Instrumentation |
| Vetcare chamber | Cat. # 340508 | Harvard Apparatus |
| Heating Pad | Cat. # 341241 | Harvard Apparatus |
| Leica DFC360 FX camera | DFC360 FX | Leica |
| Leica DFC490 camera | DFC490 | Leica |
| Leica DM5500 microscope | DM5500 | Leica |
| Leica DFC3000 FX camera | DFC3000 FX | Leica |
| Leica MZ16 FA microscope | MZ16 FA | Leica |
| CY3 Filter | Model # 11600231 | Leica |
| FITC Filter | Model # 11513880 | Leica |
| A4 DAPI/UV filter | Model # 11504162 | Leica |
| Wheat germ agglutinin, Alexa Fluor 488 conjugate | Cat. #W11261 | Invitrogen |
| Wheat germ agglutinin, Alexa Fluor 555 conjugate | Cat. #W32464 | Invitrogen |
Referencias
- Apps, R., Hawkes, R. Cerebellar cortical organization: a one-map hypothesis. Nat. Rev. Neurosci. 10, 670-681 (2009).
- Grishkat, H. L., Eisenman, L. M. Development of the spinocerebellar projection in the prenatal mouse. J. Comp. Neurol. 363, 93-108 (1995).
- Mesulam, M. . Tracing neural connections with horseradish peroxidase. , (1982).
- Reeber, S. L., Sillitoe, R. V. Patterned expression of a cocaine- and amphetamine regulated transcript (CART) peptide reveals complex circuit topography in the rodent cerebellar cortex. Journal of Comparative Neurology. , (2011).
- Reeber, S. L., Gebre, S. A., Sillitoe, R. V. Fluorescence mapping of afferent topography in three dimensions. Brain. Struct. Funct. , (2011).
- Sillitoe, R. V., Stephen, D., Lao, Z., Joyner, A. L. Engrailed homeobox genes determine the organization of Purkinje cell sagittal stripe gene expression in the adult cerebellum. J. Neurosci. 28, 12150-12162 (2008).
- Sillitoe, R. V., Vogel, M. W., Joyner, A. L. Engrailed homeobox genes regulate establishment of the cerebellar afferent circuit map. J. Neurosci. 30, 10015-10024 (2010).
- Vig, J., Goldowitz, D., Steindler, D. A., Eisenman, L. M. Compartmentation of the reeler cerebellum: segregation and overlap of spinocerebellar and secondary vestibulocerebellar fibers and their target cells. Neurociencias. 130, 735-744 (2005).
- Vogel, M. W., Prittie, J. Topographic spinocerebellar mossy fiber projections are maintained in the lurcher mutant. J. Comp. Neurol. 343, 341-351 (1994).
- Voogd, J., Broere, G., van Rossum, J. The medio-lateral distribution of the spinocerebellar projection in the anterior lobe and the simple lobule in the cat and a comparison with some other afferent fibre systems. Psychiatr. Neurol. Neurochir. 72, 137-151 (1969).
- Wu, H. S., Sugihara, I., Shinoda, Y. Projection patterns of single mossy fibers originating from the lateral reticular nucleus in the rat cerebellar cortex and nuclei. J. Comp. Neurol. 411, 97-118 (1999).

