- 00:00Panoramica
- 00:58The Anatomy of the Breast Tissue
- 01:47Preparation and Considerations
- 04:52Inspection of the Breast Tissue
- 07:12Regional Lymph Node Examination
- 09:55Clinical Breast Examination
- 13:58Summary
종합 유방 시험
English
Condividere
Panoramica
근원:
알렉산드라 던컨, GTA, 프액시스 임상, 뉴 헤이븐, CT
티파니 쿡, GTA, 프랙시스 임상, 뉴 헤이븐, CT
자이딥 S. 탈워와르, MD, 내과 및 소아과, 예일 의과 대학, 뉴 헤이븐, CT
유방 검사는 연례 부인과 시험의 중요한 부분이고 그들의 성 또는 성별 표현에 관계없이 모든 환자를 위해 중요합니다. 8명의 여자 중 1명은 유방암으로 진단될 것입니다; 남성 유방암은, 비록 적게 일반적이더라도, 1000에서 1의 일생 부각이 있습니다.
유방 검사는 환자에게 침략적인 느낄 수 있습니다, 그래서 환자가 취약하지 않고 편안하고 힘을 느낄 수 있도록 가능한 모든 것을 하는 것이 중요합니다. 심사관은 구두와 비언어적으로 의사 소통하는 것을 알고 있어야하며 가능한 한 환자에게 제어 할 수 있습니다 (예 : 항상 자신의 가운을 제거 할 수 있음). 심사관은 환자의 편안함뿐만 아니라 보호자를 활용할 수 있습니다. 일부 기관은 보호자의 사용을 필요로한다.
지나치게 임상적인 언어를 피하는 것이 항상 중요하지만, 특정 구어체 단어는 이 시험에서 지나치게 친밀한 배려에서 지나치게 친밀한 것으로 선을 넘을 수 있습니다. 이 언어는 성적 느낄 수 있기 때문에이 시험에서 “터치”와 “느낌”이라는 단어를 피하는 것이 도움이됩니다. 대신 “평가”, “확인” 또는 “검사”와 같은 단어를 사용합니다.
또한, 모범 사례는 여성의 해부학 환자가 다른 성별 (예 : 트랜스 젠더, 성별 키커 등)으로 식별 할 수 있기 때문에 환자의 성별에 대한 가정을 피하는 것을 지시합니다. 이 비디오는 그의 역사가 유방 건강과 관련있는 특정 불만 또는 위험 요소를 밝히지 않은 환자에 대한 접근을 묘사합니다.
누락 된 잠재적 인 발견을 피하기 위해, 유방 검사는 체계적인 접근으로 수행되어야하며 세 가지 주요 구성 요소로 구성되어야한다 : 유방 조직의 육안 검사, 림프절의 심포피션, 유방 조직의 심포피.
유방 조직은 쇄골 바로 아래에서 다섯 번째 갈비뼈 (또는 브래지어 라인)로 확장됩니다. 측면으로, 그것은 흉선 경계에 미색 선에서 확장됩니다. 유방은 4개의 사분면에서 볼 수 있습니다; 상부 외사분면은 대부분의 조직을 가지며 많은 림프절의 위치이며, 스펜스(또는 축꼬리)의 꼬리는 축실라의 가장자리까지 확장되어 가슴 벽에 부착된다(도1).
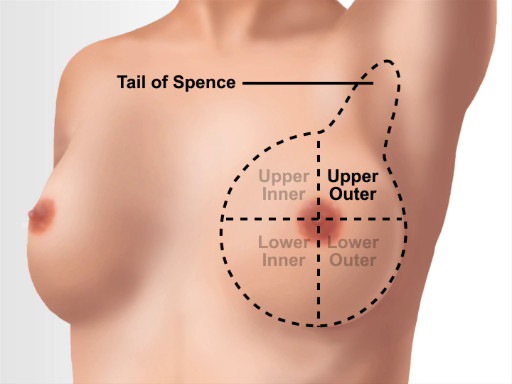
그림 1. 유방 해부학 적 랜드 마크.
Procedura
Applications and Summary
This video covers how to perform the clinical breast exam and how to visually inspect and examine breast tissue and associated lymph nodes. Before the breast exam is started, the examiner should establish the expectation that the patient can communicate questions and concerns during the visit. The patient should be asked to remove the gown only when necessary and reminded when to raise the gown during the exam. This minimizes feelings of vulnerability.
The clinician should begin with an overview of the exam and explain every step of the examination as they reach it. The examination starts with the visual inspection of the breast tissue, both still and in motion. Any potential signs of domestic or intimate partner violence should be noted. It should be remembered that some patients engage in rough sex, so bruising might not be indicative of violence. While proceeding through the exam, any findings must be documented. There is a wide range of healthy anatomy, and what is normal for one patient may be abnormal for another. For example, inverted nipples are perfectly normal for some patients; however, an inverted nipple may be concerning if it is only on one side or is a recent change.
The next step is the axillary lymph node exam, which is followed by systematic assessment of the breast tissue. The clinician should include the patient in the exam wherever possible and educate the patient so they are not alarmed by natural structures. If something concerning is found in one breast, a note of the location should be made and the other breast assessed to see if there are similar structures.
Beyond asking clarifying questions, the examiner should not discuss concerns or follow-up testing while the exam is ongoing. It is advised to wait until the patient is dressed; then, reenter the room to discuss concerns and next steps, as having those conversations while the patient is unclothed and vulnerable heightens anxiety. When an exam with no negative findings is finished, the clinician should always tell the patient "everything appears healthy and normal." This simple statement empowers patients to equate their body structures as normal.
Trascrizione
A comprehensive breast assessment is a key component of the annual gynecological exam. This exam can feel invasive to patients, so it is important to do everything possible to make them feel comfortable and empowered, rather than vulnerable.
In order to avoid missing potential findings, the breast exam should be performed in a systematic manner. The three main components of this exam are visual inspection, palpation of the lymph nodes, and palpation of the breast tissue. In this video, we will first briefly review the anatomy of the breast tissue, and then we will demonstrate the essential steps required to carry out a comprehensive breast examination.
The breast tissue extends from directly under the clavicle to around the fifth rib or bra line. Laterally, it extends from the mid-axillary line to the sternal border. A breast can be viewed in four quadrants: the upper inner, the upper outer, the lower inner and the lower outer quadrant. The upper outer quadrant has the most tissue and is the location of several lymph nodes. It is also the location of the Tail of Spence or the axillary tail, which extends the breast tissue to the edge of the axilla, where it attaches to the chest wall.
First, establish an expectation of comfort. Ask what the patient would like to be called first…”Dialogue”. Additionally, the best practice dictates avoiding assumptions about patients’ gender, as patients with female anatomy may identify as another gender, for example, transgender or genderqueer…”Dialogue”. Then request the patient to communicate their questions and concerns during the visit. For example, ask questions like…”Dialogue”.
Before beginning the exam, wash your hands thoroughly. While it is not necessary to wear gloves for the breast exam as long as the patient’s skin is healthy and unbroken, a practitioner may choose to wear them to perform the manual portions of the exam. This could be for the sake of the patients, or their own, comfort. If there is a doubt, then it is better to wear gloves, as a patient can pick up on any anxiety, which may make them feel uncomfortable. During the exam, the examiner should be aware of what they are communicating, both verbally and non-verbally, and give their patients control wherever possible. An examiner may choose to utilize a chaperone for the patient’s as well as their own comfort. However, we will not be using a chaperone in this video demonstration.
While it is always important to avoid overly clinical language, in a sensitive exam like this one, certain colloquial words can cross the line from being caring to being overly intimate. Therefore, it is helpful to avoid the words “touch” and “feel”. Instead, use words like “assess,” “check,” or “examine”. Before starting with the procedural steps, introduce and summarize the three parts of the exam for the patient…”Dialogue”.
With the patient seated on the exam table, ask them to lower the gown to their waist. Visually inspect the breast tissue while the patient remains still. Assess for redness, scaly skin, visible lumps, spontaneous discharge, moles, inverted nipples, and dimpling. If you notice something, then, in order to distinguish if it is normal or a recent change, ask the patient about it …”Dialogue”
Also inspect for potential signs of domestic violence and trauma. These include: bruises, burns, bite marks, scars, etc. If you notice any of these, then discuss the cause with the patient.
The next step is to inspect the breast tissue in motion. To do so, first ask the patient to slowly raise their arms above their head, clasp and push them together and then slowly lower them to their sides. Through all the motion steps, the breast tissue should move freely, away from the chest wall, and no tissue should appear to dimple or retract. Then move to one side of the patient; offer your arm, palm down, for support, and ask the patient to lean forward. Observe the side of the breast tissue movement as the patient does so. Then place a hand mirror under their breast. Angle the mirror to see the skin and tissue on the underside. Then ask the patient to sit back and you should angle the mirror accordingly to observe how the lower breast tissue moves during this motion. Repeat the same on the other side. Sometimes this step requires patient standing up. Next, ask the patient to place their hands on their hips and roll their shoulders forward. Observe how the tissue moves.
The next part is the regional lymph node examination. First, assess the supraclavicular lymph nodes. Using your index and middle fingers, hook over the patient’s clavicles. Then, using a circle-slide motion, palpate the supraclavicular nodes. Next, examine the axillary lymph nodes, one side at a time. For this, ask the patient to put their gown back on, leaving one shoulder exposed, in this case the right one. Then have them rest their right forearm on your shoulder, while you stand at their side.
Before you begin, inform the patient that they may feel some pressure… To palpate the central nodes, use your right index and middle fingers to push up and under the fatty tissue toward the apex of the axilla. Then press firmly against the upper thoracic wall, which feels like a large, curved bone. From there, palpate down the mid-axillary line to the fifth rib. Drag your fingers across the skin between palpations rather than lifting your hand. This will help in assessment of the most superficial layer of tissue and ensure that no area is skipped. Next, ask the patient to make a fist in order for you to view the line between the biceps and triceps. Subsequently, ask them to release the fist, and then palpate the brachial chain using two fingers of your right hand. Then place your left index, middle and ring fingers behind the patient’s pectoralis muscle and your right hand on the front of the chest. This helps you to brace the tissue and assess the pectoral lymph nodes. Apply anterior pressure with your left hand while moving it up and down in a windshield-wiper motion to assess the tissue and nodes. After that move your right index, middle and ring fingers in front of the teres major muscle and keep your left hand on the patient’s back. This time apply posterior pressure with your right hand, and move it up and down in a windshield-wiper motion to assess the tissue and the subscapular nodes. Repeat the entire process on the patient’s left side.
Following lymph node examination, the last set of steps focus on the clinical breast exam, which involves assessment of the breast tissue using finger pads. There are a few well-accepted approaches for this part of the exam: the concentric circle approach, the radial spoke or wedge technique and the vertical strip or linear method. In this video, we will demonstrate the vertical strip method. However, regardless of the approach, the palpation technique remains the same.
First step is to request the patient to lie down and have them roll away from you and onto their side. Then place a pillow behind their back and ask them to lie flat again. Next, request the patient to lower their gown on the side close to you and raise the corresponding arm over their head. Then, using the pads of three fingers, begin palpating at the top of the mid-axillary line and move vertically down in a circle-slide motion. At each spot, spiral down through three levels of pressure: superficial, medium and deep. Continue to palpate till you reach the fifth rib, then, move an inch over and palpate in a straight line up to the clavicle. Continue to examine the breast in this pattern until finishing at the nipple line. Before passing over their nipple, remember to notify the patient…and then continue.
During this palpation, a healthy breast tissue may feel lumpy as it includes fatty tissue, lobules, ducts, fibrocystic changes, the inframammary ridge and lymph nodes. If all the structures are healthy, then they have clearly defined boundaries and will move freely under your fingers. Unhealthy structure may feel stuck to the tissue around them or matted together.
Next, ask the patient to roll away from you. Move the pillow and place it under the patient’s head and ask them to roll back and lay supine. Now continue the exam by re-assessing the nipple line, moving in the vertical strip pattern until you reach the sternal border. Then ask the patient to lower their arm to their side to allow palpation of the infraclavicular nodes and tail of Spence simultaneously. Starting at the mid-clavicular area, palpate directly below the clavicle to the edge of the shoulder. Subsequently palpate back a quarter of the way across the chest in a zigzag pattern, then move to the distal border of the upper outer quadrant to finish checking the superior Tail of Spence. Lastly, to assess the inferior Tail of Spence, place three fingers under the pectoral muscle and move in a windshield-wiper like motion. This concludes the assessment for one side. You should repeat the same steps for the opposite side.
After the examination is complete, ask the patient to put their gown back on. Inform the patient that everything appears healthy and normal, if this is indeed the case. Otherwise, just exit the room and allow the patient to dress. And only after confirming that the patient is dressed, return to the room and discuss the findings and next steps.
You have just watched a JoVE video detailing a comprehensive breast examination. You should now understand the systematic sequence of steps that every physician should follow in order to conduct this exam.
Remember, carefully choosing words while conversing with the patient during the exam, allowing them to take control wherever possible, and following the best clinical practices, will allow you to conduct this examination in a sensitive yet effective manner. As always, thanks for watching!