A Robotic Platform to Study the Foreflipper of the California Sea Lion
Summary
A robotic platform is described that will be used to study the hydrodynamic performance—forces and flowfields—of the swimming California sea lion. The robot is a model of the animal's foreflipper that is actuated by motors to replicate the motion of its propulsive stroke (the 'clap').
Abstract
The California sea lion (Zalophus californianus), is an agile and powerful swimmer. Unlike many successful swimmers (dolphins, tuna), they generate most of their thrust with their large foreflippers. This protocol describes a robotic platform designed to study the hydrodynamic performance of the swimming California sea lion (Zalophus californianus). The robot is a model of the animal's foreflipper that is actuated by motors to replicate the motion of its propulsive stroke (the 'clap'). The kinematics of the sea lion's propulsive stroke are extracted from video data of unmarked, non-research sea lions at the Smithsonian Zoological Park (SNZ). Those data form the basis of the actuation motion of the robotic flipper presented here. The geometry of the robotic flipper is based a on high-resolution laser scan of a foreflipper of an adult female sea lion, scaled to about 60% of the full-scale flipper. The articulated model has three joints, mimicking the elbow, wrist and knuckle joint of the sea lion foreflipper. The robotic platform matches dynamics properties—Reynolds number and tip speed—of the animal when accelerating from rest. The robotic flipper can be used to determine the performance (forces and torques) and resulting flowfields.
Introduction
While scientists have investigated the basic characteristics of sea lion swimming (energetics, cost of transport, drag coefficient, linear speed and acceleration1-3, we lack information about the fluid dynamics of the system. Without this knowledge, we limit potential high-speed, high-maneuverability engineering applications to body-caudal fin (BCF) locomotion models4. By characterizing a different swimming paradigm, we hope to expand our catalog of design tools, specifically those with the potential to enable quieter, stealthier forms of swimming. Thus, we study the fundamental mechanism of sea lion swimming through direct observation of the California sea lion and laboratory investigations using a robotic sea lion foreflipper5,6 .
To do this, we will employ a commonly used technique for exploring complex biological systems: a robotic platform7. Several locomotion studies—both of walking8,9 and swimming10—have been based on either complex11 or highly simplified12 mechanical models of animals. Typically, the robotic platforms retain the essence of the model system, while allowing researchers to explore large parameter spaces13-15. While not always characterizing the entire system, much is learned through these platforms that isolate a single component of a locomotive system. For example, the fundamental functioning of unsteady propulsors, like the back-and-forth sweeping of a caudal fin during carangiform swimming, has been intensely explored through experimental investigations of pitching and/or heaving panels12,16,17,18. In this case, we can isolate certain modes of this complex motion in ways that animal based studies cannot. Those fundamental aspects of propulsion can then be used in the design of vehicles which do not need the biological complexity evolution provides.
In this paper, we present a novel platform for exploring the 'clap' phase of the sea lion thrust-producing stroke. Only a single foreflipper—the 'roboflipper'—is included in the platform. Its geometry is derived exactly from biological scans of a California sea lion (Zalophus californianus) specimen. The roboflipper is actuated to replicate the motion of the animals' derived from previous studies1. This robotic flipper will be used to investigate the hydrodynamic performance of the swimming sea lion and to explore a wider parameter space than animal studies, particularly those of large aquatic mammals, can yield.
Protocol
1. Digitize a Specimen of a Sea Lion Foreflipper
- Scan a specimen of a Sea lion foreflipper.
- Obtain a specimen of a sea lion flipper from a deceased individual (Figure 1a).
NOTE: In our case, they were obtained from the Smithsonian Zoological Park in Washington, D.C. - Hang the foreflipper vertically from its base (where the foreflipper attaches to the animal's body). This both allows the flipper to be straight when scanned, and exposes the entire surface for scanning.
- Scan flipper using a high-resolution structured light scanner, with an accuracy of approximately 0.5 mm, and error of approximately 0.1 mm (Figure 1b).
- Obtain a specimen of a sea lion flipper from a deceased individual (Figure 1a).
- Import the point cloud into CAD software and render it as a surface. To do this, click 'Open' and select the desired .obj file. Click on 'Import' to import the file into the CAD software.
- Manipulate the resulting point cloud using a computer-aided design (CAD) software by clicking on 'Extruded cut' and cutting out the flesh part (unwanted part) of the scan. Next, click on 'Scale' to obtain the appropriate scaling for the robotic flipper (68% of the full size). Inspect flipper for sufficient detail capture by comparing to the original specimen (Figure 2).
- Create the mold around the flipper.
- In a CAD software, use the flipper surfaces to form a mold by creating a surrounding volume around the flipper surface. Do this by extruding a rectangular block by clicking on 'Sketch' to draw a rectangle and then extruding it to more than the height of the flipper to completely encompass it.
- Click on 'Assembly' and import both parts (flipper and rectangular block) into the working area. Click on 'Mate' and make the front and top plane of both the flipper and mold as coincident. This automatically places the flipper inside the mold.
- Select the mold from the design tree and click 'Edit Part'. Once the part is selected, click on 'Insert>Features>Cavity' to make a cavity of the flipper inside the mold. Sketch a line at the center of the rectangular mold and click on 'Split' to form two parts of the same mold.
- Click on 'Cut Part' to separate the surrounding volume into two parts for easy flipper extraction. Insert cavities and pegs on each half of the volume and save it as part one and two of the flipper mold (Figure 3).
- Convert the '.SLDRPT' files of the mold to '.STL'. Import these files to the proprietary software of the 3D printer and click on 'Print' to generate the 3D printed mold.
2. Design the Bone Structure
- Open the digital foreflipper in a CAD software and obtain an image of the Sea lion foreflipper bone structure for reference (such as Figure 1 in English, 197719).
- Design three different pieces that mimic the bone structure that will fit inside the digital model of the foreflipper. Throughout this procedure, 'base' refers to the end of a part closer to the base of the foreflipper and 'tip' refers to the end of the part closer to the tip of the foreflipper.
- Base Piece
- Make the length of this piece proportional to the distance between the shoulder joint and the wrist of the Sea lion flipper (measurements are obtained using measuring tape). Do this using a CAD software by clicking on 'Sketch' and designing the shape of the base piece (Figure 4).
- Add knuckles at both ends of the part by clicking on 'Sketch' and drawing two circles. Click on 'Boss Extrude' to extrude the desired length from the plane of the base piece. Click on the sketch of the smaller circle to cut into the extrude by clicking 'Cut Extrude' to make room for the shaft. To strengthen this joint, click on 'Fillet' to smoothen the sharp joints.
NOTE: The dimensions of the circles depend on the size of the shaft to be used during mounting the flipper on top of the water flume. In our case, the diameter of the smaller circle is 0.5 inches and the bigger circle is 1 inches. The base end will be sitting outside the flipper skin geometry, so the size of the knuckles does not fall under the constraints of the skin.
- Middle Piece
- Make the length of this piece proportional to the distance between the wrist joint and the knuckle joint of a Sea lion. Do this by clicking on 'Sketch' and sketching the desired shape (as shown in Figure 4b) on a plane. Once the geometry is designed, click on 'Extrude' to get the basic three-dimensional shape of the middle piece. Input the extruded length as 0.1650 inches.
NOTE: The desired shape of the middle piece in our experiment is a trapezoid with a height of 2.25 inches and the length of the two bases as 1.625 and 0.850 inches respectively. - Add knuckles on both ends. Do this as described in step 2.2.1.2. The diameter of the extruded cut is 0.125 inches. Connect the knuckles on the base end to the tip end of the base piece with an axel to form a hinge representing the wrist joint.
NOTE: The knuckles need to fit inside the volume of the foreflipper, so design accordingly. - Add a tower approximately 1 cm in height to the tip end of the piece on both sides.
- To add a tower, click on 'Sketch' and sketch a rectangle on the base of the model. Extrude the sketch by selecting the sketch and clicking on 'Boss Extrude'. The thickness of the tower in this particular case is 0.165 inches.
- Click on 'Fillet' and select the model and one edge of the extruded tower. This strengthens the sharp joint where the tower and the base of the middle piece are connected. It is okay if the tower protrudes from the geometry of the skin. The tower should be thick enough to withstand the forces generated during a flipper clap. See Figure 4 for reference.
- Make the length of this piece proportional to the distance between the wrist joint and the knuckle joint of a Sea lion. Do this by clicking on 'Sketch' and sketching the desired shape (as shown in Figure 4b) on a plane. Once the geometry is designed, click on 'Extrude' to get the basic three-dimensional shape of the middle piece. Input the extruded length as 0.1650 inches.
- Tip Piece
- Make the length of this piece proportional to the distance between the knuckle joint and the tip of the longest finger bone of a Sea lion. Do this by clicking on 'Sketch' and sketching a desired shape on a plane. Once the geometry is designed, click on extrude to get the basic three-dimensional shape of the tip piece.
- Add knuckles on both ends. Do this as described in step 2.2.1.2. The diameter of the extruded cut should be equal to the diameter of the axle, which in this experiment is 0.125 inches. The knuckles on the base end will be connected to the tip end of the middle piece with an axle to form a hinge representing the knuckle joint. The geometry of these knuckles needs to fit inside the geometry of the foreflipper skin, so design accordingly.
- Add a tower approximately 1 cm in height to the base end of the piece on both sides. Do this described in step 2.2.2.3. The thickness of the tower in this particular case is 0.165 inches. It is okay if the tower protrudes from the geometry of the skin. The tower should be thick enough to withstand the forces generated during a flipper clap. See Figure 5 for reference.
- Base Piece
3. Creating a Flipper
- 3D print the skeleton (base, middle and tip pieces) of the flipper. Convert the '.SLDRPT' file from CAD to '.STL' and import it into the printer's proprietary software and click 'Print'.
NOTE: The printing instructions are different for each printer.- Reinforce the knuckles of the middle and tip piece with an adhesive (epoxy) and carbon threads. To do this, cut carbon threads of length 0.750 inches. Apply adhesive to the 3D printed bone structures and lay the threads over the knuckles. It is not necessary to reinforce the large knuckles on the base piece (Figure 5a).
- Drill holes at the bottom of each tower the diameter of the Kevlar string (strings that will be used to actuate the joints).
- Assemble all bone pieces together from base to tip using axles. Do this by placing all the components on a flat table as shown in Figure 4. To connect the base and middle piece, align the knuckles of the parts and insert the axle. Use the same technique to connect the middle and the tip piece together. Use an adhesive on each end of each axle to ensure the axle does not move laterally (Figure 5b).
- Cut plastic tubes to the following length. Cut four tubes the length of the base bone piece (L1 = 8 cm) and two tubes the length of the middle piece (L2 = 6 cm).
- Cut 4 pieces of Kevlar string, each 3 feet in length.
- Slide one string through an L1 tube and then an L2 tube. Slide another string through an L1 tube. Repeat the process with the remaining tubes and strings.
- Place the tubes on top of the bone structures and use a clear tape to hold them in position temporarily. Using an adhesive, stick the tubes onto the bone structure and then remove the tapes.
NOTE: There is no specific position in which the tubes have to be placed, the critical aspect is to just stick them on the surface of the structure. Use Figure 5c as a guideline. - Thread the Kevlar string from L1 tube and L2 tube through the holes drilled onto the tip and middle pieces as described in step 3.1.2. Make a small but secure knot once the string is through the hole (Figure 5d).
- Adding the skin of the flipper to create a final flipper.
- Measure 200 mL of silicon and silicon medium in two different containers.
- Pour both these liquids into a steel bowl. Add paint thinner (not to exceed 10% of weight of the total mixture) to the mixture for easy pouring and mixing.
- Use a stand mixer to mix the mixture thoroughly for 3 – 4 min. Color can be added at this step to achieve the desired visual effects. If a stand mixer is not available, use a whisk to mix it, taking care to scrape the sides and bottom of the container.
- Insert a rod into the knuckles of the base part and align it with the knuckles of the flipper mold. When the pegs fit into the cavities of the mold, the bone structure is aligned perfectly in the flipper mold. While holding down on the two parts of mold, secure the parts by using a clamp for added compression (this step is critical so that the silicon mixture does not leak from the gap between the two parts).
- Once the mixture is mixed, carefully pour it in the mold till the topmost knuckles of the bone structure. Oozing of liquid from the bottom hole in the mold is a sign of the mixture getting uniformly distributed. At the onset of this, plug the hole to avoid further flow of the liquid. Leave the liquid to cure for four hours before removing the flipper robot from the mold (see Figure 6).
4. Mounting
- To mount the silicon foreflipper on the water flume (Figure 7), create a mounting structure. A CAD representation of the finished assembly is shown. (Figure 8).
- Design a plate with a carefully extruded cut using CAD software. Click on 'Sketch' and draw a rectangle of dimensions 14 x 19 inches (the height does not matter as the laser cutter uses a .dwg file). Use a rectangular sheet of steel as the base to manufacture this plate. Upload a two-dimensional drawing from the CAD software on a computer attached to a steel laser cutter to attain the desired cuts.
NOTE: This plate houses the motor and the cut in it allows for the pulley system to work. The width of the plate is equal to the width of the water flume, thus making it easier to slide the plate over the flume. This type of placement helps in easy removal of the mounting assembly to replace parts or the foreflipper model. - Fix the foreflipper and the pulley onto a shaft, which slides into a triangular truss.
NOTE: A three-pulley system is implemented to transfer the torque/power from the motor to the rod. - Use bearings on either side to help the rod to rotate smoothly. To restrict the movement of rod in the lateral direction, place shaft collars on each end of the shaft.
- Design a plate with a carefully extruded cut using CAD software. Click on 'Sketch' and draw a rectangle of dimensions 14 x 19 inches (the height does not matter as the laser cutter uses a .dwg file). Use a rectangular sheet of steel as the base to manufacture this plate. Upload a two-dimensional drawing from the CAD software on a computer attached to a steel laser cutter to attain the desired cuts.
- Set the motion of the flipper by selecting the jogging function on the driver. Pressing the 'Up' button rotates the flipper clockwise and the 'Down' button rotates the flipper anticlockwise. The driver allows for change the revolutions per minute of the motor shaft according to the instructions in the manual20.
- Insert the right-angled dye port in the water and increase the pressure on the dye system. Adjust the speed of the dye to the freestream velocity of the water so the dye appears as a single smooth filament. Rotate the flipper so that the dye interacts and gets trapped with the resulting vortices generated.
Representative Results
The process described above yields a robotic model of a California sea lion foreflipper. The model can be used in two different ways. One is by actuating the flipper only at the root (Figure 6a). In this case, the driving motor sets the rotational rate of the first joint, but the resulting motion of the flipper is determined by the fluid-structure interaction between the flexible flipper and the surrounding water. Additionally, we can create robotic flippers that are actuated at the two lower joints in addition to the root (Figure 6b). This is done through the tower structures printed onto the skeleton pieces. Wires connected to the towers are connected to separate motors and can actively control the camber of the flipper during the clapping motion.
The purpose of the robotic flipper is to explore the hydrodynamics of the propulsive stroke of the California sea lion as described in Friedman, 20141. One way to do this, qualitatively, is through dye-based flow visualization. The robotic flipper is mounted to a recirculating water flume (Figure 7), using the assembly described above. The motor and flow speed, are set to explore a given parameter space—such as the Reynolds number based on the flipper chord (Re = cU/ν where ν is the dynamic viscosity of water) or angular velocity, ω, or acceleration, α.
The dye visualization shown in Figure 9 uses fluorescent dye injected just upstream of the leading edge of the flipper. The dye is entrained into the shear layer at the surface of the flipper and allows us to visualize the vortex structure of the wake. Figure 9a shows the stream of dye being injected upstream (to the right), of the flipper. The disturbances seen on the left side of the image are the result of the previous cycle. As the flipper moved through the injection location (Figure 9b), low pressure on the upper surface of the flipper causes the dye to be pulled around the flipper. Finally, (Figure 9c), a vortex forms as the flipper moves fully out of the plane. This structure convects downstream with the mean flow. These results demonstrate how this technique can be used to qualitatively determine the flowfield surrounding a sea lion during the propulsive stroke.
In addition to the qualitative measurements of the flipper wake, we can use particle image velocimetry (PIV) to measure the velocity field surrounding the flipper. Thus, we can obtain qualitative data about the hydrodynamics of sea lion swimming for a variety of reproducible situations.
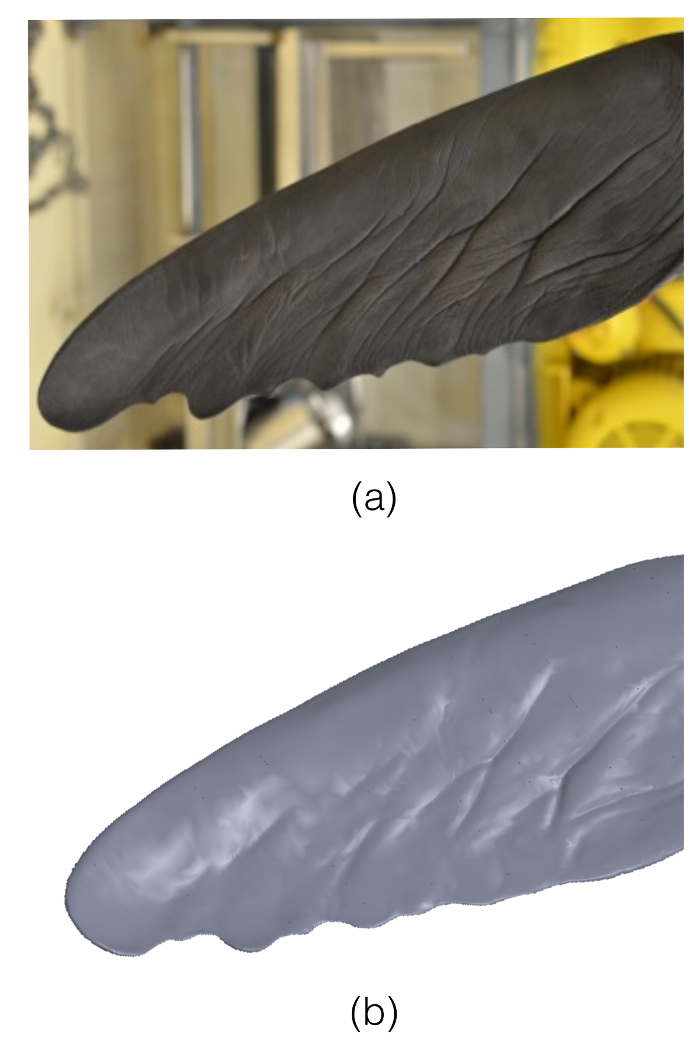
Figure 1: Flipper Bottom Comparison. A left foreflipper from a specimen of a female California sea lion is used to determine the robotic flipper's geometric parameters. The top panel (a) is a high resolution, two-dimensional image of the flipper. The lower panel (b) is a three-dimensional, computer-aided design rendering of the flipper from the laser scan. Please click here to view a larger version of this figure.
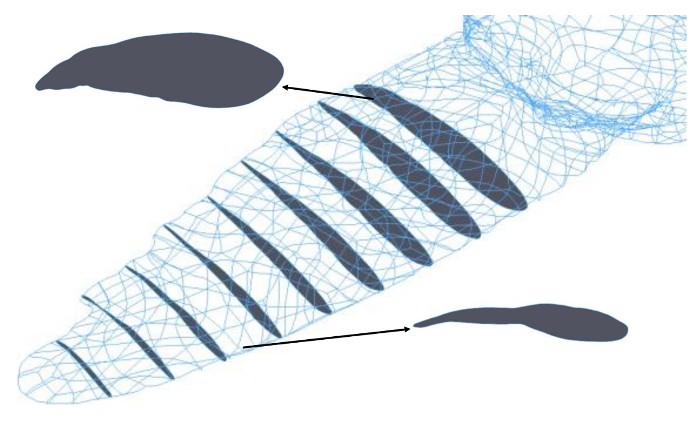
Figure 2: Wire. The digital image of the scanned flipper retains the geometric features of the animal's foreflipper. This image shows a wire-frame view of the digital flipper. Nine evenly spaced cross sections are shown in grey (every centimeter from the base to the tip of the foreflipper). The two isometric views (cross section 1 and 7) show that the flipper has an airfoil-like shape, with a thicker, rounded leading edge. The flipper is cambered, with its upper surface more convex and its inner surface concave. Please click here to view a larger version of this figure.
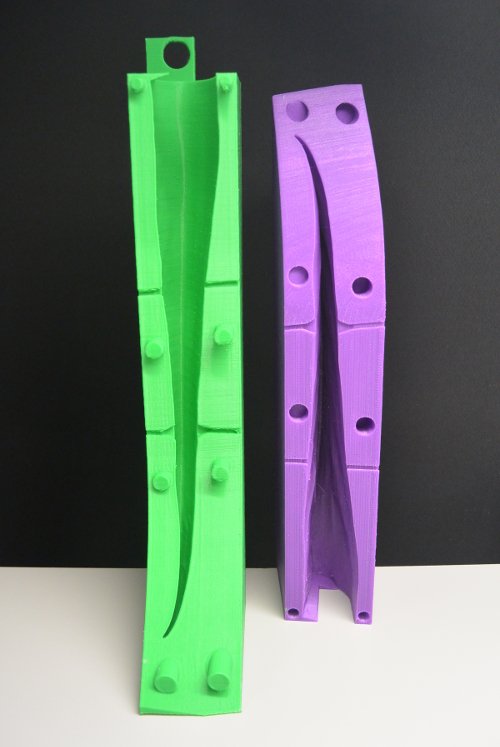
Figure 3: Mold. The mold used to create the flexible portion of the robotic flipper is created from the scanned flipper specimen. The mold has two parts: an upper (purple) and a lower section (green) that are aligned with male and female posts, respectively. The robot skeleton (Figure 4) is aligned inside the mold before the silicon mixture is poured into the mold. Please click here to view a larger version of this figure.

Figure 4: Skeleton. The flexible robotic flipper is supported by a skeleton printed in three pieces: the base (a), the middle (b) and the tip (c). The base and middle, and the middle and tip, are connected by dowels through knuckles at their joints. This allows for flexibility about those locations of the completed flipper. Please click here to view a larger version of this figure.
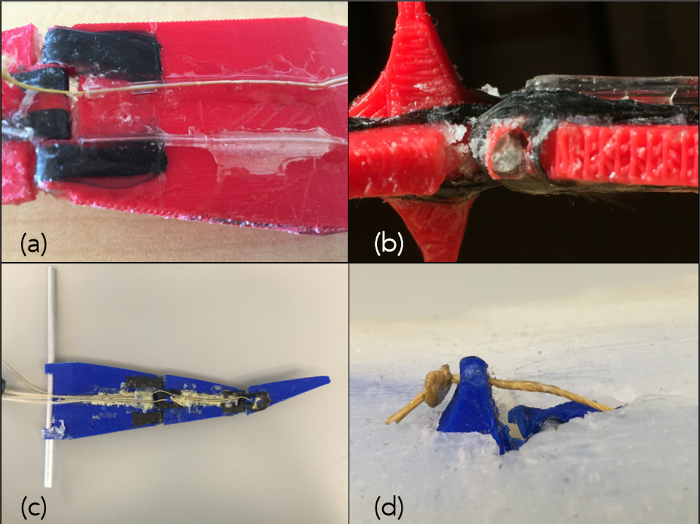
Figure 5: Skeleton Assembly. After printing, the skeleton parts, the knuckles are reinforced with carbon threads (a), they are connected at the knuckles with axels (b), guide-tubes are affixed to the base and middle pieces (c) and Kevlar threads are connected to the towers (d). Please click here to view a larger version of this figure.
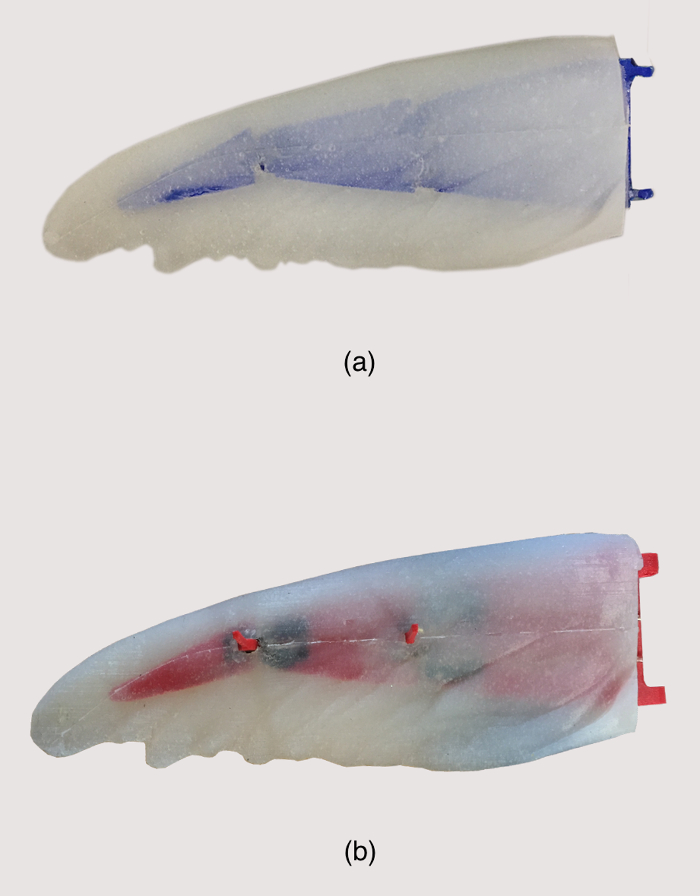
Figure 6: Robotic Flipper. The robotic flipper is made of flexible silicone (white) with an imbedded plastic supporting structure (blue). The shaft at the base rotates, emulating the rotation at the elbow and shoulder of the animal. The robotic flipper can be passive (a), where it is only actuated at the root and the resulting motion is based of fluid-structure interactions, or active (b) where Kevlar wires connect to the knuckles provide the necessary changes in camber. Please click here to view a larger version of this figure.
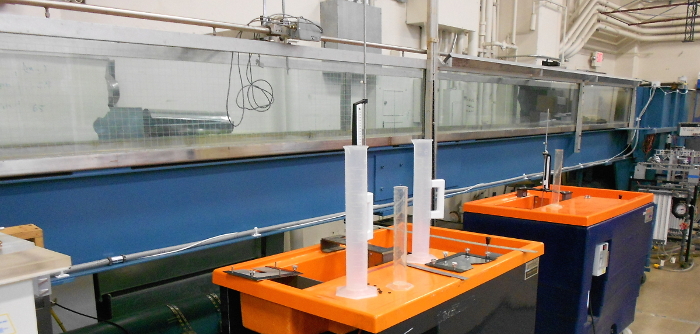
Figure 7: Flume. Flow experiments are conducted in the recirculating water flume at the George Washington University. The flume has a working section of 0.60 (width) by 0.40 (depth) meters, is 10 meters long, and can run at flow velocities of up to 1 m/s. Flow is from right to left, in the figure. The robotic flipper is mounted using the assembly shown in Figure 8 to the rails at the top of the test section. Please click here to view a larger version of this figure.
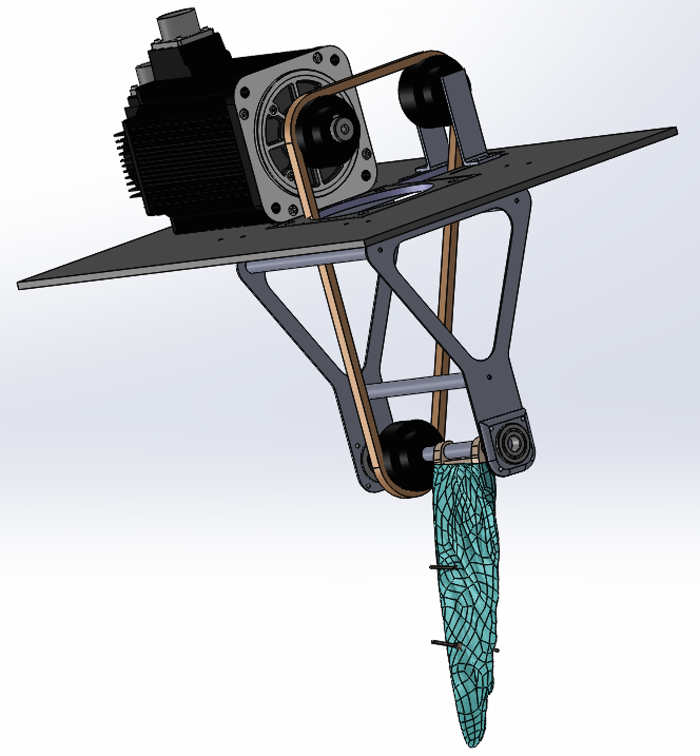
Figure 8: Assembly. The robotic flipper is mounted to a recirculating flume with a custom mounting. The mounting holds a servomotor that is connected to the main axis of the robotic flipper (located at the root of the robotic flipper) through a belt and three pulleys. Please click here to view a larger version of this figure.
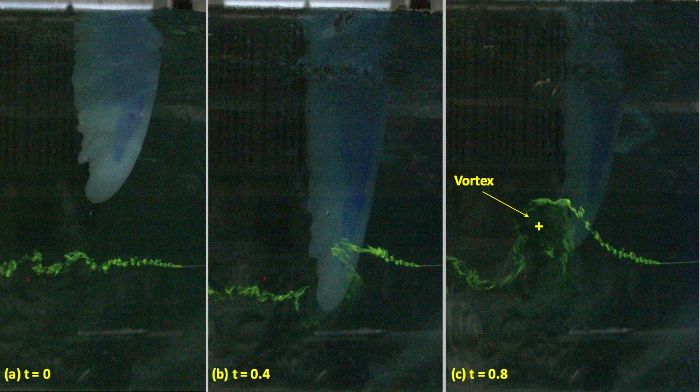
Figure 9: Dye visualization. Fluorescent dye is injected through a tube upstream of the flapping flipper. Three instances of time are shown: (a) the beginning of the cycle t= 0, (b) 40% of the way through the cycle t= 0.4, and (c) after 80% of the cycle t= 0.8. In the right panel (c), we can see a vortex that has formed around the tip of the flapping robotic flipper. Please click here to view a larger version of this figure.
Discussion
The robotic flipper apparatus will allow us to understand the hydrodynamics of the swimming California sea lion. This includes the basic thrust producing stroke (the 'clap'), as well as non-physical variations that animal studies cannot investigate. The robotic flipper has been designed for experimental versatility, thus, step 3—where the flipper itself is made—is critical in obtaining the desired results. While this apparatus is, clearly, just a model of the living system, in situ studies of the California sea lion are extremely difficult and the range of possible data is quite limited.
While sometimes possible, velocity field measurements on large aquatic animals are very difficult (e.g. untrained animals, non-research grade viewing glass, no control over the environment), and the errors are higher than laboratory experiments21. Furthermore, they require access to the animals that is often impossible to obtain and in such cases robotic platforms like the one we built allow for in depth investigations. In addition to replicating the living system as faithfully as possible, robotic models allow us to modify it in unrealistic ways. For example, the mold can be modified to alter the trailing edge morphology. Or, the texture of the surface can be changed to investigate the role of the microstructure on the swimming performance.
The use of a robotic platform to investigate the performance of a biological system gives only a partial view of that system—this is a limitation of this approach. Furthermore, this particular protocol isolates the foreflipper from the rest of the sea lion body. Thus, the results will not offer a complete view of the system and the body-flipper interactions. Further limitations include the homogenous properties of the flipper and point wise actuation (as opposed to the distributed actuation of musculoskelatal systems). Additionally, that material is compliant and can lead to fluid-structure-interactions that are not present in the physical system. This is minimized by using materials that closely replicate the overall biological properties, but can never be completely controlled for. Despite these limitations, much can be learned by comparing the performance of different activation modes and flow conditions.
The robotic flipper will form the basis of a rich research project that will provide insight into the fundamental physics of a unique paradigm of efficient swimming—the California sea lion. The platform is flexible, and each flipper can be made quickly with minimal cost. Thus, a large parameter space can be tested as new research questions arise.
Divulgaciones
The authors have nothing to disclose.
Acknowledgements
The authors would like to thank the George Washington University Facilitating Fund for financial support of the project. Mr. Patel is grateful the George Washington University School of Engineering and Applied Science Summer Undergraduate Program in Engineering Research and the Undergraduate Research award for financial support. Finally, we are grateful to the GWU Center for Biomemetics and Bioinspired Engineering (COBRE) for use of facilities controlled by the center.
Materials
| Dragon Skin 20 | Smooth-on | ||
| Dragon Skin 20 medium | Smooth-on | ||
| Object24 | Stratasys | 3D printer | |
| Stand Mixer | Hamilton | ||
| PKS-PRO-E-10 System | Anaheim Automation | PKS-PRO-E-10-A-LP22 | Controller and Servo Motor |
| Artec Eva | Artec 3D | 3D light scanner with resolution of 0.1mm | |
| Artec Spider | Artec 3D | 3D light scanner with resolution of 0.5mm | |
| Steel plate | Mcmaster | ||
| Carbon Tow | Fibreglast | 2393-A | |
| Hardened Precision 440C Stainless Steel Shaft | Mcmaster | 6253K49 | |
| Tygon PVC Clear Tubing | Mcmaster | 6546T23 | |
| Kevlar Thread | Mcmaster |
Referencias
- Feldkamp, S. D. Swimming in the California sea lion: Morphometrics, drag and energetics. Journal of Experimental Biology. 131, 117-135 (1987).
- Godfrey, S. J. Additional observations of subaqueous locomotion in the California sea lion (zalophus californianus). Aquatic Mammals. 11 (2), 53-57 (1985).
- Stelle, L. L., Blake, R. W., Trites, A. W. Hydrodynamic drag in steller sea lions (eumetopias jubatus). The Journal of Experimental Biology. 203 (12), 1915-1923 (2000).
- Yu, J., Wang, L., Tan, M. A framework for biomimetic robot fish’s design and its realization. Proceedings of the American Control Conference. , 1593-1598 (2005).
- Friedman, C., Leftwich, M. C. The kinematics of the California sea lion foreflipper during forward swimming. Bioinspiration and Biomimetics. 9 (4), (2014).
- Friedman, C., Joel, B. W., Schult, A. R., Leftwich, M. C. Noninvasive 3D geometry extraction of a Sea lion foreflipper. Journal of Aero Aqua Bio-mechanisms. 4 (1), 25-31 (2015).
- Aguilar, J., et al. A review on locomotion robophysics: the study of movement at the intersection of robotics, soft matter and dynamical systems. Rep Prog Phys. 79 (11), 110001 (2016).
- Holmes, P., Koditschek, D., Guckenheimer, J. The dynamics of legged locomotion: models, analyses, and challenges. Dynamics. 48 (2), 207-304 (2006).
- Mazouchova, N., Umbanhowar, P. B., Goldman, D. I. Flipper-driven terrestrial locomotion of a sea turtle-inspired robot. Bioinspiration & Biomimetics. 8 (2), 026007 (2013).
- Hultmark, M., Leftwich, M. C., Smits, A. J. Flowfield measurements in the wake of a robotic lamprey. Experiments in fluids. 43 (5), 683-690 (2007).
- Ijspeert, A. J., Crespi, A., Ryczko, D., Cabelguen, J. M. From swimming to walking with a salamander robot driven by a spinal cord model. Science. 315 (5817), 1416-1420 (2007).
- Buchholz, J. H., Smits, A. J. On the evolution of the wake structure produced by a low-aspect-ratio pitching panel. Journal of fluid mechanics. 546, 433-443 (2006).
- Lauder, G. V., Anderson, E. J., Tangorra, J., Madden, P. G. Fish biorobotics: kinematics and hydrodynamics of self-propulsion. Journal of Experimental Biology. 210 (16), 2767-2780 (2007).
- Leftwich, M. C., Smits, A. J. Thrust production by a mechanical swimming lamprey. Experiments in fluids. 50 (5), 1349-1355 (2011).
- Leftwich, M. C., Tytell, E. D., Cohen, A. H., Smits, A. J. Wake structures behind a swimming robotic lamprey with a passively flexible tail. Journal of Experimental Biology. 215 (3), 416-425 (2012).
- Buchholz, J. H., Smits, A. J. The wake structure and thrust performance of a rigid low-aspect-ratio pitching panel. Journal of fluid mechanics. 603, 331-365 (2008).
- Quinn, D. B., Lauder, G. V., Smits, A. J. Scaling the propulsive performance of heaving flexible panels. Journal of fluid mechanics. 738, 250-267 (2014).
- Quinn, D. B., Lauder, G. V., Smits, A. J. Flexible propulsors in ground effect. Bioinspiration & biomimetics. 9 (3), 036008 (2014).
- English, A. W. Functional anatomy of the hands of fur seals and sea lions. American Journal of Anatomy. 147 (1), 1-17 (1976).
- . PRONET-E Quick Start Guide Available from: https://www.anaheimautomation.com/manuals/servo/L011035%20-%20ProNet%20Quick%20Start%20Guide.pdf (2014)
- Fish, F. E., Legac, P., Williams, T. M., Wei, T. Measurement of hydrodynamic force generation by swimming dolphins using bubble DPIV. Journal of Experimental Biology. 217 (2), 252-260 (2014).

