Standardized and Scalable Assay to Study Perfused 3D Angiogenic Sprouting of iPSC-derived Endothelial Cells In Vitro
Summary
This method describes the culture of iPSC-derived endothelial cells as 40 perfused 3D microvessels in a standardized microfluidic platform. This platform enables the study of gradient-driven angiogenic sprouting in 3D, including anastomosis and stabilization of the angiogenic sprouts in a scalable and high-throughput manner.
Abstract
Pre-clinical drug research of vascular diseases requires in vitro models of vasculature that are amendable to high-throughput screening. However, current in vitro screening models that have sufficient throughput only have limited physiological relevance, which hinders the translation of findings from in vitro to in vivo. On the other hand, microfluidic cell culture platforms have shown unparalleled physiological relevancy in vitro, but often lack the required throughput, scalability and standardization. We demonstrate a robust platform to study angiogenesis of endothelial cells derived from human induced pluripotent stem cells (iPSC-ECs) in a physiological relevant cellular microenvironment, including perfusion and gradients. The iPSC-ECs are cultured as 40 perfused 3D microvessels against a patterned collagen-1 scaffold. Upon the application of a gradient of angiogenic factors, important hallmarks of angiogenesis can be studied, including the differentiation into tip- and stalk cell and the formation of perfusable lumen. Perfusion with fluorescent tracer dyes enables the study of permeability during and after anastomosis of the angiogenic sprouts. In conclusion, this method shows the feasibility of iPSC-derived ECs in a standardized and scalable 3D angiogenic assay that combines physiological relevant culture conditions in a platform that has the required robustness and scalability to be integrated within the drug screening infrastructure.
Introduction
In vitro models play a fundamental role in the discovery and validation of new drug targets of vascular diseases. However, current in vitro screening models that have sufficient throughput only have limited physiological relevance1, which hinders the translation of findings from in vitro to in vivo. Thus, to advance pre-clinical vascular drug research, improved in vitro models of vasculature are necessary that combine high-throughput screening with a physiologically relevant 3D cellular micro-environment.
Within the last decade, significant progress has been made to increase the physiological relevance of in vitro models of vasculature. Instead of culturing endothelial cells on flat surfaces such as tissue-culture plastics, endothelial cells can be embedded in 3D scaffolds, such as fibrin and collagen gels2. Within these matrices, the endothelial cells show a more physiologically relevant phenotype associated with matrix degradation and lumen formation. However, these models only demonstrate a subset of the many processes that occur during angiogenic sprouting as important cues from the cellular microenvironment are still lacking.
Microfluidic cell culture platforms are uniquely suited to further increase the physiological relevance of in vitro models of vasculature. For example, endothelial cells can be exposed to shear stress, which is an important biomechanical stimulus for vasculature. Also, the possibility to spatially control fluids within microfluidics allows the formation of biomolecular gradients3,4,5,6. Such gradients play an important role in vivo during the formation and patterning during angiogenesis. However, while microfluidic cell culture platforms have shown unparalleled physiological relevancy over traditional 2D and 3D cell culture methods, they often lack the necessary throughput, scalability and standardization that is required for drug screening7. Also, many of these platforms are not commercially available and require the end-users to microfabricate their devices prior to use8. This not only requires manufacturing apparatus and technical knowledge, but also limits the level of quality control and negatively affects reproducibility9.
To date, primary human endothelial cells remain the most widely used cell source to model angiogenesis in vitro10. However, primary human cells have a number of limitations that hinder their routine application in screening approaches. First, there is a limited possibility to scale up and expand primary cell-derived cultures. Thus, for large scale experiment, batches from different donors need to be used, which result in genomic differences and batch-to-batch variations. Second, after a few passages, primary endothelial cells generally lose relevant properties when cultured in vitro11,12.
Endothelial cells derived from human induced pluripotent stem cells (iPSC) are a promising alternative: they resemble primary cells, but with a more stable genotype that is also amenable to precise genome editing. Furthermore, iPSCs are able to self-renew and thus can be expanded in nearly unlimited quantities, which make iPSC-derived cells an attractive alternative to primary cells for usage within in vitro screening models13.
Here, we describe a method to culture endothelial cells as perfusable 3D microvessels in a standardized, high-throughput microfluidic cell culture platform. Perfusion is applied by placing the device on a rocker platform, which ensures robust operation and increases the scalability of the assay. As the microvessels are continuously perfused and exposed to a gradient of angiogenic factors, angiogenic sprouting is studied in a more physiological relevant cellular microenvironment. While the protocol is compatible with many different sources of (primary) endothelial cells14,15, we focused on using human iPSC-derived ECs in order to increase the standardization of this assay and to facilitate its integration within vascular drug research.
Protocol
1. Device Preparation
- Transfer the microfluidic 384-well plate to a sterile laminar-flow hood.
- Remove the lid and add 50 µL of water or phosphate-buffered saline (PBS) to each of the 40 observation wells (Figure 1b, well B2) using a multichannel or repeating pipette.
NOTE: The protocol can be paused here. Leave the plate with the lid on in the sterile culture cabinet at room temperature (RT).
2. Prepare Gel and Coating
- Prepare 2.5 mL of 10 µg/mL fibronectin (FN) coating solution. Dilute 25 µL of 1 mg/mL fibronectin stock solution in 2.5 mL of Dulbecco’s PBS (dPBS, calcium and magnesium free). Place the solution in the water bath at 37 °C till use.
- Prepare 100 µL of collagen-1 solution. Add 10 µL of HEPES (1 M) to 10 µL of NaHCO3 (37 g/L) and mix by pipetting. Place the tube on ice and add 80 µL of collagen-1 (5 mg/mL) to yield a neutralized collagen-1 concentration of 4 mg/mL. Use a pipette to mix carefully and avoid the formation of bubbles.
- Add 1.5 µL of collagen-1 solution (4 mg/mL) to the gel inlet of each microfluidic unit (Figure 1b, well B1). Make sure the droplet of gel is placed in the middle of each well in order for the gel to enter the channel (see Figure 2a).
NOTE: Phaseguides prevent filling of the adjacent channels and enables gel patterning. Correct gel loading can be confirmed under a brightfield microscope by observing the meniscus formation through the ‘observation window’ (well B2) or by flipping the plate upside down. If the gel did not completely fill the channel, an additional droplet of 1 µL can be added. - Place the microfluidic plate in an incubator (37 °C, 5% CO2) for 10 min to polymerize collagen-1.
NOTE: Timing of the polymerization is crucial; due to the low volumes used in microfluidics, evaporation can already be observed after 15 min of incubation, which results in gel collapse or shrinkage. - Take the plate out of the incubator and transfer to a sterile laminar-flow hood.
- Add 50 µL of 10 µg/mL FN coating solution to the outlet well of the top perfusion channel of every microfluidic unit (Figure 1b, well A3). Press the pipette tip against the side of the well for correct filling of the well without trapping air bubbles (see Figure 2b). The channel should fill, and the liquid should pin on the inlet (well A1) without filling the inlet well.
- Place the plate in the incubator (37 °C, 5% CO2) for at least 2 days.
NOTE: The protocol can be paused here, as the collagen-1 gel together with the coating mixture is stable for at least 5 days in the incubator. If the coating mixture is refreshed, longer periods could be possible, but this has not been tested. Crucial is the level of FN-coating, as this prevents the dehydration of the collagen-1 gel.
3. Cell Seeding/Microvessel Culture
- Add 5 mL of fetal calf serum and 2.5 mL of pen/strep to 500 mL of basal endothelial cell culture medium and filter sterilize using a bottle top filter with 0.22 µm pore size. This medium is now referred to as basal medium.
- Prepare vascular growth medium: Add 3 µL of 50 µg/mL vascular endothelial growth factor (VEGF) and 2 µL of 20 µg/mL basic fibroblast growth factors (bFGF) to 5 mL of basal medium.
- Thaw the frozen iPSC-ECs rapidly (<1 min) in a 37 °Cwater bath and transfer to a 15 mL tube and dilute in 10 mL of basal medium.
- Count the cells.
NOTE: A single vial contains 1 million cells in 0.5 mL with >90% viability. - Centrifuge the tube at 100 x g for 5 min. Aspirate supernatant without disturbing the cell pellet and resuspend in basal medium to yield a concentration of 2 x 10⁷ cells/mL.
- Transfer the microfluidic 384-well plate from the incubator to a sterile laminar-flow hood.
- Aspirate FN-coating solution from the perfusion outlet well (A3) and replace with 25 µL of basal medium in the outlet well (well A3).
- Add a 1 µL droplet of cell suspension to every top perfusion inlet well (Figure 1b, well A1). The droplet should flatten in a few seconds (see Figure 3a,b for an illustration of this ‘passive pumping’ method).
NOTE: Check under a microscope whether the seeding is homogeneous. If not, add another 1 µL in the outlet and wait till the droplet flattens. - Incubate the microfluidic well-plate for 1 h at 37 °C, 5% CO2. After this, the cells should have adhered. If not, wait another 30 min.
- Remove the basal medium from the top perfusion outlet wells (Figure 1b, well A3). Add warm vessel culture medium in the top perfusion inlet and outlet (Figure 1b, wells A1 and A3). Place the plate on the rocker platform (set on 7° angle, 8 min rocking interval) in the incubator (37 °C, 5% CO2).
- Image the plate using a brightfield microscope with automated stage at day 1 and 2 post-seeding to confirm cell viability. After 2 days, a confluent monolayer should have formed against the collagen-1 scaffold.
NOTE: If the channels do not appear to be equally confluent, the microvessels can be cultured for an additional 24 h.
4. Study Angiogenic Sprouting Including Tip- and Stalk-cell Formation
- Prepare 4.5 mL of angiogenic sprouting medium by supplementing basal medium with 4.5 µL of VEGF (50 µg/mL stock), 4.5 µL of phorbol 12-myristate-13-acetate (PMA) (2 µg/mL stock), and 2.25 µL of sphingosine-1-phosphate (S1P) (1 mM stock).
- Prepare 8.5 mL of vessel growth medium (basal medium supplemented with 30 ng/mL VEGF and 20 ng/mL bFGF).
- Aspirate medium from the wells and add 50 µL of fresh vessel culture medium in the top perfusion inlet and outlet wells and gel inlet and outlet wells (Figure 1b, wells A1, A3, B1 and B3).
- Add 50 µL of angiogenic sprout mixture to each of the bottom perfusion channel inlet and outlet wells (Figure 1b, wells C1 and C3).
- Place the device back in the incubator (37 °C, 5% CO2) on the rocker platform in order to form a gradient of angiogenic growth factors.
- Image 1 day and 2 days after addition of the angiogenic growth factors using a brightfield microscope with automated stage.
NOTE: Continue culturing the microvessels to study anastomosis (go to section 5) or fix and stain the microvessels to quantify sprouting length and morphology at day 2 and day 6 (go to section 6).
5. Study Anastomosis and Sprout Stabilization
- Image using a brightfield microscope with automated stage.
- Add 1 µL of fluorescently labeled albumin (0.5 mg/mL) to the top perfusion inlet (Figure 1b, well A1) and mix using a 50 µL pipette.
- Transfer the plate to a fluorescent microscope with automated stage and incubator set at 37 °C. Set microscope at 10x objective and correct exposure settings (e.g., tetramethylrhodamine [TRITC]-channel, 20 ms exposure). Acquire time-lapse images every minute for 10 min.
- Remove the plate from the microscope and transfer the plate to a sterile laminar-flow hood.
- Remove all medium from the wells and replace both the vessel culture medium and angiogenic sprouting medium in the corresponding wells (see steps 4.3 and 4.4).
- Place the device back into the incubator (37 °C, 5% CO2) to continue angiogenic sprouting.
- Repeat steps 5.1−5.6 to study the permeability at day 6.
6. Fixation, Staining, and Imaging
- Aspirate all culture media from all the wells.
NOTE: Residual medium or liquids in the microfluidic channels does not influence the fixation due to its low volume of 1−2 µL. - Add 25 µL of 4% paraformaldehyde (PFA) in PBS to all the perfusion inlet (Figure 1b, A1 and C1) and outlet wells (Figure 1b, A3 and C3). Incubate for 10 min at RT. Place the device under a slight angle (±5°) to induce flow (e.g., by placing one side of the plate on a lid).
- Aspirate PFA from the wells. Wash all the perfusion inlets and outlets twice with 50 µL of Hank’s balanced salt solution (HBSS). Aspirate HBSS from wells.
- Permeabilize at RT for 10 min by adding 50 µL of 0.2% nonionic surfactant to all the perfusion inlets and outlets.
- Aspirate the nonionic surfactant from wells. Wash the perfusion channels twice by adding 50 µL of HBSS to all perfusion inlet and outlet wells. Aspirate HBSS from wells.
- Stain the nuclei using Hoechst (1:2,000) and F-actin using phalloidin (1:200) in HBSS. Prepare 2.2 mL for 40 units, and add 25 µL to each perfusion inlet and outlet well. Place the plate under a slight angle and incubate at RT for at least 30 min.
- Wash twice with 50 µL of HBSS in all the perfusion inlets and outlets.
- Directly image using a fluorescent microscope with automated stage or store the plate protected from light at 4 °C for later use.
Representative Results
The microfluidic 3D cell culture platform consists of 40 perfused microfluidic units (Figure 1a,b), which is used to study angiogenic sprouting of perfused microvessels against a patterned collagen-1 gel (Figure 1c). These microvessels are continuously perfused and exposed to a gradient of angiogenic growth factors (Figure 3a-d). The angiogenic sprouts can be either studied 2 days after gradient exposure or cultured for more than 5 days after gradient exposure to study anastomosis and sprout stabilization (see timeline, Figure 1d).
Seeding the iPSC-ECs using the passive pumping method should result in homogenous seeding densities (Figure 4a,b). Culture under continuous perfusion resulted in confluent microvessels in 2 days, with the cells completely lining the circumference of the microfluidic channel and the formation of a confluent monolayer against the patterned collagen-1 gel.
Exposure to a gradient of angiogenic factors resulted in directional angiogenic sprouting of the microvessels within the patterned collagen-1 gel (Figure 5a-g). Clear tip cell formation and invasion into the collagen-1 gel was visible 24 h after addition of the angiogenic gradient, while stalk cells including lumen formation were visible after 48 h (Figure 5a).
After fixation and staining, the capillary network can be visualized using phalloidin to stain F-actin and using Hoechst 33342 to stain the nucleus (Figure 5b,c). These sprouts can be quantified (e.g., shape and length14). Without addition of growth factors, no invasion into the collagen-1 gel should be observed (Figure 5d). Confocal imaging was used to determine the sprout diameter and to confirm lumen formation (Figure 5e-g).
The sprouts continue to grow towards the direction of the gradient and reach the opposite perfusion channel within 3−4 days after addition of angiogenic growth factors. This results in remodeling of the vascular network, with a clear reduction in the number of angiogenic sprouts (Figure 6a). Lumen formation was assessed by perfusion of the vascular network with fluorescently labeled macromolecules (e.g., albumin or dextrans). Perfusing the microvessels with 0.5 mg/mL labeled albumin before and after anastomosis revealed a clear difference in sprout permeability after 10 min (Figure 6b-e), which suggests that the capillaries stabilize and mature after anastomosis.
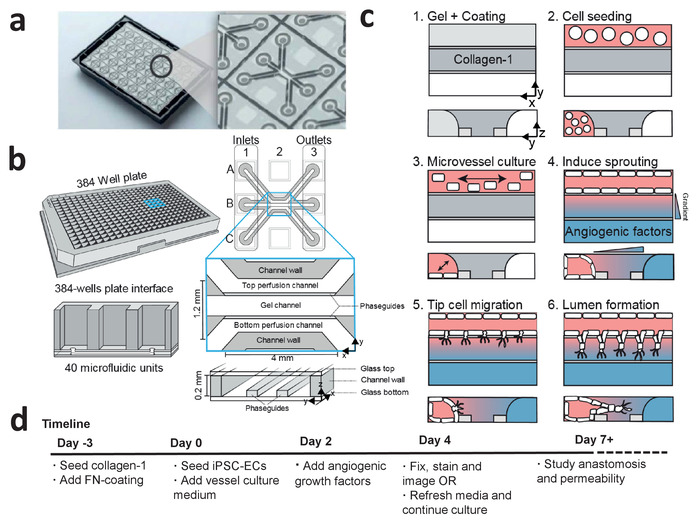
Figure 1: Microfluidic cell culture protocol for iPSC-derived microvessels. (a) The bottom of the microfluidic cell culture device is shown displaying the 40 microfluidic units that are integrated underneath the 384-well plate. Larger view displays one of the 40 microfluidic units. (b) Each microfluidic unit is positioned underneath 9 wells with 3 inlet wells and 3 outlet wells. The microfluidic channels are separated by ridges (‘phaseguides’), which enable the patterning of hydrogels in the central channel (‘gel channel’) while there is still contact with the adjacent channels (‘perfusion channels’). (c) Method to culture a perfused microvessel within the microfluidic device, which is used to study gradient driven angiogenic sprouting through a patterned collagen-1 matrix. (d) Timeline for studying angiogenic sprouting and/or anastomosis. This figure has been modified from van Duinen et al.14. Please click here to view a larger version of this figure.
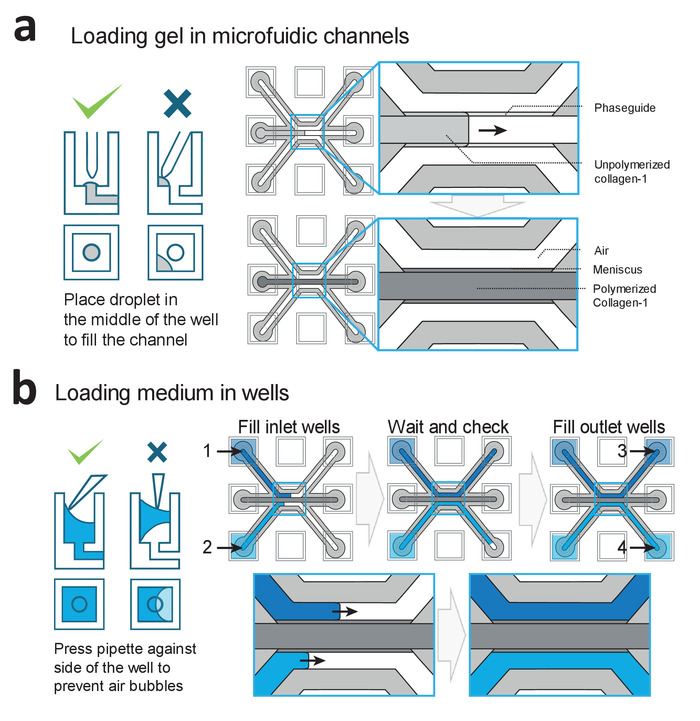
Figure 2: Loading procedures for gel and medium. (a) Examples of correct and incorrect gel deposition. Correct filing results in a patterned collagen-1 gel in the middle channel, which is subsequently polymerized. (b) Examples of correct and incorrect filling of the wells. Wells are filled in the order of 1−4 to prevent air-bubble trapping within the microfluidic channels. Please click here to view a larger version of this figure.
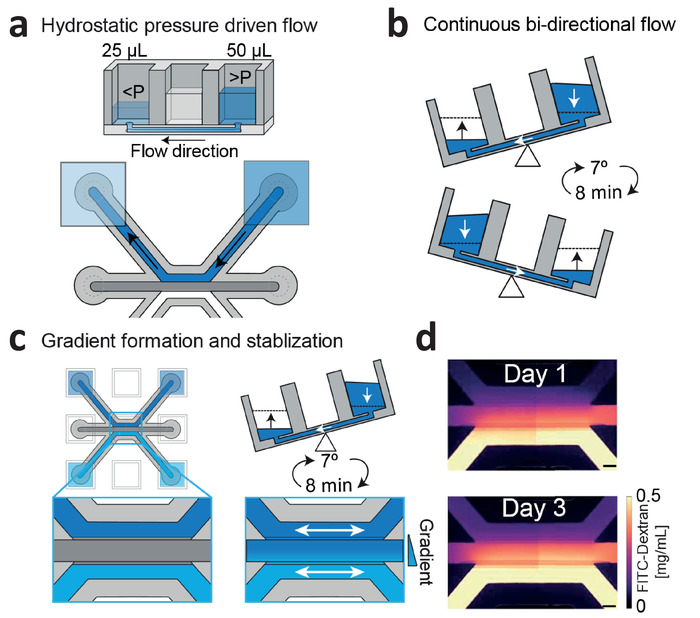
Figure 3: Continuous hydrostatic pressure driven flow and gradient stabilization. (a) Hydrostatic pressure differences between wells result in passive levelling and flow within the microfluidic channels. (b) Placing the device on a rocker platform set at 7° and 8 min cycle time results in continuous, bi-directional perfusion within the microfluidic channels. (c) Gradients are formed by introducing two different concentrations within the wells, which are continuously refreshed by passive leveling. (d) Gradient visualization using fluorescein isothiocyanate (FITC)-dextran. Bi-directional flow stabilizes the gradient up till 3 days. Scale bar = 200 µm. This figure has been modified from van Duinen et al.14. Please click here to view a larger version of this figure.
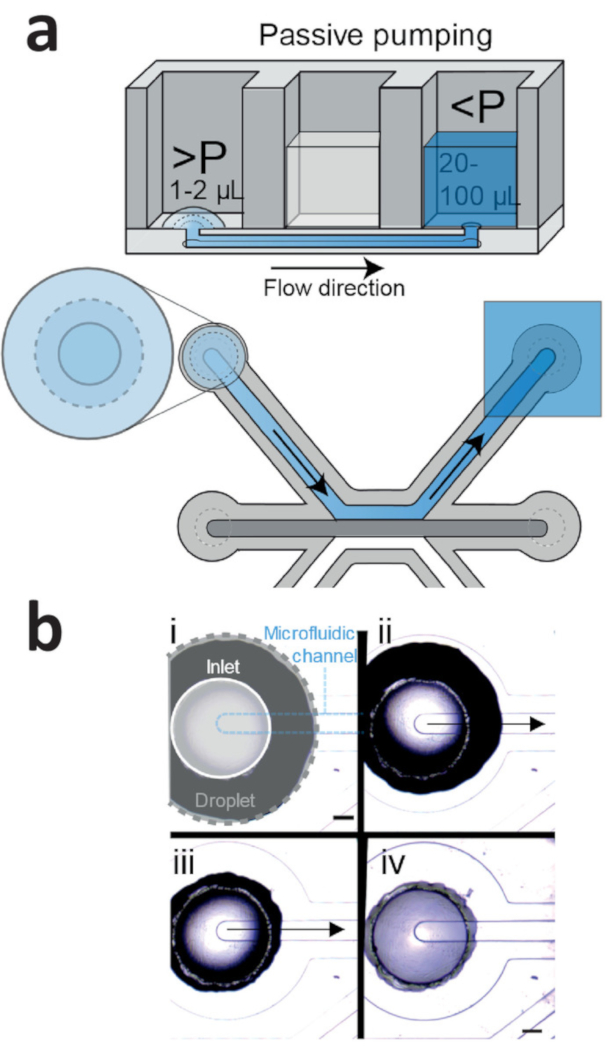
Figure 4: Passive pumping method for cell seeding. (a) Passive pumping is driven by pressure differences that are caused by differences in surface tension. This results in a flow from the droplet (high internal pressure) towards the reservoir (low internal pressure). (b) Time lapse of a droplet (gray outline) that is placed on top of the inlet (white outline) of the microfluidic channel (blue outline). Right after addition (Figure 4b, i), the droplet on top of the inlet shrinks (Figure 4b, ii: 1 s after addition; iv: 2 s after addition), which results in a flow towards the outlet. This continues until the droplet meniscus is pinned by the inlet (Figure 4b, iv). Scale bar = 400 µm. Please click here to view a larger version of this figure.
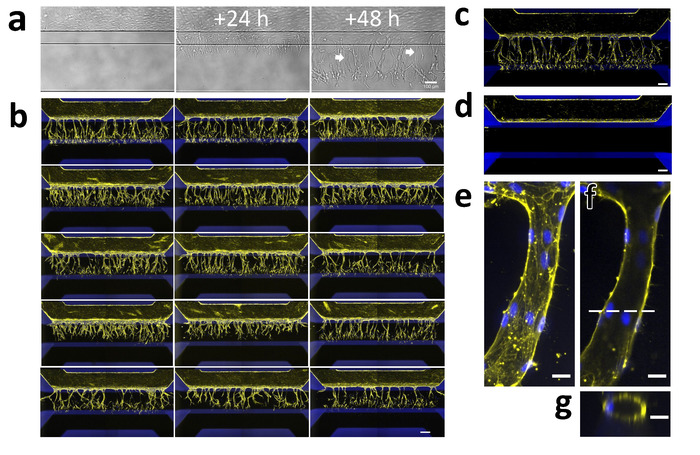
Figure 5: Robust 3D sprouting of iPSC-EC microvessels. (a) Sprouting of iPSC-EC over time. Microvessels were grown for 48 h (right) and then stimulated with an angiogenic cocktail containing 50 ng/mL VEGF, 500 nM S1P, and 2 ng/mL PMA. The first tip-cells that invade the collagen-1 scaffold (middle) are visible 24 h after exposure. The first lumens are visible (arrows) 48 h after exposure (right) while the tip-cells have migrated further in the direction of the gradient. (b) Array of 15 microvessels that were stimulated with VEGF, S1P and PMA for 2 days and stained for F-actin (yellow) and nuclei (blue). Scale bar = 200 µm. (c) Stimulated microvessel (positive control). (d) Unstimulated microvessel (negative control). (e) The maximum projection of a single capillary within the gel. (f) Same as (g) but focused on the middle. Dotted line indicates the position of the orthogonal view in panel g. Scale bars (a-d: 200 µm; e-g: 20 µm). Please click here to view a larger version of this figure.
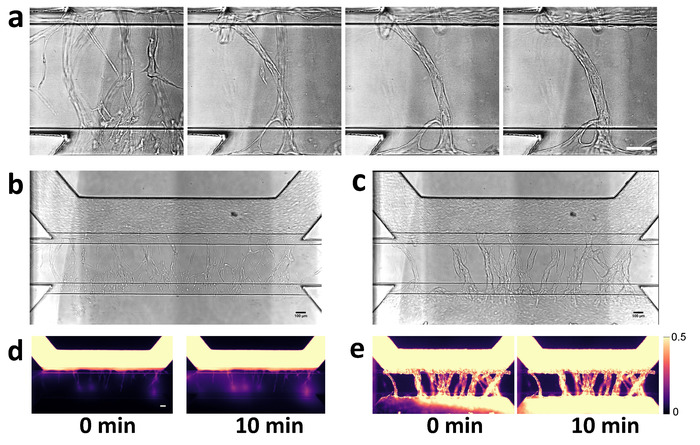
Figure 6: Visualization of angiogenic sprout permeability before and after anastomosis. (a) Anastomosis with basal channel triggers pruning and maturation of angiogenic sprouts. Closeup of capillary bed at 2, 4, 6 and 7 days after stimulation with angiogenic growth factors. (b) Angiogenic sprouts after 2 days after addition of angiogenic growth factors. Angiogenic sprouts are formed within gel, but are not yet connected to the bottom perfusion channel. (c) Perfusion of the microvessel with 0.5 mg/mL albumin-Alexa 555 solution. Fluorescent images obtained at 0 and 10 min. (d,e) Same as in panels b and c, but after 7 days of stimulation. Sprouts are connected to the other side and formed a confluent microvessel in the basal perfusion channel. Scale bars = 100 µm. Please click here to view a larger version of this figure.
| Problem | Cause | Solution |
| Collagen-1 does not enter or fill the channel completely | Collagen-1 droplet is not placed on top of the inlet | Carefully place the droplet on top of the inlet from the gel channel |
| Volume of collagen-1 is too low | Use 1.5 µL of the gel to fill the channel completely | |
| Collagen-1 is too viscous | Use another batch of collagen-1 | |
| Collagen-1 flows into perfusion channels | Collagen-1 is pipetted directly into the inlet of gel channel | Carefully place the droplet on top of the inlet from the gel channel |
| Collagen-1 is not clear/fiber formation | Collagen-1 is not stored properly | Store collagen-1 at 4 °C, do not freeze |
| NaHCO3 and HEPES are not mixed well before adding collagen-1 | Carefully mix the NaHCO3 and HEPES by pipetting before adding the collagen-1 | |
| Droplet does not shrink using passive pumping method | Droplet adheres to side of the well | Aspirate droplet and add new droplet on top of the inlet |
| Make sure the outlet well is filled with at least 20 µL of medium | ||
| No sprouting is observed | Growth factors are not added or aliquots are not stored properly | Prepare fresh angiogenic sprouting medium |
| Air bubble blocks perfusion/ gradient formation | Remove air bubbles using a P20 or P200 pipette | |
| Volume differences between wells | Volumes in all wells need to be equal in order to form a linear gradient | |
| Cells not viable | Plate not placed on rocker platform/rocker platform turned off | Make sure rocker platform is on and has the right cycle time/angle (8 min/7°) |
| No perfusion possible due to presence of air bubbles | Remove air bubbles using a P20 or P200 pipette | |
| No lumens are formed, cells migrate as single cells | Angiogenic sprouting mixture was added before a monolayer was formed | Wait an additional 24 h before adding the angiogenic growth factors |
| Major variation in sprouting density | Differences in cell densities after seeding | Check if cell density is homogenous and comparable between microfluidic units. Add another droplet of cell suspension if necessary |
Table 1: Troubleshooting common errors.
Discussion
This method describes the culture of 40 perfusable endothelial microvessels within a robust and scalable microfluidic cell culture platform. Compared to traditional 2D and 3D cell culture methods, this method shows how a physiological relevant cellular microenvironment that includes gradients and continuous perfusion can be combined with 3D cell culture with adequate throughput for screening purposes.
One of the major advantages over comparable microfluidic assays is that this method does not rely on pumps for perfusion but uses a rocker platform to induce continuous perfusion in all microfluidic units simultaneously. This ensures that the assay is robust and scalable: plates can be stacked on a rocker platform. Importantly, all microfluidic units remain individually addressable, which allows this method to be implemented within drug screening including the generation of a dose-response curve. Furthermore, without a pump, imaging and medium replacement is far simpler with less risk of (cross)-contamination.
Another advantage of this method is usage of a standardized, pre-manufactured platform, while comparable microfluidic cell culture platforms need to be fabricated by the end-users. This availability facilitates the adoption of this assay among other academic and pharmaceutical research groups, leading to standardization. Also, unlike microfluidic prototypes, the 384-well plate interface ensures compatibility with the current lab equipment (e.g., aspirators, plate handlers and multichannel pipettes), facilitating the integration within the current screening infrastructure.
There are several critical steps in performing this assay. The collagen-1 gel should completely fill the gel channel. During gel loading, this filling can be observed by inspecting the microfluidic channels either through the observation window (Figure 2a) or by flipping the plate upside down (as shown in Figure 1a). While filling, the collagen gel should remain in the center channel, without flowing into adjacent perfusion channels. We noticed that the quality of the collagen-1 gel is crucial for proper assay performance. Collagen-1 batches with too high viscosity will lead to incomplete filling of the gel channel. After 10 min of polymerization at 37 °C, the gel should be homogenous and clear. If collagen-1 is not stored properly (e.g., due to fluctuating temperatures in the fridge), collagen will polymerize within the channels with clearly visible fiber formation. This can result in invasion of the ECs into the gel without addition of angiogenic factors, but without proper lumen development.
When the cells are seeded, the fibronectin coating solution is removed from the wells, leaving only the microfluidic channels filled with coating solution. Aspiration of the coating solution from microfluidic channels could cause gel disruption or gel aspiration. The cell suspension needs to replace/displace this coating solution. This works best when the cell suspension is seeded using the passive pumping method, as directly pipetting the cell suspension into the channels show less reproducible seeding densities.
As the microvessels form a stable monolayer against the gel, these small differences only result in different times needed for reaching confluency. Thus, the assay start point is determined by confluency rather than culture time. If necessary, the culturing time can be extended until a clear monolayer has been formed against the gel.
Within the wells, air bubbles can be trapped by incorrect filling of the wells (see Figure 2b). These air bubbles will restrict the flow of medium, even when the device is placed on a rocker platform, and result in collapse of the microvessel and improper gradient formation. Pressing the pipette tip against the side wall of the wells will increase the success of completely filling the well. If an air bubble is trapped within the wells, it can be removed by gently inserting a sterile pipette tip into the glass bottom. Air bubbles can also occur within the microfluidic channels. When medium has been removed from the wells, evaporation of medium is noticeable from the microfluidic channels after 30 min (due to the microliter volumes within the channels). Thus, medium changes are preferably performed as quick as possible. When medium is added in a channel with evaporated medium, air bubbles will be trapped within the microfluidic channels. These air bubbles within the microfluidic channels can be removed manually by placing a P20 pipette directly on either the inlet or outlet and forcing medium through the microfluidics from the opposite well. Successful removal of the air bubbles results in a small but noticeable decrease in volume in the other well. Table 1 lists common errors and how to troubleshoot them.
The lack of a pump is a limitation when continuous imaging is required, as the rocker platform limits the user to image at sequential time intervals. Furthermore, the perfusion of medium in this platform consists of bi-directional flow with low levels of shear stress, while vasculature in vivo is exposed to unidirectional flow with higher levels of shear stress. While we do not observe negative effects of the bi-directional flow with regards to the angiogenic sprouting, flow is an important biomechanical stimulus and preferably controlled. However, while there are commercially available pump setups, interfacing with the 384-well plate remains challenging and pump setups severely hamper the scalability of this assay.
The possibility to use iPSC-ECs to study angiogenic sprouting opens up new opportunities in disease modeling and drug research. In contrast to primary ECs, these cells can be generated in nearly limitless quantities with a stable genotype and by using genome editing techniques, cells can be generated that including gene knockouts and knock-ins. However, as the protocols to differentiate ECs from iPSC are relatively new, it is still unclear what leads to iPSC-ECs that best reflect primary ECs and which subtypes of EC are or can be generated. Also, there are still remaining questions regarding their relevancy. For example, do iPSC-ECs still exhibit the plasticity that is typical for endothelial cells? And to what degree do iPSC-derived cells respond to and interact with their cellular microenvironment? The standardized platform presented here could be used to answer some of these questions in order to further validate the usage of iPSC-derived ECs in vitro.
The most straight-forward future direction for this assay will be the integration of other cell types that play an important role during angiogenesis, such as pericytes and macrophages. This will facilitate the ability to study the role of macrophages during anastomosis between sprouts or the adherence of pericytes after capillary formation. Also, it is possible to culture various other cell types within or against an extracellular matrix (e.g., we have shown the culture of neurons and various epithelial structures such as proximal tubules and small intestines), which can be combined with the vascular beds generated using this method. Finally, it will be interesting to study angiogenic sprouting in synthetic hydrogels, as their defined composition further increases the standardization of the assay and allows tuning of stiffness and binding motives that affect cell-matrix interactions.
In conclusion, this method shows the feasibility of iPSC-derived ECs in a standardized and scalable 3D angiogenic assay that combines physiological relevant culture conditions in a platform that has the required robustness and scalability to be integrated within the drug screening infrastructure.
Offenlegungen
The authors have nothing to disclose.
Acknowledgements
This work is in part supported by a research grant from the ‘Meer Kennis met Minder Dieren’ program (project number 114022501) of The Netherlands Organization for Health Research and Development (ZonMw) and the Dutch Heart Foundation CVON consortium grant RECONNECT.
Materials
| 0.2-10 μL Electronic repeater pipette | Sigma | Z654566-1EA | |
| 1 M HEPES | Gibco | 15630-056 | |
| 3-lane OrganoPlate | Mimetas | 4003-400B | |
| 4% PFA in PBS | Alfa Aesar | J61899 | |
| Basal culture medium | NCardia | ||
| Collagen-1 | Cultrex | 3447-020-01 | |
| Combitips Advanced Biopur 2.5 mL | VWR | 613-2071 | |
| dPBS | Gibco | 14190-094 | |
| Eppendorf Repeater M4 pieptte | VWR | 613-2890 | |
| Fibronectin | Sigma-Aldrich | F4759-1MG | 1 mg/mL in milliQ water |
| HBSS | Gibco | 14025-050 | |
| Hoechst | Molecular Probes | H3569 | 10 mg/mL solution in water |
| iPSC-derived endothelial cells | NCardia | ||
| NaHCO3 | Sigma | S5761 | 37 g/L in milliQ water |
| OrganoPlate Perfusion Rocker Mini | Mimetas | Rocker platform used to provide flow | |
| Pen/Strep | Sigma | P4333 | |
| Phalloidin | Sigma | P1951 | 1 mg/mL in DMSO |
| PMA | Focus-Biomolecules | 10-2165 | 2 μg/mL in PBS containing 0.1% DMSO |
| S1P | Ecehelon Biosciences | S-2000 | 1 mM in methanol containing 1% acetic acid |
| TRITC-albumin | Invitrogen | A34786 | |
| VEGF | Peprotech | 450-32-10 | 50 μg/mL in water containing 0.1% BSA |
Referenzen
- Griffith, L. G., Swartz, M. A. Capturing complex 3D tissue physiology in vitro. Nature Reviews Molecular Cell Biology. 7 (3), 211-224 (2006).
- Davis, G. E., et al. Control of vascular tube morphogenesis and maturation in 3D extracellular matrices by endothelial cells and pericytes. Methods in Molecular Biology. , 17-28 (2013).
- Kim, S., Chung, M., Jeon, N. L. Three-dimensional biomimetic model to reconstitute sprouting lymphangiogenesis in vitro. Biomaterials. 78, 115-128 (2016).
- Kim, C., Kasuya, J., Jeon, J., Chung, S., Kamm, R. D. A quantitative microfluidic angiogenesis screen for studying anti-angiogenic therapeutic drugs. Lab Chip. 15 (1), 301-310 (2015).
- Kim, J., et al. Engineering of a Biomimetic Pericyte-Covered 3D Microvascular Network. PLoS One. 10 (7), e0133880 (2015).
- Tourovskaia, A., Fauver, M., Kramer, G., Simonson, S., Neumann, T. Tissue-engineered microenvironment systems for modeling human vasculature. Experimental biology and medicine. 239 (9), 1264-1271 (2014).
- Junaid, A., Mashaghi, A., Hankemeier, T., Vulto, P. An end-user perspective on Organ-on-a-Chip: Assays and usability aspects. Current Opinion in Biomedical Engineering. 1, 15-22 (2017).
- Pagano, G., et al. Optimizing design and fabrication of microfluidic devices for cell cultures: An effective approach to control cell microenvironment in three dimensions. Biomicrofluidics. 8 (4), 046503 (2014).
- Berthier, E., Young, E. W., Beebe, D. Engineers are from PDMS-land, Biologists are from Polystyrenia. Lab Chip. 12 (7), 1224-1237 (2012).
- Nowak-Sliwinska, P., et al. Consensus guidelines for the use and interpretation of angiogenesis assays. Angiogenesis. 21 (3), 425 (2018).
- Dejana, E., Hirschi, K. K., Simons, M. The molecular basis of endothelial cell plasticity. Nature Communications. 8, 14361 (2017).
- Geraghty, R. J., et al. Guidelines for the use of cell lines in biomedical research. British Journal of Cancer. 111 (6), 1021-1046 (2014).
- Passier, R., Orlova, V., Mummery, C. Complex Tissue and Disease Modeling using hiPSCs. Cell Stem Cell. 18 (3), 309-321 (2016).
- van Duinen, V., et al. Perfused 3D angiogenic sprouting in a high-throughput in vitro platform. Angiogenesis. 22 (1), 157-165 (2019).
- Wevers, N. R., et al. A perfused human blood-brain barrier on-a-chip for high-throughput assessment of barrier function and antibody transport. Fluids Barriers CNS. 15 (1), 23 (2018).

