JoVE 科学教育
Physical Examinations II
需要订阅 JoVE 才能查看此.  登录或开始免费试用。
JoVE 科学教育 Physical Examinations II
Pelvic Exam II: Speculum Exam
  • 00:00概述
  • 00:54Preparatory Steps and Inspection Considerations
  • 06:11Collection of Samples for the Pap Test
  • 10:32Summary

Examen pelvien: Examen au spéculum

English

分享

概述

Source :

Alexandra Duncan, GTA, Praxis clinique, New Haven, CT.

Tiffany Cook, GTA, Praxis clinique, New Haven, CT.

Jaideep S. tari, MD, médecine interne et pédiatrie, école de médecine de Yale, New Haven, CT.

Placement de spéculum confortable est une compétence importante pour les fournisseurs à se développer, étant donné que le spéculum est un outil nécessaire pour nombreuses interventions gynécologiques. Les patients et les fournisseurs sont souvent inquiets de l’examen de spéculum, mais il est tout à fait possible de placer un spéculum sans inconfort pour le patient. Il est important pour le clinicien de connaître le rôle joué par langue en créant un environnement confortable ; par exemple, un fournisseur doit désigner le spéculum « bills » au lieu de « lames » d’éviter de perturber le patient.

Il existe deux types de spéculums : métal et plastique (Figure 1). Cette démonstration utilise en plastique, comme les spéculums en plastique sont plus couramment utilisés dans les cliniques pour les tests de routine. Lorsque vous utilisez un spéculum en métal, il est recommandé d’utiliser un spéculum Graves si le patient a accouché par voie vaginale et un spéculum Pederson, si le patient n’a pas. Spéculums Pederson et tombes sont de différentes formes, et les deux viennent dans beaucoup de différentes tailles (moyenne est utilisée le plus souvent). Avant de placer un spéculum en métal, il est utile d’effectuer un examen du col utérin digital pour évaluer la taille du spéculum approprié. La profondeur et la direction du col de l’utérus est estimée en plaçant un doigt dans le vagin. Si le col de l’utérus de la patiente peut être trouvée, alors que le patient est assis, il est probable que le patient a un vagin peu profond et qu’il devrait donc être plus à l’aise avec un spéculum métallique court.

Figure 1
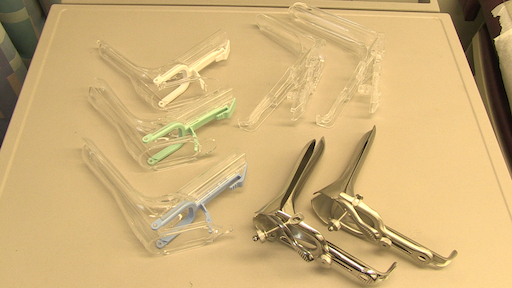
La figure 1. Une photographie de spéculums commercialement disponibles dans différentes tailles.

Spéculums en plastique sont en forme de Pederson spéculums en métal et viennent dans différentes tailles. Afin d’évaluer la taille appropriée pour un spéculum en plastique, l’examinateur met deux doigts dans le vagin de la patiente, paume vers le bas et tente de séparer les doigts : s’il n’y a pas d’espace entre les doigts, un petit spéculum en plastique doit être utilisé ; s’il y a l’espace entre les doigts, un milieu un devrait être utilisé. L’examen ne devrait s’effectuera avec un gros spéculum (tel qu’il est beaucoup plus longue) sans d’abord déterminer la longueur du canal vaginal.

Le spéculum est utilisé pour effectuer le test de Papanicolaou dans le cadre des examens de dépistage du cancer du col utérin. Cancer du col utérin était autrefois la principale cause de décès par cancer chez les femmes aux États-Unis, mais dans les dernières décennies le nombre de cas et de décès a diminué de façon significative1. Ce changement est crédité de la découverte faite par Georgios Papanicolaou en 1928 que cancer du col utérin peut être diagnostiqué par frottis vaginales et cervicales. Le test de Papanicolaou, comme on l’appelle maintenant, détecte des cellules anormales dans le col de l’utérus, cancéreuse et précancéreuse. Les lignes directrices actuelles pour des intervalles de dépistage recommandé se trouvent dans le site Web de U.S. Preventive Services Task Force (USPSTF)2.

Le test peut être effectué à l’aide soit 1) une lame de verre classiques et fixateur avec un pinceau spatule et endocervical (le traditionnel « frottis ») ou 2) le plus couramment utilisé de cytologie liquide avec un balai cervical ou un pinceau spatule et endocervicales (Figure 2). N’importe quels outils sont utilisés, les échantillons sont prélevés à l’intérieur de l’orifice externe et la jonction pavimento-cylindrique ou la zone de transition autour de l’os (Figure 3). Cette vidéo montre la spatule et brosse endocervicale avec cytologie liquide, comme la préparation liquide est une technique plus efficace pour la détection des lésions cervicales et la brosse spatule et endocervicales améliorer PRELEVEMENT.

Figure 2
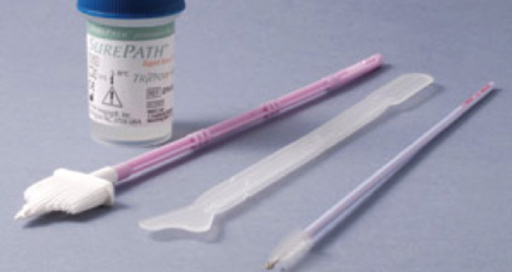
Figure 2. Outils de test de PAP. Montré dans la séquence sont : un traîneau de cytologie liquide cervical balai, spatule et brosse endocervicale.

Figure 3
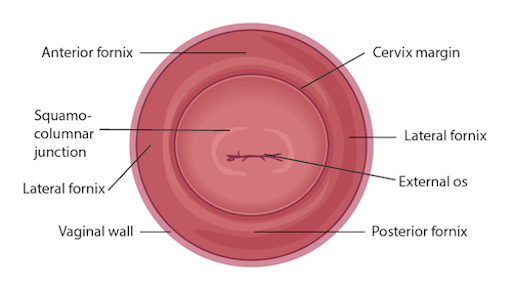
Figure 3. Diagramme du col de l’utérus avecstructures concernées étiquetés.

Procedure

L’examen spéculum commence immédiatement après la fin de l’examen des organes génitaux externes ; par conséquent, le patient a fourni une histoire déjà et est en position gynécologique. Assurez-vous que le patient est assis à la fin de la table, car le spéculum ne peut être inséré complètement autrement. 1. préparation Disposez les fournitures pour le test de Pap. Étiqueter le contenant de la cytologie liquide avec information du patient. D?…

Applications and Summary

This video reviewed the techniques for performing a comfortable speculum exam and collecting the samples for a Pap test. Before the exam is started, the examiner should ensure all supplies are prepared and let the patient know what to expect. Being able to perform a comfortable speculum exam is an important skill for any practitioner, as it is used in a wide variety of gynecological procedures and can provide a wealth of information. When the speculum is inserted, it is possible to observe the cervix and vaginal walls for a variety of signs including tone, color, discharge, lesions, polyps, ulcerations, and more-all of which may be clinically significant and can help with the process of diagnosis. A well-inserted speculum also allows easy access to the cervical os, at which point samples may be taken for the Pap test (as well as for other screenings, like chlamydia and gonorrhea). It's necessary to use a speculum to access the cervix for many other procedures, including inserting or removing an intrauterine device (IUD), a loop electrosurgical excision procedure (LEEP), and more.

Many patients may feel anxiety about the speculum and experience it as the most invasive part of the gynecological exam. The provider can offer the patient general support and empathy, along with specific tools to make the exam more comfortable for themselves. Asking the patient to take a deep breath and then bear down as if having a bowel movement before insertion can open the vaginal introitus and greatly aid comfort. The examiner may offer a particularly anxious patient the opportunity to insert the speculum themselves by placing it upside-down with the handle pointing toward the ceiling as the provider talks them through opening it3. It is often easier to get a clear view of the cervix with an upside-down insertion, but it is not a technique practitioners should employ, because it places the examiner's hand directly against the patient's clitoris.

There are many things the practitioner can do to ensure the exam is comfortable. The speculum should be inserted at an oblique angle to avoid putting too much direct pressure on the urethra. When the speculum is inserted fully, the bills should be angled below where the cervix was located during the digital exam. The practitioner can then apply enough posterior pressure to the speculum, so there is space visible in the vagina over the bills; this allows the bills to be opened without putting pressure on the delicate anterior structures. The most important thing is to never insert or remove a speculum while the bills are open. This is very painful and risks injuring the patient. The examiner should not touch the thumb lever until the speculum is positioned fully and ready to be opened. The lock on the speculum should be released fully before removal, and any pressure maintained manually. Once the cervix is free, the thumb lever should be completely released and the speculum smoothly removed the rest of the way, allowing the vaginal walls to close the bills on the way out.

References

  1. Cervical Cancer Statistics. U.S. Preventive Services Task Force. Centers for Disease Control and Prevention (2014).
  2. Cervical Cancer: Screening. Recommendation Summary. U.S. Preventive Services Task Force (2012).
  3. Wright, D., Fenwick, J., Stephenson, P., Monterosso, L. Speculum 'self-insertion': a pilot study. Journal of Clinical Nursing. 14(9): 1098-1111 (2005).

成績單

The speculum exam is used in a wide variety of gynecological procedures and can provide a wealth of diagnostic information. The speculum is a bivalve instrument, which is utilized for separating the walls of the vaginal canal. This not only allows for visual inspection of the cervix, but also provides an access to this region for specimen collection during diagnostic procedures such as the Papanicolau, or Pap test, which is performed to check for any precancerous changes. This video will illustrate the proper technique of using the speculum for cervical inspection, and the appropriate method for collection of samples for the Pap test.

Let’s begin with the review of the steps involved in prepping for the speculum exam and the Pap test, followed by a discussion of what a physician should look for while inspecting the cervix through the speculum. There are different types of commercially available specula. Some are made up of disposable plastic, while the metal ones are reusable. In this demonstration, we will use a plastic speculum.

Before starting the exam, it is essential to familiarize yourself with the instrument to be used and understand how it functions. After that you shall begin with the exam. Remember, this procedure usually comes after the external pelvic inspection, so at this point the patient history has been obtained, and they are already in the modified lithotomy position.

Make sure that the patient is seated at the end of the table to allow compete insertion of the speculum. Also lay out the supplies for the Pap test, including a cytology canister; lubricant squeezed onto a clean tray with a liner, and a spatula and endocervical brush OR just a cervical broom to collect the cell sample.Label the liquid cytology canister with the patient’s information. Then unscrew the lid of the canister until it is resting on top such that it can be easily lifted off.

It is essential to understand how to hold a speculum. In case you’re using a plastic speculum, place it in your non-dominant hand and position your index finger above the bills, your middle finger below the bills, and your thumb on the back of the speculum, avoiding the thumb lever as that would open the speculum. Using your dominant hand spread the water-based lubricant on the outside of the bills. Show the speculum to the patient without pointing it directly at them, and let them know what to expect during the exam, “Dialogue”.

Start by letting the patient know that you will first place the back of your hand on their thigh. This is done to prepare the patient for the exam by establishing a non-invasive contact first. Now separate the labia minora with the dominant index and middle finger pads to get a clear view of the vaginal introitus. Next, explain the relaxation technique to the patient, “Dialogue”. The vaginal introitus should open up as the patient bears down. Let the patient know that you are about to insert the speculum, “Dialogue” and place it halfway into the vaginal canal, keeping the bills at about 45° angle. Next, bring your non-dominant hand to the bottom handle and rotate the speculum flat, while simultaneously clearing the labia on both sides. Then angle the tip of the bills toward the floor and insert fully, such that the tip ends up below the cervix. Stop when the speculum is flushed against the patient’s pelvis.

Next place one of the dominant fingers inside the bills and apply strong posterior pressure while pulling down on the handle with the other hand until it is perpendicular to the floor. Make sure you apply enough pressure to see the space above the speculum. Now, while maintaining posterior pressure with the finger inside the speculum, you can smoothly depress the thumb lever to open the bills. Stop once resistance is met. Then engage the lock by pushing the thumb lever up one or two clicks and remove the finger from inside the speculum. Hold the speculum steady and, using a light source, check if the cervix is visible. Note the tone, color, and position of the cervix and observe for discharge, lesions, polyps, ulcerations, and masses.

You can visually inspect the lower intravaginal part of the cervix. This includes the exocervix, which is normally 2-3 cm in diameter, pink in color, and has a smooth surface; the external os, which is the opening of the endocervix into the vagina; and the four fornices, which are the recesses between the cervix margin and the vaginal wall.

After the visual inspection of the cervix, proceed to collecting samples for the Pap test. With the speculum still in place, insert the spatula into the vagina, being careful not to touch the walls. Position the spatula with its long end in the os, and the short end pressed against the junction. Now rotate it 360°, while maintaining consistent pressure and contact with the exocervix. Carefully remove the spatula avoiding the vaginal walls. Place the spatula into the open cytology canister and thoroughly rinse it by vigorous swirling in the liquid following the manufacturer’s instructions. Next, insert the endocervical brush into the vagina avoiding contact with the walls. Push the brush into the os until only the bottom bristles are exposed and then slowly rotate it 180° in one direction. Do not over rotate. Carefully remove the brush avoiding the walls, and place it into the cytology canister. Thoroughly rinse the brush by vigorous swirling and press it repeatedly against the sides of the canister to release material. Instead of using both spatula and brush, one can use just the endocervical broom, which has different sizes of bristles forming a triangular pattern. If using this, then you would insert it so the longer bristles rest in the os and the shorter rest on the transition zone and rotate it about five to ten times, depending on manufacturer’s instructions. The release of the sample is same as for that for the endocervical brush.

After sample collection is complete, release the locking mechanism by pressing down on the thumb lever, and while holding the lever down and bills open, remove the speculum about two to three inches out, to ensure that the cervix is cleared off the tip of the bills. Remove your thumb from the lever and place it on the handle. Finally, rotate the speculum by 45° while smoothly removing it all the way out. Have your hand underneath the speculum to catch any possible discharge, and discard the speculum, if disposable. At the end, replace the canister lid. Now the sample is ready for subsequent cytological analysis.

“Examiner explaining different types of specula-the similarities and differences”

You’ve just watched JoVE’s illustration of the speculum exam and the Pap test. You should now understand how to use the vaginal speculum and how to collect cervical cell sample for diagnostic evaluation. As always, thanks for watching!

Tags

Cite This
JoVE Science Education Database. JoVE Science Education. Pelvic Exam II: Speculum Exam. JoVE, Cambridge, MA, (2023).